you are here [x]: Scarlet Star Studios > the Scarlet Letters > stopmo in progress: mutate
<< before
the whisperer in darkness - big news!
after >>
mutate
June 1, 2010
stopmo in progress: mutate
by sven at 10:38 am

I'm almost done with a new stopmo film, "mutate." Just finishing up adding sound cues.
It can take months to to fabricate armatures, puppets, and sets for a polished stopmo film. I think it's important to keep your animator muscles warm in the meantime. So this project was a "quick" improv. Like going out for a jog around the block while in training for the marathon.

Short jogs are a good way to try out new methods. During this project, a number of tech issues have taken the next evolutionary step forward:
Framegrabber: Dragon
I've finally purchased Dragon Stop Motion — and it's been a joy to work with. Head and toes above FrameThief, iStopMotion, and AnimAideXT.
Hi Def
I'm shooting Blu-Ray standard Hi Def (1920x1080 pixels) using my old Canon PowerShot G5 digital still camera. This is my first time using the 16:9 aspect ratio, which has (finally) emerged as the unified standard for both film and TV. None of the computers at our house can play HD files — but you can always shrink the master file down. What I'm doing is future-proofing my films so that they still have some value 5 years from now.
Camera mount: Manfrotto
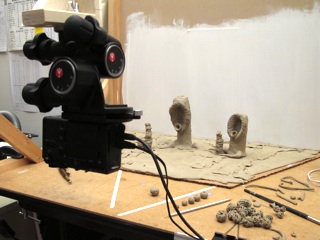
This is my first time using a Manfrotto 410 geared head to mount the camera. I'm a little troubled that you can't lock it into position... But its precision has allowed perfect recovery from a significant camera bump.
Shooting upside down
While shooting her film "Little Theatres," Stephanie Dudley has hung her camera upside down to get some tricky shots. An epiphany! There's no camera tripod to kick when the camera hangs from above! So much elbow room is freed up, I'm only ever going to use a tripod again if I absolutely must. [Incidentally, Dragon, makes flipping frames a breeze.]

I should comment on a few of the tricks I'm repeating from previous projects...
Modular stage design
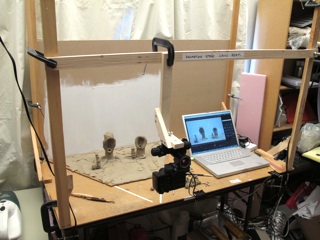
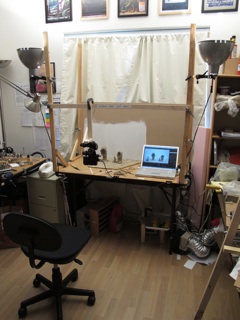
Pros build their animation tables from the ground up. For my home set-up, it's worked well to build up from a 2'x4' folding table. I've got several reusable lighting pylons that attach to the table with C-clamps. (You can never have too many C-clamps!) For this project, there were no tie-downs — so I didn't need a raised stage — I could work directly on the table top. But for future projects, I can quickly set up a raised stage by clamping horizontal struts onto the pylons, which then support the stage floor. I'm really happy with this fast, versatile approach.
Field of vision
After locking the camera in place, I find it very useful to tape off the boundaries of what the lens can see. This avoids wasting fabrication time on stuff that won't be in frame.
[I've gone a step farther, too. I know that the G5's maximum angle of view is 54.4º. After doing some basic trig, I realized this means the distance of the camera from the backdrop is very nearly equal to the width of the backdrop. This 1:1 ratio is extremely useful for estimating how much studio space I need for different set designs. Anyone interested in learning more about that math?]
Lighting
I've got two GE Crystal Clear 200 watt bulbs pointed at the ceiling. Each puts out 3980 lumens — which is massive. The bulbs are commonly available at department stores and Home Depot. Bouncing the light off the ceiling approximates noontime on a slightly overcast day. Bouncing diffuses the light, to avoid any hard shadows. Not very dramatic — but handy if you just need a flat, cartoony look.
OK, that's enough for now. I hope to have the finished film posted sometime this week.