you are here [x]: Scarlet Star Studios > the Scarlet Letters > mold design (part 1)
<< before
mutate
after >>
mold design (part 2)
June 10, 2010
mold design (part 1)
by sven at 4:14 pm
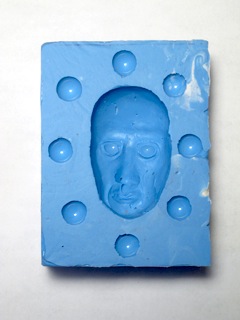
I'm back at work on creating replacement faces for the "Howard" puppet.
I've abandoned pressing Super Sculpey into an UltraCal 30 plaster mold. Getting the Sculpey out of the mold without distortion wasn't working out so well. And the plaster mold was beginning to lose fine detail.
Oh well. The press mold idea was always intended as a stepping stone on my way to something better: making resin castings from a silicone mold.
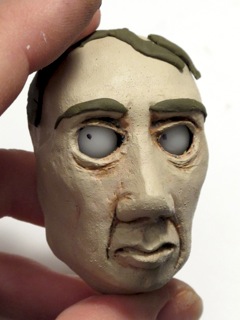
Fig.1: Here's a reminder of what Howard looked like when the Sculpey casting was fully painted. Doing resin castings from a silicone mold should allow me to replicate the original sculpt even more precisely.
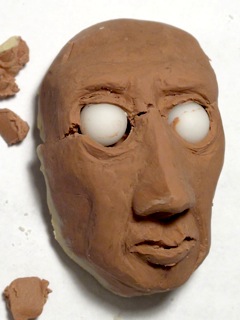
Fig.2: The original Howard sculpt was made from Chavant NSP medium. It cracked when coming out of the plaster mold, but was otherwise in pretty good condition. Before making a new silicone mold, some repair and resculpting is called for.
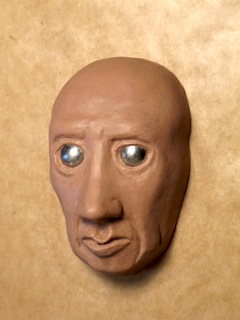
Fig.3: The newly repaired sculpt isn't exactly the same as the original, but it's very close. There were a few areas that I reworked... And I also made the surface much more smooth.
I tried a trick I read about on pro sculptor Dave Pressler's blog, where you use a butane torch to melt the surface of the clay. Jury's still out on that one. [Note: I switched out the acetal plastic eyes for 3/8" stainless steel balls to fire-proof the sculpt.]
I also tried a trick I learned from a sculptor at Bent, where you use Brylcreem as a solvent. I like this one — it's nice that the solvent is a paste, rather than a fluid like alcohol or citrisolve. It's easier to control, and gives off less fumes.
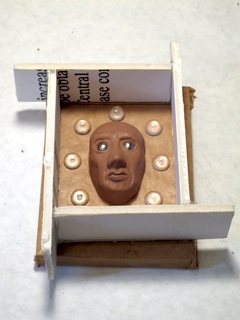
Fig.4: The mold box was made from pieces of foam core that I got cheap from Scrap. Notice the way that the walls overlap one another — that makes it easy to get the things to line up well.
The sculpt is sitting on a piece of MDF (a type of particleboard) that's been wrapped in wax paper. The mold walls are set in place using hot glue. If the walls hang over the edges of the base, be sure to hot glue their undersides too, to avoid leaks there.
Acrylic hemispheres where taped into the mold to a act as mold keys.
Fig.5: I was dismayed to discover that my silicone is labeled as having a 6 month shelf life. I've had this current supply sitting around for 2 or 3 years.
The silicone base seemed even thicker than usual, and I think the working time was reduced. My first batch clotted up before I could do anything with it. A shame! Silicone is one of the more expensive materials in my workshop. :(
Fig.6: I ran a second batch of silicone, this time mixing it with silicone thinner. I was able to get a useable material this way — but it still wasn't thin enough to pour.
A big problem with silicone is that it traps bubbles. The pro solution is to put the material into a degasser (a vacuum chamber), which causes the bubbles to explode. Unfortunately, degassers begin at about $300.
However, there's a poor man's solution that I learned about from this excellent TAP Plastics video, where you cut a hole in your mixing cup… If you let the silicone pour from 3 feet up, it turns into a string on the way down, which breaks the bubbles. Pretty cool.
But, since my silicone was still too thick to pour, I just had to glop it into the mold as best as a could… Knowing full well It probably wouldn't result in a useable mold.
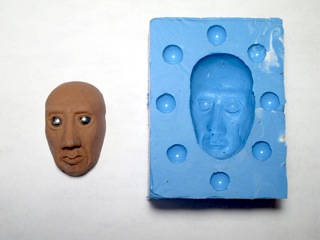
Fig.7: There are two kinds of catalyst you can use with this silicone: fast cure and regular cure. Fast cure takes 6 hours, regular takes 16. I HATE waiting between steps — so I went with fast cure.
Here's another really excellent trick. Stick your silicone in the oven at its lowest setting. (On mine, that's 170 F.) Curing is a chemical reaction, and chemical reactions can almost always be speeded up or slowed down by heating/cooling. By using the oven, I was able to get the silicone adequately cured in only 90 minutes.
But wait! As I learned the hard way on my last silicone mold, if you de-mold at this point, the Chavant will still be in a melted state. Take it out, and the sculpt is ruined — and it leaves a clay residue in the mold.
This time I was smart and put the mold in the freezer for a while before taking out the sculpt. Worked like a charm! The sculpt came out clean and undamaged!
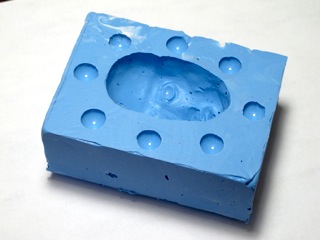
Fig.8: As I feared, the silicone trapped lots of little bubbles. It looks like swiss cheese in there. Silicone also seeped underneath the mold keys an sculpt a little, creating a slight undercut, which is no good.
The mold is unusable. However, during the process of making this mold I had a little revelation.
I've always thought of mold-making as a matter of selecting one of the standard mold-making methods, and following it to the T. Now I realize that mold-making is actually a matter of design. Each mold you make is going to be somewhat unique, and requires an active application of intelligence and creativity.
With that insight in mind, I've decided to get good at making molds… Viewing mold-making as an artform unto itself.
This failure helped me come up with lots of improvements to build into the next mold design… Which is the subject of my next post.