you are here [x]: Scarlet Star Studios > the Scarlet Letters > new puppet: professor ichbonnsen
<< before
sale of the century
after >>
first lip-sync test
November 14, 2007
new puppet: professor ichbonnsen
by sven at 11:00 pm
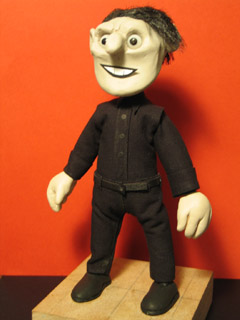
I've just finished up a new puppet: Professor Ichbonnsen!
I wanted to try some new puppet-making techniques, baby-step improvements on the basic Dad and Jimmy designs... A new puppet to play with on my new stage.
This pup didn't start off as Professor Ichbonnsen... But I think it's probably close enough. (Looks a bit more like Johnny Depp than I'd like... But oh well.) I have some ideas for the December SMS stopmo haiku challenge that involve the Prof. Wink.
Here are the gory details about how I built the guy.
THE HEAD
The head is detachable. At the base of the skull, there's a 1/2" long 7/32" piece of K&S. A 3/16" (6/32") piece of K&S at the end of the neck fits into the slot.
I've standardized the size of K&S that I use for this kind of plug-in. My choices are based on using 1/4" dia. balls as the default in ball&socket armatures. For a 1/4" ball, you're going to use a 1/8" rod. If you want to attach that rod into squarestock, it can't be any smaller than 3/16" wide -- that leaves 1/32" on either side of the hole (precise drilling work, but you don't have to break out a micrometer). The walls of K&S are 1/64" thick -- so to have the square stock plug in, you need a piece that's 7/32" wide.
A diagram would help... But it'll have to wait til another day.
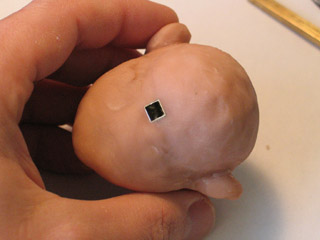
The head is made out of Super Sculpey that has been sculpted around a core of tin foil. Using tin foil means that the Sculpey isn't as thick, doesn't need to be baked as long, and is less likely to crack. Tin foil also keeps the head light enough so that it won't tip the puppet over.
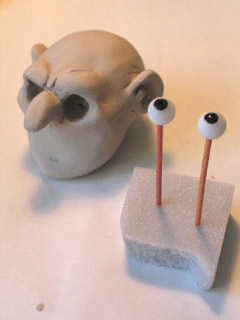
On my Percy 5 puppet, I used wooden eyeballs painted with acrylics. They tended to stick in their sockets more than I'd like. This time, I tried using acetal plastic balls for eyes. You can get them via Marc Spess at animateclay.com ("delrin" is the brand name); I got mine directly from smallparts.com.
I drilled holes in the balls, put them on toothpicks, put the toothpicks into a drill, and spun them while I painted the pupils, so the pupils would be nice and round. Acrylic paints don't adhere to acetal well, so I used enamel paints (Testor brand, the stuff you use for model kits). The balls turn in the sockets quite well. I added a dab of vaseline in the sockets, though, to help keep the eyes from falling out.
For this particular puppet, I was going for a look similar to the Rankin & Bass puppets in Mad Monster Party... Since I made the head (back on Sept 20), I've realized that I broke the formula somewhat. Almost universally, puppets that have hard heads will have eyes that are built into the sculpt. Freely rotating eyeballs are only used when the head is made out of a soft material: clay, liquid latex, foam latex, silicone.
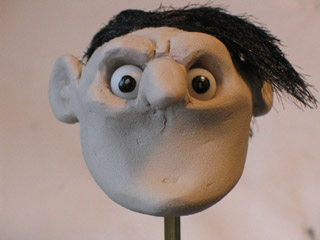
The head was painted with acrylics: "bambi brown" + white. I applied the paint with a cosmetic sponge, which gave the head a really nice texture.
The hair is actually yak fur, which I found at Sportsman's Warehouse in the aisle of materials for making fishing lures. I glued down small tufts of hair using Fabri-Tac, working from the center of the scalp outward. I used hair gel to make sure the hair will all stay in place. I cleaned up the hair line a little with dabs of black paint.
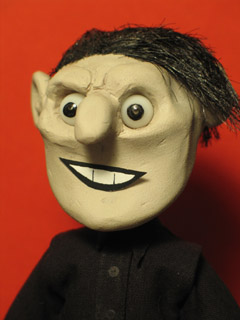
My intent is to do lip-sync using mouths that have been photocopied onto sticker paper. The mouth the Prof is wearing right now is photocopied out of Preston Blair's classic book, Cartoon Animation. After reviewing four books (Blair, Williams, Shaw, Priebe) and two lip-sync softwares (Magpie, Papagayo), I decided that Blair's breakdown of the visemes makes the most sense, and is the best place for a beginner to start.
THE FEET
For the feet, I used knurled brass thumbnuts for the tie-downs. I attached the thumbnuts to the wire armature using 20 minute plumber's epoxy putty. Then, I sculpted shoes over the tie-downs using Magic Sculp (an epoxy clay designed for scupltors).
On the Dad puppet I used Sculpey for the feet -- and it wound up shattering. Since hands and feet are subject to a lot of stress, I decided to go with epoxy clays this time -- which are much sturdier.
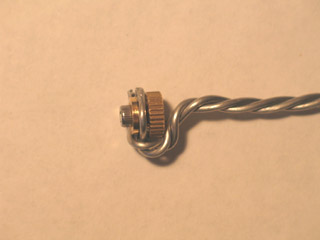
One mistake I made on the Dad and Jimmy puppets was having the ankle wire coming out the backside of the foot. This time I was careful to have the leg wire coming up out of the top of the foot.
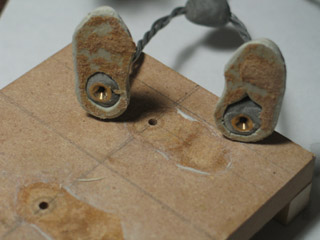
One side of the knurled nut is shaped like a funnel, while the other side's flat. Pointing the funnel toward the floor makes it easier to get your tie-down screw screwed in.
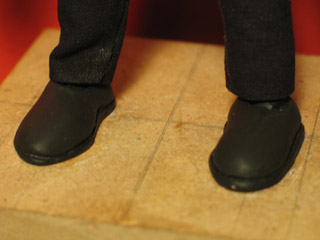
Magic Sculp has a 3-4 hour working time. To speed up curing, I put it in the oven at 175 degrees for 30 minutes. [The studio oven isn't used for food.]
I'm really pleased with how the shoes came out... I sculpted the line where the shoe's sole attaches, and the rim of the shoe (where you can just see a little bit of sock). The shoes did stick to the wooden base -- but I was able to cut them off using a blade.
THE BODY
Not much different in terms of how I did the body this time... I'm finding that I'm frustrated with foam build-up, though. I want more definition of the body -- even if it's going to be hidden under clothes. The Prof is essentially symmetrical on the dorsal/ventral plane... He needs a butt. And curvature to the spine.
I realize that I could get a little more definition if I used snip foam... But using spray glue is a sticky pain. My "mummy wrap" method is certainly good for "quick and dirty"... If I'm going to put more effort into shaping the body, though, I think I'm going to be happiest with a casting process.
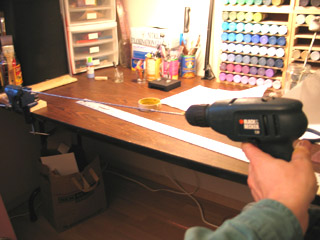
All parts of the armature use three strands of 1/16" aluminum armature wire twisted together. I twisted them together using a method Marc Spess recently demonstrated on a youtube video... You put one end of the wires into a vise, and the other end into a drill chuck. (I found the drill had an easier time holding the wire if I taped the ends together.)
I used the drill method for twisting the wire for Moon Baby... Whose arm broke. That put me off the drill method for a while; but now I'm pretty sure that I over-twisted the wire -- shortening its life. So, I'm back to the drill method now.
One of the things that I'm liking about it is how it gives you a long straight rod. Whatever I don't use is easily kept for later.
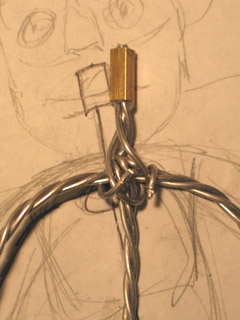
Previously I've made my armatures with three lengths of twisted wire: the legs, the arms, and the spine/neck. The problem with this method was that looping the spine around the arm length innevitably made my puppet shorter than I intended.
Marc Spess does the spine and neck as separate bits... So I decided to try that out this time. Untwist the end of your twisted wire, and then wrap the ends around the arms (or legs). This wad of wire gets covered up with epoxy putty, so it doesn't matter how ugly it gets.
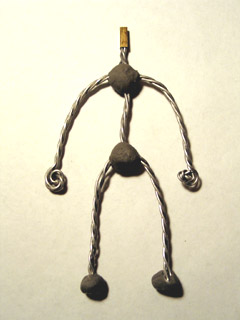
The armature was closer in scale to my sketch than usual, so I think doing the neck and spine as separate pieces is a keeper.
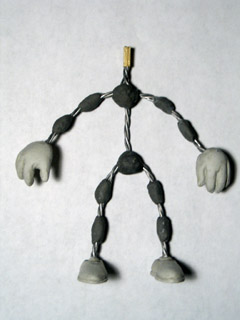
I added limb "bones" to the basic armature, as usual. It's quick, and works well.
Even so, I'm looking forward to trying something different on my next armature. I want to try using sections of K&S for the bones, like Susannah Shaw demonstrates. Now that I have a mini cut-off saw, cutting K&S is a breeze...
And this go around, epoxy glue suddenly started making sense to me. The difference this time is that I've got a supply of toothpicks and craft sticks within arm's reach; the one little plastic stirring rod they give you with the kit was confounding me previously.
Assembling an armature out of K&S, armature wire, and epoxy glue may take a bit longer -- but the precision is appealing, and I'm looking forward to not having putty gunk building up on my gloves while I work.
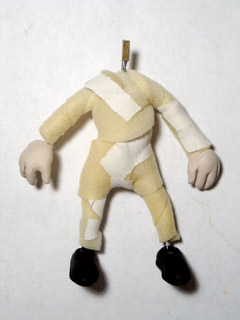
I wrapped the armature with 1/4" thick cushion foam, which I cut into strips that are about 1" wide. I'm still using a supply that I got for cheap at Scrap... When it runs out, though, I've located Fabric Depot as a reliable supplier.
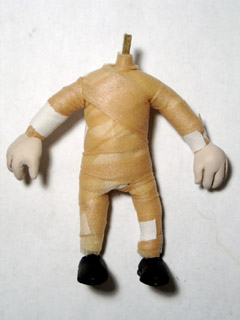
The foam gets covered with athletic underwrap. Love this stuff!
THE CLOTHES
The head took 5.25 hours to make. The body took 6.5 hours. The clothes took 9... And I'm still thinking that I want an overcoat for the Professor.
Significance: It looks like making puppet clothes may wind up taking just as long as it did to make the rest of the puppet! So, I've got myself a book on making clothing for dolls, and am putting some energy into figuring out how to better manage this part of the fabrication process...
The Prof's clothes are nearly identical to the ones I made for Dad. The one main difference is that I decided to hem everything this time. Dad looked good at the beginning of filming... But by the end, his edges were beginning to fray.
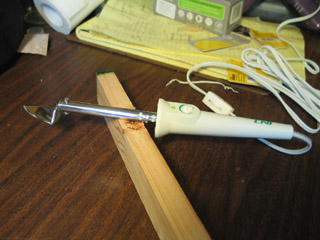
Very useful: A miniature iron produced by Clover Needlecraft, Inc. I found mine at Collage on Alberta street. Folks who are into encaustics tend to use this tool.
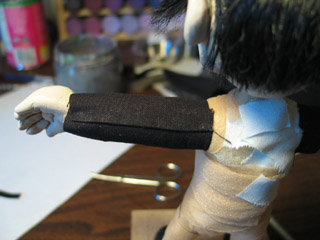
Apparently there are two main approaches to creating patterns: either you start by working on paper, and then modify your plans with successive drafts -- or you start by draping cloth over your subject/victim, and begin pinning/sewing from there. I'm mostly using the "draping" approach.
The sleeves are the easiest part: they're basically just cloth tubes. To hem my cloth I iron a fold and then seal it in place with a line of Fabri-Tac glue.
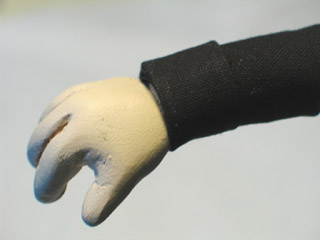
Wherever an edge of cloth is going to get covered up by another piece, I leave the edge ragged. The cuff, for example, is a separate piece of fabric that's hemmed on three edges which covers up the ragged end of the sleeve.
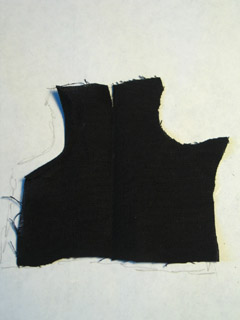
For the sleeves, the front and back of the shirt, and the pant legs, I found that you can start with a rectangle of cloth and then modify it until it's about right. The fit isn't exactly what you'd get if you had a more sculpted pattern -- but it's adequate for now... Knowing that I can begin with a rectangle makes things relatively easy.
Check out how gnarly the shirt back was... All the edges get covered by other pieces of cloth -- so it doesn't matter!
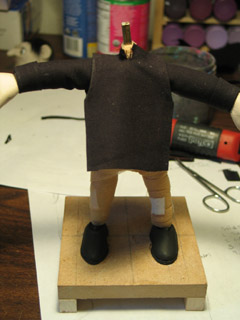
The shirt front needed to be much more precise. It started as a rectangle, then I folded the arm holes, ironed them, glued the hems down... You get the picture.
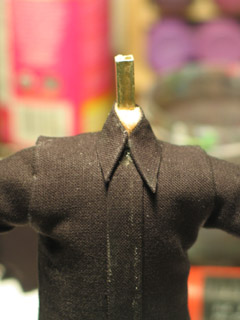
The shirt collar is a separate piece of cloth. So is the strip down the front where buttons go.
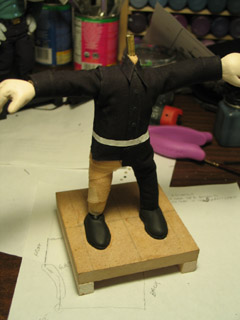
Getting the pant legs right is awkward. I do each leg with one piece of fabric, and have the seam fall on the inside of the leg.
I put a piece of tape around the belly to help me keep track of where the waist line is supposed to be. I glue the waist in place first. Then I glue the butt in place. Then the bottom cuff. Then I glue the inseam down. That order seems to make things work out fairly OK.
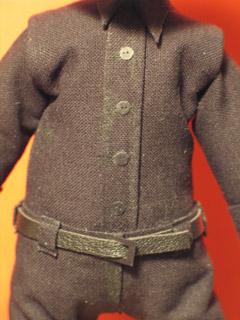
I'm really pleased with a few details...
The buttons are 1/8" dia. pieces of black cardstock that I made with a hole-punch. Then: I used a needle to give them button holes.
The belt is real leather. It goes through a rectangular belt buckle that I made out of cardstock. The belt loops were cut from a thin, hemmed strip of cloth. I put the strip over a cardboard form and used my mini iron to sculpt it into shape. The iron liquifies the Fabri-Tac, essentially plasticizing the cloth. [I wear a respirator and have the windows wide open while I do this.]
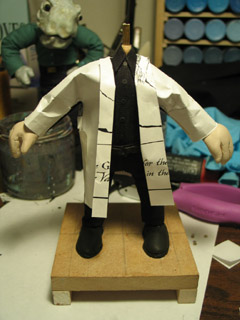
It feels like the Prof ought to have a big overcoat. And maybe a fedora. He's looking a little more Goth than Monster Hunter right now. Giving him eyebrows and maybe some oil clay eyelids might also help.
For the coat I've got some black velvet that Shelley gave me. I could use felt -- but for the scale, velvet seems to look better. I'm nervous about cutting this fabric, so I'm putting more work into creating a paper pattern... Which is challenging. As is, the Prof has some decent body definition; I don't want it to be completely obliterated by a floppy, formless coat.
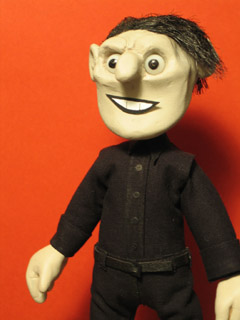
Next on the list: Lip-sync tests... Painting a backdrop and building some trees... A Scarlet puppet?
posted by sven | November 14, 2007 11:00 PM | categories: stopmo