you are here [x]: Scarlet Star Studios > the Scarlet Letters > demo wire armature
<< before
elder thing puppet test
after >>
speaking @ the "world puppet animation" show
March 11, 2007
demo wire armature
by sven at 3:10 pm
REMINDER: Tonight I'll be speaking at the "World Puppet Animation" show at Disjecta (230 E. Burnside) at 7:30pm. ...Don't forget that Daylight Savings Time ends today -- make sure that your watch has "sprung forward!"
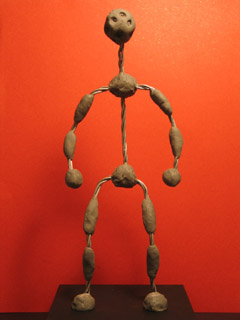
For public speaking, it seemed like it would be a good idea to have a demo wire armature that hasn't been covered up with foam, Sculpey, and the like.
I've talked about how to do all this before, but this'll be a nice review.
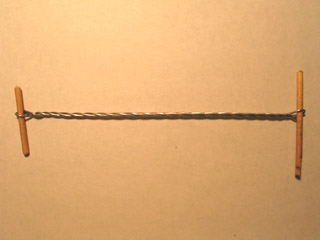
When you make a wire armature, it is imperative that you not scratch or nick the wire. If the wire is scratched, it's guaranteed to break. So: avoid using pliers!
My method is to slip two pieces of scrap dowel through the loops at the ends of my wire and twist by hand. [Another method is to put one end into the chuck of a power drill. I've tried this; it tends to twist the wires too tightly.]
Using multiple strands of wire gives you a stronger armature. If one strand breaks, the others can still go on working. It's generally a bad idea to use just one strand of wire for any part of the armature.
Twisting wire is the simplest way to make an armature -- and it works quite well. However, it should be noted that twisting immediately introduces stress into the wires. There is another method where you don't twist the strands of wire together, but instead wrap them together loosely with thread and then use Barge rubber cement (found at hardware stores) to bind everything together. I have not tried this approach myself yet, but understand that it is a somewhat more professional method.
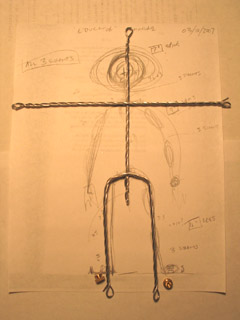
I'm using 1/16" aluminum armature wire for all parts of this armature. Aluminum armature wire can be found at art and craft supply stores. Unlike the aluminum wire you find at hardware stores, it is annealed -- which means that it is softer and more pliable.
There are, of course, other kinds of wire that you can use. The two main contenders are steel and lead. Lead has no "spring back" when you pose it -- but it is very breakable (and toxic). Steel is very strong -- but consequently also has a lot of spring back. Annealed aluminum is a nice compromise between these two: it's durable, and has minimal spring back.
After annealed aluminum, steel florist's wire (often thread-wrapped) is probably the most common wire used among amateur animators. Soldering wire has reasonably good animating qualities -- but also contains lead. Copper tends to break fairly quickly, and is generally avoided.
I strongly recommend putting in the effort to find aluminum armature wire. However, if you are set on using a different type of metal, do a bend test. Flex a piece of your wire at a single point repeatedly. How many bends did it take for it to break? ...The answer should give you some sense of how the wire will hold up while you're animating.
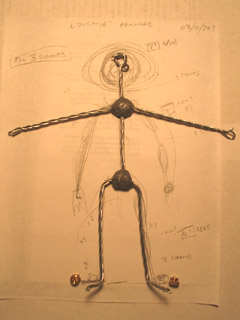
My armature is made out of three segments: the legs, the arms, and the spine/head. For each of these segments, I twisted together three strands of the 1/16" wire. The segments are held together with plumber's epoxy putty.
Look for epoxy putty in a hardware store, either in the adhesives aisle or with the plumbing supplies. Epoxy putty is about the size and shape of a roll of 50 pennies. It is made of two chemicals which, when kneaded together, react with one another and become very hard. "As hard as steel," the advertising says... Which is a bit of an overstatement -- but not by much.
Epoxy putty typically either has a 5-minute or 20-minute cure time. I recommend going with the 20-minute variety. The reality is that it will be too hard to work with by the end of 5 minutes (though it's not yet cured). You need that time to knead and apply the material.
For safety's sake, one should wear gloves while mixing epoxy putty. Simple latex gloves help, but the epoxy actually passes through a latex barrier quite quickly. Nitrile gloves give you much better protection; they can be purchased online via Amazon.com or locally at a medical supplies shop (the sort that specializes in serving the needs of people with disabilities and the elderly).
Epoxy is a sensitizer. Given large enough eposures over time, you will (guaranteed) develop a chronic allergic reaction to the material. How long it takes to develop a sensitivity varies from person to person. There is also anecdotal (but not scientific) evidence that prolonged, unprotected use of epoxy putty can cause "nerve death in the fingers."
Bottom line: epoxy putty is a nearly irreplacable media in the animator's tool box -- but do use it as safely as possible!
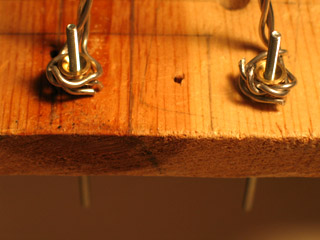
For a humanoid armature, you're going to want tie-downs in the feet.
The easiest way to make feet tie-downs is by epoxy-puttying in nuts. You'll drill holes in the floor of your set; then you'll reach under the set and insert screws through those holes into the soles of your puppet's feet. Another option is to drill wood screws through the feet from above -- but doing so will require puppet feet that can be peeled back to reveal the armature. [For how to hide holes in the set, see Mike Brent's helpful tutorial.]
Pretty much any kind of nut will work. I've chosen to use knurled nuts -- which are handy, because they have a groove around the middle that gives the wire a place to sit while you work.
You're going to want feet with flat soles. So, it's useful to epoxy the nuts in place while they're already screwed onto a piece of wood. Here I'm using a piece of scrap wood that's hanging off the edge of my table. I've also fabricated a piece of wood that sits up on risers before, to have an easier way to tie down puppets while I'm working on them.
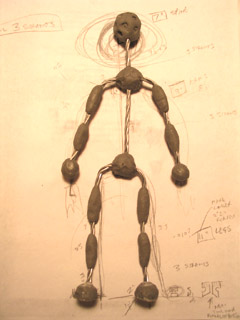
Add in epoxy putty "bones" as necessary.
Leave as much room between bones as possible. On people the elbow may bend on a single point -- but if you do this with wire, it won't last very long. Allowing the wire to bow at joints will prolong its life.
In my experience, the part of a wire armature that gets the most stress is the shoulder. Often it's a good idea to have the shoulder wires come up out of the shoulders and then bow downward -- just so you have some extra slack. I neglected to include shoulder slack while making this demo.
This demo armature is suitable for many types of puppet. You could cover it in oil-based clay to do "claymation." You could cast foam latex or silicone around it...
Most likely, though, you'll use a build-up process. The hands, feet, and head will be solid pieces made from Super Sculpey or an epoxy clay (such as Magic Sculp or Apoxie). The body will be built up with strips of cushion foam and then covered with fabric clothing.
...
And there you have it! It's pretty easy to build one of these armatures -- the real trick is just figuring out what materials you need, where to get them, and then actually collecting them all. ...Good luck!
posted by sven | March 11, 2007 3:10 PM | categories: stopmo