February 2007 archives
you are here [x]: Scarlet Star Studios > the Scarlet Letters > February 2007
<< before
January 2007
after >>
March 2007
February 25, 2007
melanie sage's beautiful truth: creating art journals & altered books
by gl. at 9:56 pm
beautiful truth was another successful workshop! i've been hoping to have melanie teach at the studio and then in december one of the open studio participants wished aloud for an art journal workshop, and i knew i could make it happen. the funny thing is that there were two other art journal classes happening in portland on the same day that i didn't know about when i planned this workshop! still, the workshop filled within five days, had a waiting list, and everyone showed up! i was happy to get new people out to the studio, too, partly thanks to a posting at the art therapy listserv.
i cut the setup a little too close because i was hoping to say goodbye to sven before he left tuscon, but i missed him by just a few minutes. even so, i was carrying chairs into the space as people were arriving to fill them, which didn't give me enough brainspace or time to interact with people the way i would have liked.

[one of the journals from the workshop]
like the don't think! paint! workshop, one of the only dissatisfactions was space. this is especially true in such a supply-heavy workshop like art journaling. i think our space is more usable than some other workshop spaces in town, and i sort of think that no matter how much space you have, you always want more space. :) but i'm facing a dilemma for our events: it is more comfortable with six, but the dynamic is better with eight -- especially if one of the people at the table is the instructor. if anyone has any idea for magically finding more space around the table, let me know.
and i 've gotta figure out a new way to hang stuff. ever since we painted the studio, the clippies don't want to hold art. i've got to figure out another way to get art on the walls that doesn't require holes and that's easy to move around. it's dangerous to sit beneath them!
i'm looking forward to the march workshop, which i have always been curious about: encaustics! i am very likely to attend this workshop myself.
posted by gl. | permalink | categories: exhibits & events
February 20, 2007
artist's way open studio (february)
by gl. at 2:46 am
i don't think this collage has -any- shiny on it! :) nothing even very unusual: it's all clippings from magazines. everything simply found its way into my hands. i like the composition quite a bit. i've also hit a couple of surprising interpersonal realtionship bumps for which this image is pretty appropriate.

[release: click the image to see the other collages]
i deliberately overbooked 10 in a studio that seats 8, and so when the first person changed their RSVP, I didn't panic -- but we still ended up with 7 people, i think. i'm also still debt collecting from the last artist's way guided intent, which is one of my least favorite activities (right up there with flyering).
in general it was a lively event, though with a underlying tension and competive (!)dynamic i still need to sort through. one of the participants, especially, felt particularly overbearing, and then that just set off a couple of the others. a new boy came and i felt we weren't as inclusive of him as i would have liked. i just want people to come & make art, you know? i often feel the guided intents are more successful in part because they're so structured, so it's difficult for any one person to monopolize the group.
in fact, the next event is a guided intent featuring blind contour drawing. :) and after that, to celebrate our second year of open studio, i am very excited to host an edible book tea! i attended one of these in san diego w/ terrilynn & loved it so much!
posted by gl. | permalink | categories: artist's way
February 19, 2007
swaporamarama pdx
by gl. at 11:59 pm
this is what i was doing two weeks ago:
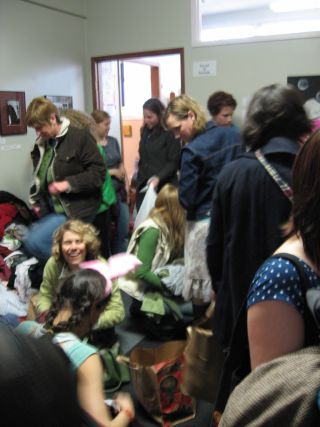
i volunteered to sort clothes and take pictures at the swap-o-rama-rama at 100th monkey for four hours. i did this before the last artist's way guided intent because i wanted more experience with a fiber arts event before i tried hosting my own.
this picture doesn't even do justice to all the chaos: there were six rooms containing different forms of alteration & embellishment. i just got this new camera for my unbirthday and wish i had thought to use the video mode! i walked away with 2 "new" pairs of shoes, an awesome pair of flowy sweatpants, a pretty red sweater, a fuzzy green shirt, and a desire to try needlefelting.
i also finally met sister diane from church of craft! i've been troubleshooting bugs at the newly awesome resource diyalert and she's been very patient about it. kind, even! in person, she was just as nice and i am now an order of magnitude more likely to attend a church of craft event. i really enjoyed meeting her.
posted by gl. | permalink | categories: exhibits & events
February 18, 2007
doubtful guests
by gl. at 1:38 pm
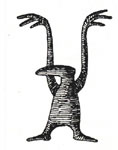
i am so very excited to announce the first-ever edward gorey figBASH!
last year i wrote gorey details to ask if they were doing anything special on gorey's birthday, and they weren't, so this year we collaborated to create a party with cupcakes, music & videos. there will be a group reading of the gashlycrumb tinies and we will share our favorite gorey books & memorabilia.
i have come to discover that one of my favorite styles is "cute and horrible." edward gorey is one of my favorite artists. his dry, dark humour was rarely ever mean, even when people are falling down stairs and being assaulted by bears.
posted by gl. | permalink | categories: exhibits & events
February 15, 2007
display stand for puppets
by sven at 8:00 am
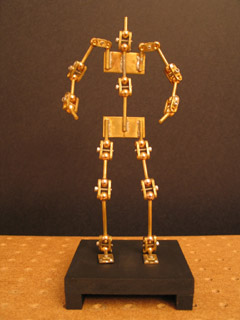
Last night I did a quick little project: a display stand for puppets or armatures.
I'd been gathering materials for a while -- at last I had everything needed:
- a 4" x 4" x 1/2" piece of MDF, sold at Craft Warehouse for making coasters ($2)
- 1/2" x 1/2" x 3' strips of wood sold at Home Depot in the molding aisle (~$1.50 ea.)
- 3/4" long 10-24 socket cap machine screws from Ace Hardware (50¢ ea.)
I cut two 4" lengths off one of the wood strips using my mini cut-off saw, then hot glued them to the bottom of the MDF. I drilled two 3/16" holes for the tie-downs to come up through. And finally, I painted the whole thing with a coat of black acrylic.
See? Isn't that a professional-looking way to show off your pups?
posted by sven | permalink | categories: stopmo
February 14, 2007
valentine
by sven at 11:59 pm

For Valentine's Day, for Gretchin, I made this "card"...
The two sides sides of the card are 1/4" thick hardboard which I cut out with a small hobby saw, then filed and sanded. Gesso, midnight blue acrylic paint, then a transparent bright blue -- sponged on with an old kitchen sponge. The heart form is about 4" across.
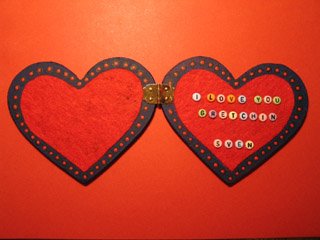
The nails for the little brass hinge were too long, so I used the grinder to shorten and re-sharpen them. The pieces of red felt are glued down with matt gel medium. The dots around the red hearts are acrylic. The red paint is transparent -- so I made dots of white first, then painted over them.
The letters are plastic beads. They were too thick, so I used the grinder again to thin them down.
Yay! A fun little holiday project... Happy Valentine's Day everyone!
posted by sven | permalink | categories: other art
happy birthday, blog!
by gl. at 8:00 am
believe it or not, we've only had "the Scarlet Letters" for two years. can you feel the love? :) the studio's been around longer than that, of course. i was happy to get sven & i writing in the same space, even though we write about things so differently.

thanks to susan, i finally got to make valentines for locals this year! every year i say i'm going to but i never do. (maybe next year that means the 'moes will get one, too!). after the virtual open studio last month, susan offered to host a valentine-making party at her house. hooray! this is just one of the valentines i made: i got to experiment with a lot of different styles and materials.
posted by gl. | permalink | categories: administrivia, other art
February 13, 2007
visual journaling
by gl. at 11:54 pm
on monday i went to a free visual journalling group at collage. i thought it would be a small, meditative group, but it turned out to be over 15 people packed into collage's back room making soul collage cards. that really threw me for a loop: i didn't sign up for soul collage! i was also a little miffed because i had asked if we should bring anything and they said "no," so i packed oil pastels and watercolor pencils just in case -- but scissors and glue were sort of necessary! it also turns out their version of visual journaling is more akin to art journals & altered books than the technique i'm more familiar with.
later they told me they do a different technique each week, and i ended up liking what i got, so i'll go back. i met some new people, made art i'm fond of, and it's conveniently located on my way home from ppcw. :)
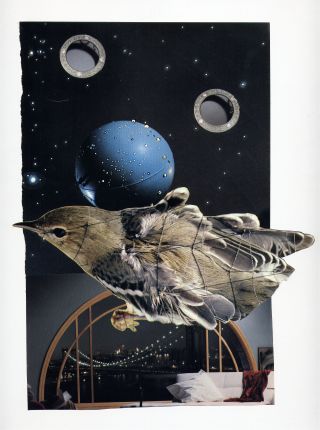
[trapped between two worlds]
"i am the one who is trapped between two worlds. i am the one with the weight of the world on her hollow bird shoulders. i am the one who sees stars inside and out. i am the one who wonders what's out there."
posted by gl. | permalink | categories: other art, sketchbook
February 11, 2007
artist's way guided intent (february)
by gl. at 11:54 am
this was a pretty successful event! i was nervous about it because i don't do the fabric arts much at all, but part of the goal of the guided intent is to push my own boundaries, too. i was epescially worried that we wouldn't have enough time for such an ambitious event: we had two hours total, and only a little over an hour of work time when you accounted for introductions, writing & sharing.
we wrote about what needs protection and what it needs protection from. i wrote that i need protection from my mental gremlins that keep me from enjoying the present because i have so much left to do in the future.
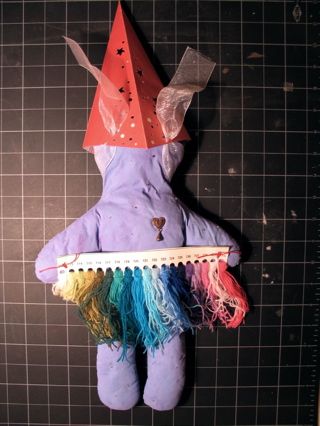
["twilah": click the picture to see the other photos]
"i am the one who can manage it all, beautifully & unfraid, while my heart beats above and the sky beats below. i am the one who sings with the frogs in the gathering twilight." the threads represent my tasks which are neatly gathered in her arms, leaving her room for peace and emotions. you can't see it well at all, but she's covered in very small rhinestones, glittering like stars. her "hat" is a piece from the porch star lamp we retired last year.
the next guided intent is blind contour drawing: "You have a life and vitality that is yours alone. Retain your autonomy by exploring your unique vision! Blind contour drawing is often a reflection of your truest perceptions because it teaches you to draw what you really see rather than how you think something should look. You learn to rely on your senses and self: allowing your eyes to see, your mind to think, and your hand to act. Learning to draw this way will increase your artistic freedom, independence & self-reliance. Trust the process! Trust yourself!"
posted by gl. | permalink | categories: artist's way
February 10, 2007
this week's metalworking progress
by sven at 5:10 pm
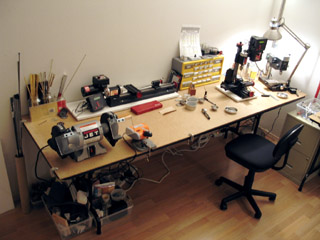
Things are really beginning to come together in my revamped studio room. The space has such a gravitational pull, I keep wanting to wander back over and play more.
I got an 8-foot table at Office Depot for my machine tools. I cut the piece of masonite I'd previously been using as a floor mat to size, and am now using it as a protective surface for the table. The masonite is held in place with a bunch of 1" C-clamps that I got at The Tool Peddler.
The rolly chair is new. I've taken all the other chairs out of the room, and am having a blast scooting from one station to the next.
I got several abrasive grinding wheels for the mini cut-off saw via McMaster-Carr -- before discovering that Tool Peddler (which is local) sells one that's just as good. I also got a metric stainless steel replacement screw for the cut-off (thanks Winks!) after promptly stripping the crappy screw that came with the machine.
(Um, that's not this week's progress -- just an update on things that have been in motion for a while.)
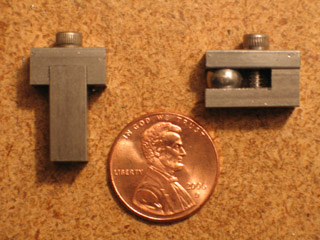
Here's the big progress for this week: I made a trial step-block joint.
I'm getting better at machining... I now understand how to use a "wiggler" to precisely locate the edges of a workpiece in relation to the mill's spindle (X and Y axis). And I know how to use a piece of paper to figure out how far my cutting tool is from the surface of the workpiece (Z axis). (The Swarfrat Mini Machines 101 DVD series was really helpful.) ...A precision part like the stepblock joint wouldn't be possible without these skills.
I'm getting better at figuring out set-ups on the mill. Using the "sushi roll method" to make the Man of Steel was madness. I've made a T-spacer (pictured above) that will make mass producing joints far easier. Clamping technique: I've got homemade risers and store-bought parallels to raise the workpiece up to where I need it -- and I'm being more careful about having a spacer on the left side of the vise if my work is hanging off the right side. Still need to make some machinist's jacks... But they're not necessary for making stepblocks.
The killer step in making the joint was milling out the hollow area between the plates. That space is 7/16" long (.4375"). It took 175 passes with a 1/4" two-flute endmill to carve it out, .0025" at a time. I timed it: 33 mind-numbing minutes. I was pretty demoralized. I may be an absurdly patient person -- but even I can't see spending 10 hours like that (and just on that one step!), to make the 20 joints you need for a standard stepblock armature.
Happily, I just got my copy of Machine Shop Essentials by Frank Marlow in the mail -- and it suggested a solution. [It's an excellent book! I highly recommend it!] The trick to getting rid of a lot of material quickly is to make plunge cuts with the largest, most fluted end mill you have. I tried it out -- and while it still took 19 minutes (on the first try) -- this is definitely the way to go. Much less mind-numbing; and I think I can ultimately get things set up so I can process through a batch of joints with relative ease. ...Yay!
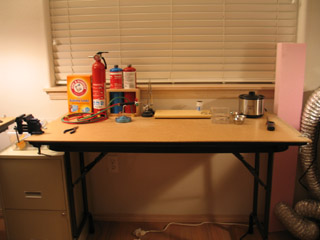
The soldering table is also coming along nicely...
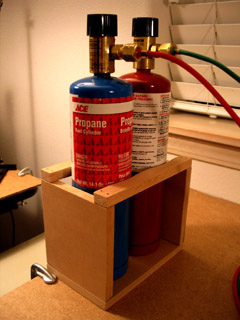
Yesterday I built this box to keep my propane and oxygen bottles standing safely upright. You can't see it in this photo, but there's a C-clamp behind them that holds the box firmly to the table.
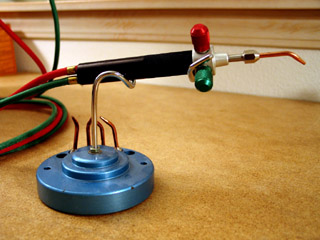
I've been meaning to share a picture of this since... October? This is the "little torch", a tool that comes from the jewelry-making field. They say that its flame is so precise, you can have have it lit inside of a cigarette paper and not light the paper on fire. Impressive claim...
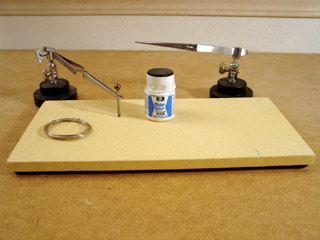
You don't use an oxy-propane torch just on a cinder block, as I was doing with my butane micro torch. You need a special ceramic tile that is designed to deal with super high temperatures. ...And here it is.
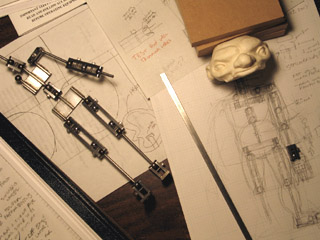
All this metal working... It has me hungry to make a new armature. Can't let myself get into that now -- but let me take this opportunity to talk about where I'm going with all the metalworking development.
My stopmo focus is wholistic -- I want to learn everything that there is to know about puppet fab. Armatures are a good place to put attention early on; they're the foundation of a puppet.
My goal -- (well, one of my goals) -- is to be able to make pro-level steel armatures with stepblock, hinge, and swivel joints by the end of this year. I want to be able to replicate what I saw at Bent and what I see in photos from The Nightmare Before Christmas at home. Overkill? Yeah, probably. But it's a skill that I want nonetheless.
My strategy is to take baby steps, making a series of armatures, each of which builds upon the previous... Conscientiously evolving them. From brass to steel; from hand-held tools, to the drill press, to the mill and lathe; from open-hole sandwich plates, to ball-and-socket joints, to step-blocks, to hinges.
Anyway. I'd been thinking that the follow up to the Man of Steel would be a stepblock armature. Now I'm thinking that that skips a step -- that I ought first to do sandwich plates with sockets instead of holes. Given where I'm at now, that feels easy-peasy, and I'm eager to get started.
(A road trip to Tucson next week stands in the way, though.)
...
On a related note: I just watched Rankin & Bass' Mad Monster Party last night. I'm considering doing a film with their style of pups, next time I do a StopMoShorts haiku challenge. Foam latex body, hollow resin head, limited facial movement -- but with steel jointed armatures instead of wire.
I was paying special attention to the faces. I saw four strategies being used: (1) the upper lip is hard-sculpted, but there's a flat space underneath it where paper mouths can be adhered with sticky wax; (2) same thing, but using a clay lower lip (particularly for female characters); (3) a hinged marionette-style jaw; (4) replacement heads for extreme poses (like a sneeze or a shout). I'm not sure how I ultimately want to deal with facial expressions... But giving the Rankin & Bass approach a try seems like a really worthwhile experiment.
posted by sven | permalink | categories: stopmo
February 9, 2007
more letterpress experiments
by gl. at 12:40 pm
so in the spirit of many small experiments, i had an inspiration about how to check if the rollers or ink was one of the problems in my last letterpress attempt: i took the form out, inked it with a stamp pad, and tried an impress. strangely, many of the letters were crisper and more detailed than they had been with rollers, but it didn't solve my basic problem, which is that half of the letters aren't really showing up at all.
so i tried tightening the screws on the platen and adding more paper under the tympan to no avail. i finally even pushed the offending letters out obscenely raised above the other letters, and it had no effect. how can that be?
posted by gl. | permalink | categories: printing
February 8, 2007
stopmo play date
by sven at 11:59 pm
Hazel (whom I met at Bent Image Lab) and Eric (who was there, but I didn't knowingly meet) are starting up a new animation club here in Portland. Doesn't have to be stopmo. Next meeting is Feb 27. If you wanna come, talk to me.
Hazel is the first local person I've met who suffers as I do from "the sickness" -- stopmo fever. Getting together to geek out over stopmo tech details? Predestined.
So today she came over; an afternoon of frenetic conversation ensued. She ogled and was boggled by the stacks of stopmo DVDs. I demonstrated the use of the "wiggler" attachment on the mill. And -- praised be the lord (Harryhausen) -- we got FrameThief fired up and did a little animating with The Diplomat.
Here's a person who's got the passion to do great things, given the resources... So I sent her home with a spare roll of aluminum wire, a tube of epoxy putty, some 3" 4-40 threaded rods and knurled nuts. We've scheduled a day for next week when she can come over again, abscond with my laptop, and have the day to herself in the studio practicing the art of breathing graceful life into inanimate pups.
Just lock the door behind yourself when you go. 'K?
posted by sven | permalink | categories: stopmo
February 4, 2007
speed letterpress
by gl. at 11:59 pm
tonight i wanted to see if i could create a "speed letterpress" card in under an hour. i wanted to make a birthday card for a friend before we met her for dinner. this was an incredibly silly idea, considering i have yet to pull a good print from the press. but i thought it would be a noble attempt, and if it worked it would be a grand gift!
it didn't work, of course. it almost worked, but i couldn't get a good imprint: many of the letters on the right weren't printing well, and i didn't really have much time to adjust it before i had to go. the composition was easy & fun, but as usual, the arranging & locking of the form took most of the time. in this case, because it was an irregular block, it was exceptionally difficult to fit the furniture & reglets around the letters so that they would remain flush and firm in the chase. also, i was using one decorative cut that was slightly smaller than the letters.
oh, well. i'm still glad i tried instead of waiting for the next perfect 4-hour block of time, which looks like it won't happen till thursday. the good news is that even though i had to leave the press for about 8 hours with ink still on the plate & rollers, when i returned i was still able to wash it off w/o much fuss, even without citrisolve. it looks like simple green & a microfiber towel will do the trick!
(by the way, bad news: i only have 3 s's in this style, which means i can't actually spell "scarlet star studios"! but i have 9 r's for some inexplicable reason.)
posted by gl. | permalink | categories: printing
February 1, 2007
soiduts telracs
by gl. at 11:59 pm
first letterpress prints! alas, it was not as complete of a success as i would have hoped.
first i had to sort throught the typecase of the type i chose to resort everything into its appropriate cubby and discover what letters are missing. it looks like the largest quad i have is an em quad. not many coppers/brasses, either.
composition is easy and fun. the part i was dreading is, in fact, the part i like least: arranging and locking the form. the furniture is like playing evil tetris and it takes me two or three times as long to it as it would probably take anyone else. once i sorted it into similar sizes that helped a bit: i need a beter way of storing/sorting the furniture & reglets other than a jumbled box.
so finally, my first print:

what's wrong here? :) reversing the letters is such a classic mistake it was really funny.
let's rearrange the letters, shall we?

ah, that's better. sven got one of the mirrors i use for the blind-contour drawing exercises so i can always check the orientation, though i suspect i'll get better at this over time.

but this is the best print i could get out of dozens of tries. much more of them were like that second one, and even this one is lacking in clarity and detail. one of the big problems is that awesome star cut in the middle, i think. it's actually a cut nailed to a block of wood, not a solid chunk of lead like the others. so i think it's just the sliiigggghhhtest bit too tall. this means the letters to either side of the star aren't getting enough ink or impression, i think. even planing didn't help. this frustrated me so much i ended up adding enough underlays to the back that the chase finally fell out of the chase bed. i hope i can sand the wooden block down a bit. in the meantime, i'll try using the word "star" next time instead of a cut, but how can i resist this star?
i wasn't sure how cleaning would go, but i am pleased to discover the ink and the press is easily cleaned with liberal use of a weak simple green solution and judicious use of citrisolve, both of which i consider only mildly toxic at worst. (i use the simple green for cleaning gocco screens and the citrisolve for transfer prints.) the question of cleanup had been worrying me because i really wanted to avoid a pile of kerosene-soaked rags. with safety boy on my side, i didn't want to have to install another fume extractor. ;) sven's already already worried about the toxicity of lead type. also, i bought some lava soap which works great for taking the ink off my hands.
further review:
how do i know if it's the rollers? when will i know i need to replace them?
i was surprised to discover how easily the ink bled through to the other side. i thought this was reasonably good paper, but the star and some of the letters can frequently be seen on the reverse. is there something i should know about the paper & ink combo for letterpress? that was one of my least favorite issues w/ calligraphy.
i have no idea how old this letterpress is. it's an adorable kelsey excelsior 3x5 tabletop press, and a note i found in chas' things indicated it may have been made around 1945. how do i find out?