you are here [x]: Scarlet Star Studios > the Scarlet Letters > stainless steel balls
<< before
artist's way guided intent (july)
after >>
a stopmo play day
July 9, 2006
stainless steel balls
by sven at 2:00 pm
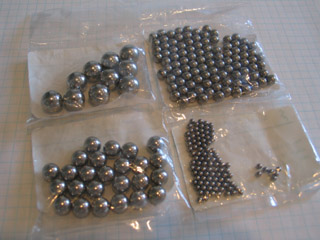
Having done a pretty successful brass armature, the next step up is to try making a steel armature. Following the advice of Lionel Orozco and Tom Brierton, I'm going to use type 302 stainless steel balls for the joints. I ordered a selection of ball sizes from smallparts.com.
On my brass armature, I had a nifty trick: I used hollow beads instead of solid balls -- which really cut down on drilling time. Before moving on to the professional standard (type 302 balls) I had to see if my bead trick could also be used with steel. The answer: no.
Stainless steel beads, it turns out, are harder to acquire than brass beads. I had to get my supplier, "A Bead Source," to make a special order for me. The steel beads soldered onto my 1/8" dia. K&S music wire with no problems. However, when I put the beads between my 1018 cold finish steel plates from Metal Supermarkets, the beads got all scratched up. I shouldn't be surprised -- the beads must be made of a far softer metal.
I've looked in the K&S stainless steel center for something analagous to the 12" x 1/4" x .093" brass strips I used on the brass armature -- but found nothing. Conclusion: I could make an armature that uses steel beads and brass sandwich plates, but there's not going to be an all-steel armature that uses beads for balls.
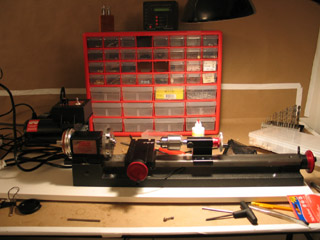
My Sherline 4400 lathe and 5400 mill arrived June 20... I was so busy writing the brass armature tutorial, however, it took me a while to get around to setting them up. Much of this past week was spent assembling the machines, attaching them to wooden bases, and getting acquainted with their basic operations.
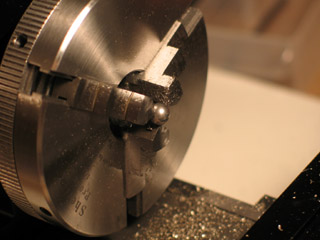
Friday night (7/7) I successfully drilled my first ball using the lathe method. Basic idea: the chuck of the lathe spins the ball while the drill stays still, which allows you to make a perfectly centered hole.
I've read quite a bit by this point -- in Stop-Motion Armature Machining, Tabletop Machining, and The Home Machinist's Handbook -- and yet, the tactile quality of machining steel was not at all what I expected. I knew that you need to be patient; but I couldn't imagine the extent to which progress is measured in fractions of a millimeter. I knew that you use a lot of oil; but I didn't comprehend that the tiny metal chips would form a sort of oily paste.
...Metal-working at this level is going to be challenging. But I still think I have what it takes.

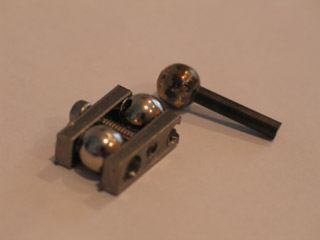
Here's a photo of my first drilled stainless steel ball. For comparison's sake, I simply fit it onto the other end of a rod that was already soldered to a bead. I have the Safety-Silv 56 solder I need in order to attach it permanently, but that's the next step...
Celebrate one small victory at a time. This stuff ain't easy.