July 2006 archives
you are here [x]: Scarlet Star Studios > the Scarlet Letters > July 2006
<< before
June 2006
after >>
August 2006
July 31, 2006
a toast to the happy couple
by gl. at 3:47 am
(this is the last post before we go to canada for a couple of weeks...)
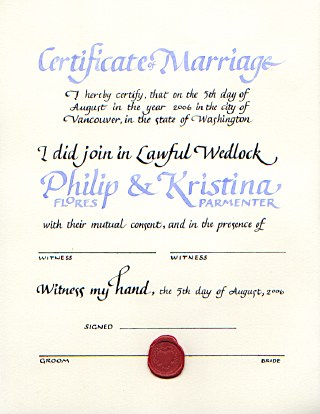
i just finished a commission for a marriage certificate! i very much enjoy creating things for joyous ocassions:
[click the image to see it larger]
exif: about 20 hours; arches text wove; tape .5, 1 & 2 nibs w/ some help from a .03 pen meri gave me to create the lines; sumi ink for black and custom acrylic mix for the periwinkle; basic italic/chancery; wax seal
believe it or not, there's no shiny on this piece! the wax seal was difficult, though: i had to create several emergency ones at the last minute when the one i put on as the last and final step before delivering it broke! aieeee! melting the wax creates noxious fumes and if safety boy had been there he probably would have handed me a mask. i hate using those candle-like wax sticks; they mix soot in the wax and by the time you've dripped enough wax to create a seal, it's already begun to harden. instead, i crushed the wax stick w/ a hammer, melted the fragments in a little spoon and pooled it onto the paper all at once.
the ink is always my nemesis. their wedding color was periwinkle, and i mixed up a great one using a pearlescent purple ink, a couple of drops of random blue ink & a fair amount of higgins eternal white. but when i tried to use it, the ink would separate, leaving the letters outlined in shocking turquoise with streaks of darker purple in the stems. so i thinned a pretty, pale blue-violet acrylic, but by the time it was thin enough to (barely) write with, its color had become far more ice-pale blue than periwinkle. i ended up adding some purple ink to it & a little silver pearlescent, but it was still a struggle to write with.
when the nib is at its smallest size (.5), it takes more effort to keep the nib from skipping over paper fibers & whatnot, so i find my writing in smaller sizes isn't as fluid or consistent as it is at larger sizes.
when i create calligraphy, the layout comes to me in fragments: i knew how i wanted to do their names first, and then i had to go through about 20 versions of the rest of the text before i could begin working on good paper. i had initially thought it was going to be a horizontal layout because the "certificate of marriage" and the names could be so much bigger than they can in this format, but the line length for the smaller text and the signatures was simply too long and i couldn't get a good balance between all the elements.
and now off we go into the wild blue yonders of canada. oh, canada!
posted by gl. | permalink | categories: calligraphy
July 29, 2006
making cobblestones at bent
by sven at 11:59 pm
Wednesday (7/26) I finished my first job at Bent: casting plaster tiles that will represent cobblestones in a small town.
[Being conscientious about confidentiality, I only took these 4 photos -- ones that show my little project, and nothing else.]
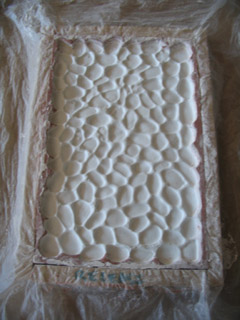
Here's an empty mold that I made. The cobblestone pattern is vacuformed. Clay walls helped give the tiles a more "jig-saw"-like edge. The mold sits in a wooden box, but the box is protected by a sheet of plastic.
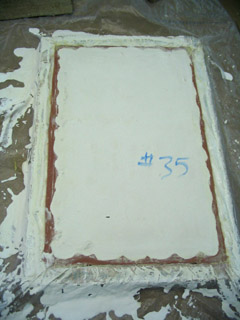
I'd fill the mold up with plaster (hydrostone), layering in a piece of burlap. Then I'd "scree" the excess off the top.
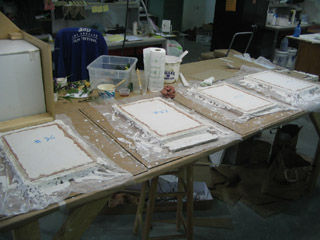
When I finally got the workflow down, I had four molds running at once, popping out four tiles per hour. To control the spread of particulates, mixing plaster and de-molding tiles needed to be done in the spray booth.
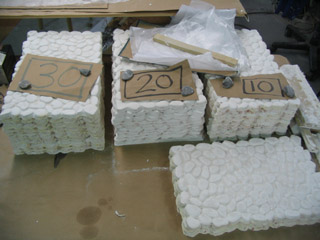
In order to help me keep track -- and make it easy for supervisors to see how far along I was -- I numbered the backs of the tiles. After de-molding, I stacked the tiles in piles. By the end of the job, I'd made 55 cobblestone tiles.
Working at Bent was wonderful! I was thrilled to discover that I was familiar with almost every material I came in contact with -- due to the intensive research of the past eight months. And yet, seeing these materials actually in use -- it gave me a much more visceral understanding of how they all come together to make an animation. It was a good low-stakes project for me to start out with, getting me oriented in the world of professional stopmo.
Bent hires folks on a per-job basis... And it sounds like they've got a lot of projects coming up. I'm really hoping to work with them again soon.
posted by sven | permalink | categories: stopmo
July 21, 2006
artist's way open studio (july)
by gl. at 3:09 pm
ah, there's the heat! despite an ample supply of cucumber lemonade, two fans, and a portable room air conditioner borrowed from a neighbor, it was still pretty warm in the studio last night.
fortunately, one of the participants also brought lemon-lime popsicles and we were feeling pretty creative with 12 collages between six people (and one of the participants made three more after the event was over!).

["summer": click the image to see the other collages
& an extra bonus shot of people at work in the studio!]
of course there's plenty of shiny in here the scan didn't capture: the top half is teal shiny & the gold bits are shiny, too. i colored the central image & gave this card to the neighbor who loaned us the air conditioner.
we'll be taking a break in august to go to sven's family reunion in canada, so there won't be a guided intent or an open studio next month. but i am hosting a "fabulous end-of-summer august art swap" august 23 for anyone who wants to clear our their studios & start fall by feasting on "new" supplies. :)
in september we'll host artist's way creative clusters and begin the guided intent events and the open studio again. so enjoy the summer, now that it seems to have been turned on full force!
posted by gl. | permalink | categories: artist's way
July 20, 2006
I've got a contract!
by sven at 10:00 pm
I'm so excited! Today I got a contract with Bent Image Lab, a local animation studio that seems to focus on producing TV ads on the national and international levels. I got the call asking me if I wanted a job at 10:35am... I went in to sign paperwork at 1:00pm... And by 2:00pm I was actually working!
A million thanks to Grace Weston, who recommended me to studio and gave them my contact info. Go look at Grace's website; she's an amazing photographer. Gretchin met Grace at Job Club for Creatives and showed off my work to her -- so thank you Gretchin as well!
I signed a (sigh) confidentiality form, so I'm not going to be able to say much about the job... But here are a few innocuous details I think are safe to share:
I'm going to be making cobblestones for a street scene. The first task they set me to was vacuforming. You use a special machine to melt a piece of plastic, and then very quickly pivot it over and onto a table that has a vacuum under it. You place a 3D form on top of the vaccuum table called a "buck" (in this case cobblestones); the vacuum forces the melty plastic to take the shape of the buck. ...Cool!
My job will last maybe one week or ten days, so it will be done before Gretchin and I head off to a family reunion in Canada. It's the first paid animation-related work that I'll be able to put on my resume. It may not be the most glamorous part of the production -- but I'm in, which is the important thing. And really, given my voracious interest in animation, I'd kinda sorta like to take a stint doing every job in the building.
Ah, the adrenalin still hasn't worn off...
:-D
posted by sven | permalink | categories: miscellany, stopmo
July 17, 2006
steel armature progress
by sven at 11:59 pm
I've been doing tests and experiments in preparation for making my first steel armature. Here's a quick progress report...
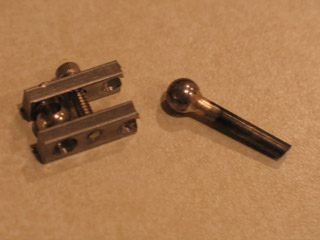
I think I've figured out the magic combination of factors needed to successfully drill balls on the lathe. Step 1: file a small flat surface on the bearing while it's in the lathe. Step 2: While the ball rotates at 1800 rpm, use a #2 centering drill fitted into my smaller drill chuck to start a hole. Step 3: Three turns of the handwheel will put a 1/8" dia. drill just about halfway through a 1/4" ball. (Actually, the balls that I'm going to use will be 5/16" dia. -- they're very nearly identical in size to the 8mm beads I used on my last armature.)
Above you see a ball that I've soldered onto a rod using 1/32" dia. Safety-Silv 56. I used three tiny snippings of solder; I think 3 or 2 would have been adequate. The silver solder was a pleasure to work with -- I didn't have any problems getting the parts to join.
On this test, I used 1/8" music wire for the rod. One of our Scarlet Letters readers warned me that this stuff would be hell on a hacksaw. I forget now who said this -- but thank you! Sure enough, I took the teeth right off my hacksaw's blade. If you hadn't given me the heads-up, I would have been baffled. ...I've bought some type 304 stainless steel rod as a replacement now.
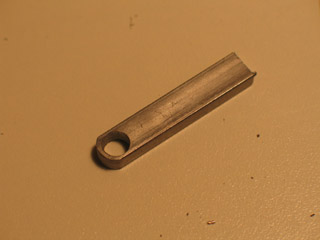
Today's project was to "radius" (round off) a sandwich plate. The big problem was how to clamp the plate down for cutting -- while not cutting the rotary table.
Upon consultation, stopmoe/machinist Mark Fullerton suggested that what I require is a jig. He even went so far as to create a 15-photo tutorial for me! Holy cow, that's above and beyond, Mark! BIG THANKS!!
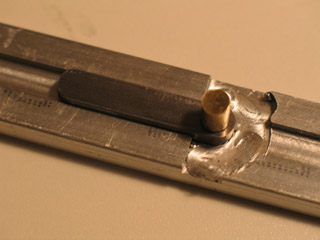
The jig design that I came up with has little in common with what Mark showed me -- but the tutorial was very helpful nonetheless, and I'm going to be chewing on it for quite some time.
For my own jig, I milled a 1/4" wide x 1/16" deep slot in a 3/4" wide bar of 6061 aluminum. A 1/4" wide 1018 steel sandwich plate sits snugly in that slot. The plate is kept registered with a piece of 3/16" dia. x 1/2" long brass rod.
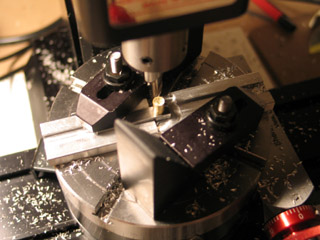
One of the trickiest parts of this operation is getting the rotary table perfectly centered underneath the mill's headstock. What I did was attach a lathe chuck to the rotary table, and a drill chuck to the headstock. I put a piece of 3/16" brass rod loosely in the drill chuck, and then maneuvered the X-Y table until the rod fell down into the lathe chuck. From that point on in the process, I made sure to never move the X-Y table.
I put the rod back in the drill chuck and used it to center the jig. I used a precision machinist's square to square the jig with the milling column. The slots in the rotary table had to be at 45 degree angles to the jig so there'd be room for hold-downs. I used two step-block hold-downs to keep the aluminum jig and steel plate in place while I was milling.
Making the jig and this first test plate took almost five hours. It's time well spent: at this point, I just need to get familiar with using my machines. I tried filing the opposite end of the sandwich plate by hand to make it into a curve. It was quick and easy... But nowhere near as pretty as the radiused end! ;-)
posted by sven | permalink | categories: stopmo
July 12, 2006
gifting
by gl. at 2:58 pm
the studio loves gifts! so i'd like to acknowledge & thank three recent ones:
first, ubatuber sent a copy of his "jenny greenteeth" woodprint, which is even more impressive in person than it is here:
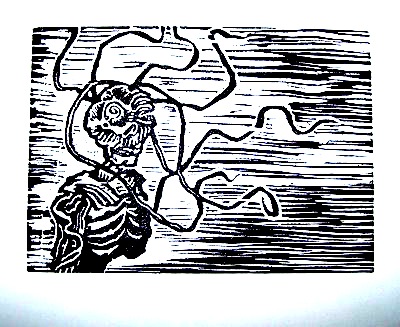
then one of my artist's way independent support students brought perfectly sweet chilcotin raspberries fresh from the farmer's market. yum!
and finally today, laura gave us both evil-eye bracelets she picked up in instanbul!
of course, the collage fairies always bless us by refreshing our pool of interesting and unusual collage materials: thanks colleen, vicki, jen, chip & kathy, grace & alesia!
posted by gl. | permalink | categories: artist's way, miscellany, stopmo
July 10, 2006
a stopmo play day
by sven at 8:00 am
I've been long overdue to do some actual animating. So yesterday I declared a "stopmo play day," and did some serious fooling around...
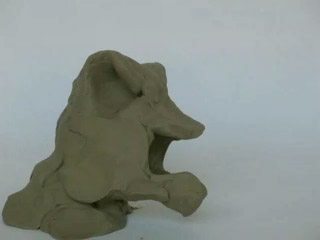
I'm out of practice. So, rather than leap into something really complicated, I decided to start simple and add levels of sophistication with each successive clip. For the first one, I clamped a piece of masonite to the livingroom coffee table, taped on a piece of butcher paper, and started animating a piece of clay. I used my digital still camera and its remote capture software -- no framegrabber.
Previously I've shot 24 fps on ones. Today I was shooting 15 fps, which is the same as shooting 30 fps (NTSC) on twos. It was interesting to discover that my clips weren't overly fast today, as they tended to be when I shot 24 fps. Fewer frames per seond means you don't accidentally squeeze too much into a second.
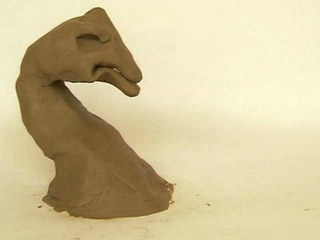
For the second clip, I switched to using my digital video camera in combination with FrameThief (a framegrabber). I've resisted using the DV cam because the picture quality isn't quite as good as what a still cam can produce... But I have to remind myself that a TV screen is going to trash the picture quality anyway. The benefits of using a framegrabber outweigh the loss of quality. [Still cams are notoriously difficult to get working with a framegrabber.]
The motion is much improved by the use of the framegrabber... One problem that came up on both of the clay clips, though, is that I didn't have the horizontal piece of paper adequately locked down. In the first clip it slid sideways. In the second clip, the stickiness and tipping weight of the clay would lift the paper up off of the table.
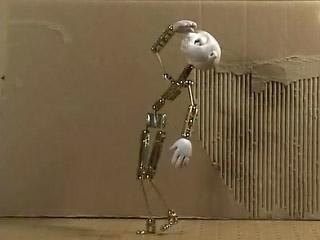
My first try animating the new brass armature! For the most part, it performed excellently. It did tip over once, though, when I had Percy doing an extreme lean. It's forgivable: he has a very heavy head. Still, for an armature to tip over -- that's a significant failure.
For this clip, I moved into the garage, where I can completely control the light. It was so hot, though -- I had to set up a fan to keep the laptop computer from overheating. My shadow shows up a couple of times in frame. Since Percy is way over on the right side of the screen, and the computer was to the left, I got sloppy about standing far enough away when I'd hit the shutter release key.
In terms of the motion itself, I'm fairly pleased. Percy is supposed to be looking up at a bird or a plane (or..?) -- and he loses his balance. Then he looks over his shoulder to see if anyone saw him. I see a number of moments that could be improved -- but this was pretty much improvised, so I'm not going to hold the clip to a high standard.

For the final clip I did, I set up a theatrical light with a gel, and put in the "cave wall" backdrop I did a while back. Percy's supposed to be looking back at someone behind him, and then waving as if to say "follow me." I don't think I got the angle of the hand right... But I did animate the shadow following Percy off screen, which I think looks cool.
The DV cam automatically adjusted for brightness, which messed up the shot. I've had more troubles with this camera's automatic settings... >:-( ...There's also some blur that's a result of the compression process. These issues aside, I feel pretty good about the clip. Everything is slowly coming together -- you could almost begin to imagine me (gasp) shooting a short story.
posted by sven | permalink | categories: stopmo
July 9, 2006
stainless steel balls
by sven at 2:00 pm
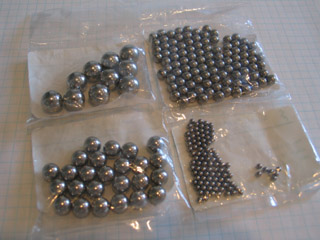
Having done a pretty successful brass armature, the next step up is to try making a steel armature. Following the advice of Lionel Orozco and Tom Brierton, I'm going to use type 302 stainless steel balls for the joints. I ordered a selection of ball sizes from smallparts.com.
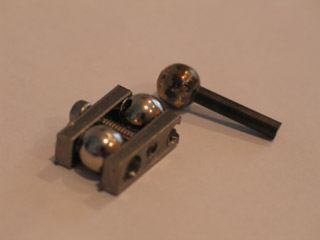
On my brass armature, I had a nifty trick: I used hollow beads instead of solid balls -- which really cut down on drilling time. Before moving on to the professional standard (type 302 balls) I had to see if my bead trick could also be used with steel. The answer: no.
Stainless steel beads, it turns out, are harder to acquire than brass beads. I had to get my supplier, "A Bead Source," to make a special order for me. The steel beads soldered onto my 1/8" dia. K&S music wire with no problems. However, when I put the beads between my 1018 cold finish steel plates from Metal Supermarkets, the beads got all scratched up. I shouldn't be surprised -- the beads must be made of a far softer metal.
I've looked in the K&S stainless steel center for something analagous to the 12" x 1/4" x .093" brass strips I used on the brass armature -- but found nothing. Conclusion: I could make an armature that uses steel beads and brass sandwich plates, but there's not going to be an all-steel armature that uses beads for balls.
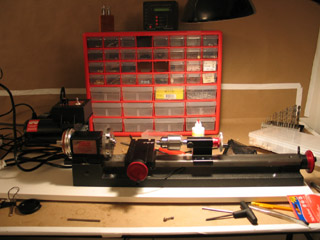
My Sherline 4400 lathe and 5400 mill arrived June 20... I was so busy writing the brass armature tutorial, however, it took me a while to get around to setting them up. Much of this past week was spent assembling the machines, attaching them to wooden bases, and getting acquainted with their basic operations.
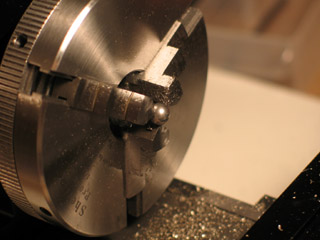
Friday night (7/7) I successfully drilled my first ball using the lathe method. Basic idea: the chuck of the lathe spins the ball while the drill stays still, which allows you to make a perfectly centered hole.
I've read quite a bit by this point -- in Stop-Motion Armature Machining, Tabletop Machining, and The Home Machinist's Handbook -- and yet, the tactile quality of machining steel was not at all what I expected. I knew that you need to be patient; but I couldn't imagine the extent to which progress is measured in fractions of a millimeter. I knew that you use a lot of oil; but I didn't comprehend that the tiny metal chips would form a sort of oily paste.
...Metal-working at this level is going to be challenging. But I still think I have what it takes.
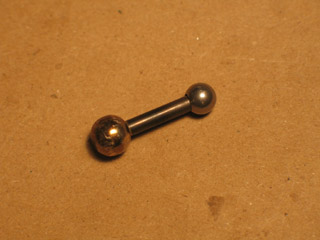
Here's a photo of my first drilled stainless steel ball. For comparison's sake, I simply fit it onto the other end of a rod that was already soldered to a bead. I have the Safety-Silv 56 solder I need in order to attach it permanently, but that's the next step...
Celebrate one small victory at a time. This stuff ain't easy.
posted by sven | permalink | categories: stopmo
July 8, 2006
artist's way guided intent (july)
by gl. at 9:56 am
wednesday was the most recent guided intent night, and we actually did something other than collage! *gasp* this month was lifemaps, where one creates a visual representation of one's past, present or future either as a literal map (svenlandia!), or juxtaposed using another visual metaphor like a body, or even the classic timeline approach. the trick is that it's a visual timeline, so no words or numbers can be used.
i created two quick lifemaps to work out some ideas (one was powell butte, one was a garden). i have trouble w/ pastels: they smudge everywhere and i can't get the detail i want. but i often reach for them because they are so smooth and soft-edged. the first two maps were incomplete and aren't worth sharing, but helped me create this:
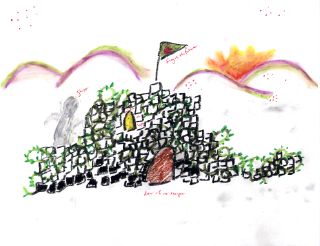
["the past is finally crumbling": click the image to see the other lifemaps]
in this crumbling castle, the ghost of my mother is walking the parapet endlessly, like hamlet's father. it's overgrown with thorny vines that are tearing the castle apart. raise the flag for scarlet star studios, pointing towards the sun rising in the hills of the future. but one window is still lit: is someone still inside, or does it symbolize hope among the horror? during the writing exercise i wrote: "i see the metaphor here but feel silly explaining it. what am i, a princess locked in a tower? well, wasn't i? aren't we? all girls, in all ways, are still locked in the tower."
like the last artist's way guided intent, i may not end up thinking this is a great work of Art, but i'm happy with the imagery and could totally work more with it. art is such a fascinating process: if i had set out to create this piece w/ these meanings, i doubt i could have done it. but simply drawing what needed to be drawn next allowed the symbols to emerge on their own.
i was surprised to find that though the exercise was designed to explore drawing forms, a couple of people chose to use collage techniques. also worth mentioning, with or without a good transition: we were delighted to meet a lurking blog reader that night (hi, kori! *waves*).
since sven & i will be in canada for the next artist's way guided intent, in august i'm going to collapse both events into the "fabulous end-of-summer august art swap!" give things! get things! stay tuned for details...
posted by gl. | permalink | categories: artist's way
July 4, 2006
neighborly
by gl. at 11:52 pm
i spoke with three neighbors before noon today. that's a record!
two of the conversations were about gardening & tree pruning. but i was picking raspberries from the bush by the studio when a woman and her giant airedale stopped at the driveway to ask about scarlet star studios. she's an artist in a cul-de-sac down the way, and her studio's nom de plume is "shooting star!" she does botanical watercolors and teaches in an after school art program at an elementary school down the road. so i showed her around the studio and gave her a flyer. i've seen her around; i remember she was one of the few people who didn't think we were crazy when we were making the labyrinth in our driveway (oh, how i wish sven would write about that! it was an amazing project). so hooray! another artist nearby!
posted by gl. | permalink | categories: miscellany