you are here [x]: Scarlet Star Studios > the Scarlet Letters > making my first two-part mold
<< before
bloom
after >>
artist's way guided intent (june)
June 5, 2006
making my first two-part mold
by sven at 7:54 pm
Thursday (June 2) I got back into the studio and made my first two-part mold.
The mold itself is made from ultracal 30 that I bought at Stephenson Pattern Supply. Ultracal is a gypsum product that's about halfway between plaster and concrete; it's designed to capture a lot of detail.
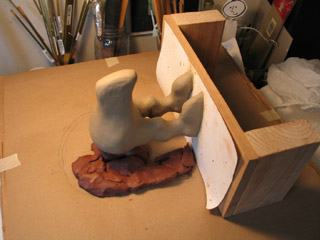
The red clay is "cherry creek red (no grog)" that I bought at Georgies. I needed a soft clay that wouldn't damage my sculpt; an employee recommended that I select any "low fire" clay without grog. I picked a red clay so there'd be good visual contrast with my sculpt while I was working.
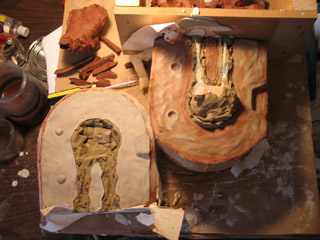
This sculpt has a long nose and long feet. It really ought to get a three- or four-part mold. However, I opted to go for a two-part mold.
Why? I decided that I just couldn't leap from only ever having done one-piece molds to doing a complicated four-piece mold. The material I'm going to use for casting is flexible; I'm hoping that with a little effort I'll still be able to get it out of the two-piece. ...I decided that while this is most likely a mistake, it's a mistake that I need to make in order to understand the mold-making process better. I also decided that I've been being too precious with my sculpt; there will be more sculpts -- it's OK to screw this one up.
I think occasionally it's worthwhile to go ahead with a project even when you know at the outset that it's flawed. Mistakes are an important part of how we learn.
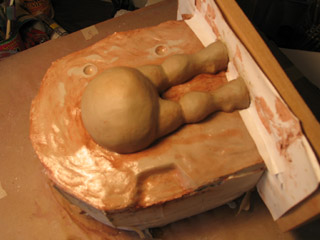
I made a cardboard wall to hold the liquid ultracal in place... I've watched Kathi Zung's video, and she doesn't do this. She slathers the material on by hand, then shapes it with a kidney-shaped pottery tool (sort of like frosting a cake).
It may well be that I wasn't mixing my ultracal thickly enough -- or maybe I should have waited for it to get stiffer before pouring... Nonetheless, the technique I used seems to have worked out alright.
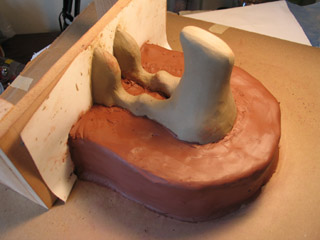
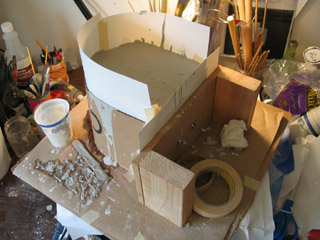
For making "keys" for the mold, I tried two different styles. On one side there's a sort of clay trapezoid with tapered edges. On the other side there are two marbles that I pressed into the clay. Initially, the marbles didn't want to separate from the ultracal 30. A gentle knock with a hammer did the trick, though. ...The two sides of the finished mold seem to fit together very well.
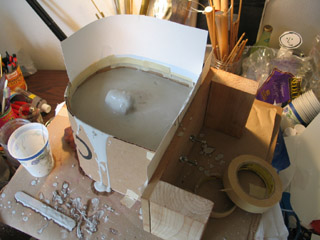
I extended the top of the mold using what was at hand: cardstock. It worked OK when the paper didn't have to hold back too much ultracal.
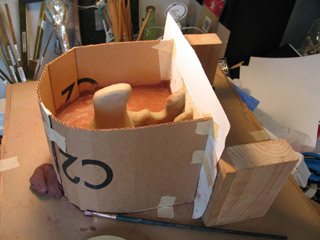
I figured out when I made my second wall that you really do need the cardboard for strength -- but if you line it with cardstock, then the resulting mold has smoother and nicer sides.
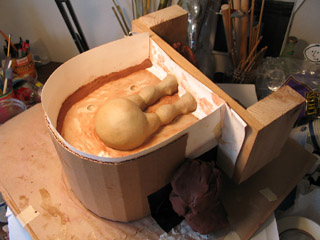
When I mixed the ultracal 30 with water, I did so in these big paper buckets that I found at Ace Hardware. They seem to be meant for house-painters... However, they very quickly became soggy. Near the end of the day, I was carrying one of these paper buckets, full with water, away from the sink -- and it started gushing water out the bottom onto the carpet!
Grrr.... No real harm done -- but on my next plaster-making run, I'll definitely be using plastic buckets instead.
When the ultracal for the first side of the mold was hard, I removed the cardboard walls. Then, I flipped the whole thing over and stripped away the red clay. I had been worried that the clay would damage my sculpt... I was very pleased to discover that it really left no damage at all.
When I was flipping everything over so I could do the other side, I had an absentminded moment where I tried to pick up the work-piece by its wooden base. Oops! While it looks like everything is firmly attached to that piece of wood, really it's just the sculpt that's held in place with tie-downs. My flub created some tiny spaces beneath the feet of the sculpt that I had to fix -- otherwise, ultracal would have flowed into the feet-holes of the mold.
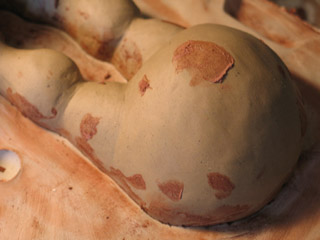
There were some minor smudges of red clay left on the sculpt. It was very easy to clean these off, just using a brush and water.
After I cleaned off all the red clay residue, I used a brush to apply vaseline to the ultracal. In retrospect, I think I probably should have applied vaseline to the sculpt as well. It was a nightmare picking plasticene out of the mold later.

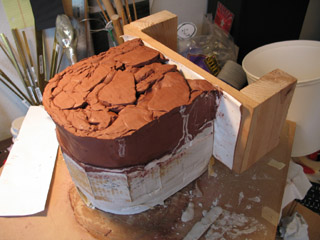
Doing the second pour of ultracal is pretty similar, so I'm just going to let the pictures tell the story here...
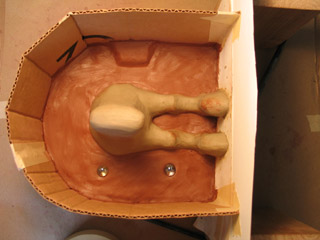
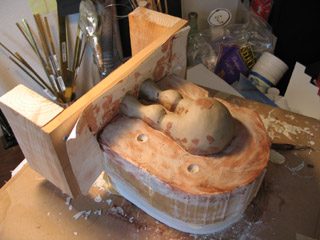
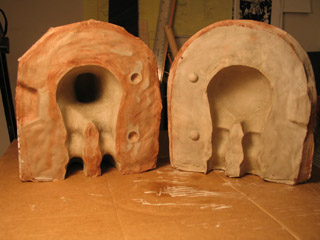
After giving the second side of the mold time to harden, I opened it up... The sculpt didn't survive at all. I had thought that plasticene -- an oil-based clay -- wouldn't stick to the ultracal. I was wrong.
Maybe I opened up the mold too soon. I know that you're supposed to let ultracal set for at least two hours -- and I only gave it one. When I opened it up, it was pretty warm inside... The plasticene had the consistency of peanut butter. Maybe if I hadn't been in such a hurry -- if I had let everything cool down -- maybe then the plasticene would have come out more easily.
Or maybe I just needed to apply a release to the sculpt itself. Vaseline would probably work. I've also heard that a clear acrylic spray can do the trick.
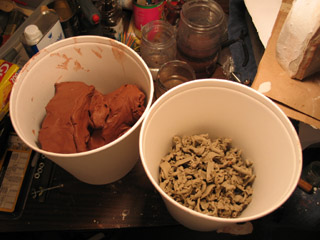
(Here you see those terrible buckets that I mentioned earlier.)
Even after I'd scraped all the plasticene out of the mold using my trusty loop tool, there was still an oily residue. To get this out, I needed a solvent. What I had at hand was turpenoid. Scrubbing turpenoid around with a brush, the residue came out quite easily (although scrubbing ultimately ruined the brush).
...I'm a bit worried, though. Turpenoid is a petroleum distillate. Will it leave any sort of oily residue? When you cast liquid latex in a plaster mold, it cures because the ammonia content is absorbed into the gypsum. Will a petroleum residue prevent the ultracal from absorbing the ammonia? Or will the turpenoid, since it's a solvent, evaporate from the mold -- leaving it OK for use with latex?
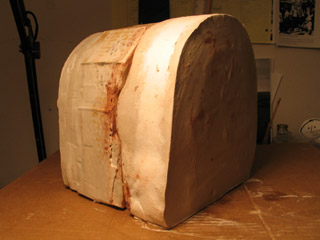
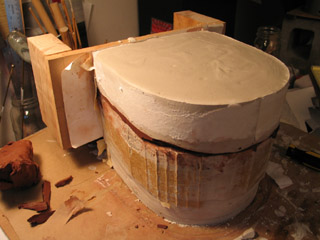
And here's the finished mold! I took me a bit over eight hours to make -- kinda a long time, but not over my patience threshold.
Boy is this thing massive, though! Lesson learned: Another advantage of doing a three- or four-part mold would be that you wouldn't need nearly as much ultracal.
THE SURPRISING EPILOGUE
The mold is done; I'm ready to make castings. However, just this morning I had surgery on my back to remove a lipoma (a large, non-cancerous fatty deposit). Consequently, I'm not supposed to lift anything as heavy as a gallon of milk for 4-6 weeks. How am I going to work with my monster-sized mold?
Gretchin has generously offered to help... Still, I'm having a moment of discouragement.
posted by sven | June 5, 2006 7:54 PM | categories: sculpture, stopmo