you are here [x]: Scarlet Star Studios > the Scarlet Letters > how to make a brass ball-jointed armature (part 2 of 5)
<< before
how to make a brass ball-jointed armature (part 1 of 5)
after >>
how to make a brass ball-jointed armature (part 3 of 5)
June 23, 2006
how to make a brass ball-jointed armature (part 2 of 5)
by sven at 9:02 pm
Let's take a look at what supplies you're going to need.

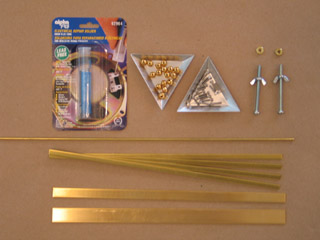
RAW MATERIALS:
Soldering wire: 1/16" diameter lead-free rosin core. Lead-free solder should have silver content. For a professional armature, you might use solder that's 56% silver -- and costs $25 per ounce. On this project I used Alpha Fry solder that's 96% tin 4% silver, bought for under $4 at Ace Hardware. It's important that you find solder with a rosin core. Otherwise you'd need to apply flux paste separately, which would be very awkward in this case. (In addition to lead, check labels to make sure that your solder is also free of Cadmium and Antimony.)
Brass beads: 8mm hollow brass beads. Most bead shops seem to carry these. The specific number you need will depend on your design; my example armature uses 24. I've purchased bags of 25 for about $3.50; they're more expensive when sold individually. Make certain that the beads you get are hollow spheres, not solid balls that have been drilled with a hole. The hollow space inside of the bead is where the solder is going to sit. According to the people I've purchased from, these beads are "base metal" that's merely been plated. They seem to work very well, nonetheless. The beads need to be equally hard or harder than the plates that they sit in, or else they'll scratch.
Screws for joints: 1/2" long 4-40 stainless steel socket cap machine screws. In addition to stainless steel, you can also buy these screws made from black "coarse" metal. It doesn't matter which sort you use. The example armature uses 14 screws. They're small and easy to lose track of, so I recommend keeping extras on hand. (Note that you'll need a 3/32 hex key to tighten these screws.)
Screws for tie-downs: two 2.5" long 10-24 machine screws with wing nuts. The length and diameter of screws that you use for tie-downs is largely a matter of preference. This size simply feels sturdy to me. If you go for a different size, make sure that the tie-down nuts are of a matching size.
Nuts for tie-downs: 10-24 brass hex nuts. While your tie-down screws might be made of zinc or stainless steel, it is important that the nuts be made of brass. Otherwise it will be difficult or impossible to solder them onto the armature's feet.
Brass rod: 1/8" diameter brass rod. K&S sells this material in 12" lengths. If you look in the metal supply section of your local hardware store, you can probably find 36" lengths. These are preferable. You'll be cutting the rod up into segments; you'll have fewer unusable leftovers from the tail-ends of rods if you're cutting from a 36" length.
Brass strips for sandwich plates: K&S brand brass strips, four pieces, each .093" (3/32") thick x 1/4" wide x 12" long. It is very important that you find .093" thick strips. Thinner material will bend when you tighten your joints' screws. K&S has eight different metal displays that they ship to hobby shops and hardware stores; only the "jumbo metal center" carries .093" thick strips. K&S displays are pretty common, so with some looking around you're likely to be able to find a local store that carries what you want. If you're unable to find anyone that has the "jumbo metal center", any store that has a K&S display ought to be able to special-order a box of eight .093" thick strips for under $20.
Brass strip for feet: one K&S brand brass strip, .064" (1/16") thick x 1/2" wide x 12" long. This stock is sold in both the "metal center" and the "jumbo metal center." It should be fairly easy to find. Ask at hardware stores or hobby shops that deal with model railroads, remote control cars/airplanes, dollhouses, scale model building, or wargaming miniatures.
Brass strip for chest & pelvis: one K&S brand brass strip, .064" (1/16") thick x 3/4" wide x 12" long. This stock is also sold in both the "metal center" and the "jumbo metal center."

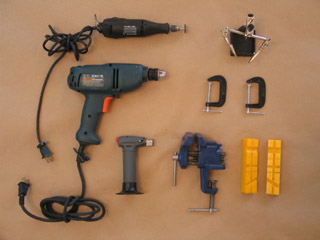
POWER TOOLS AND CLAMPING DEVICES:
Dremel rotary tool: Fit the Dremel with a reinforced cut-off wheel, and have spares on hand. Don't be tempted to just use regular cut-off wheels; they won't hold up for long. You're going to be doing a lot of cutting and grinding with this tool. You could do the same jobs with a hacksaw and a file -- but it would be much more labor intensive.
Power drill: This project requires a plug-in power drill. I've tried using a battery powered drill -- it doesn't have adequate force to get the job done.
Butane micro-torch: A butane micro-torch costs about $25, and can be found in a hardware store among the soldering irons, propane torches, and welding supplies. The torch in the picture actually came with a set for making creme brulee -- so you can also look for these in kitchen stores. All models have a safety switch that must be clicked before you can ignite the flame. Some models place this button immediately underneath the flame, others place it on the back of the tool where your thumb will rest. I strongly recommend purchasing the latter type! The soldering wire that I use melts at 430 degrees Fahrenheit. A propane torch should also do the job -- but it's a bulkier tool, and this is small work. A soldering iron will not be adequate. There is too much metal involved in the joins we'll be making; heat dissipates quickly, and the soldering iron just can't get the join area hot enough.
"Helping Hands" clamping system: These are invaluable for holding small things while you solder. You can find them for less than $15 at stores that sell parts for making circuit boards, such as Radio Shack.
Two small C-clamps: The two C-clamps pictured above each have 2" capacity.
Small vise: A small vise is essential. You can get one that clamps onto the edge of your work table for under $20. The vise pictured above has jaws that are 3" wide.
Rubber jaw attachments: Rubber jaw attachments will hold the brass beads in place while you drill them. They connect to the vise with inset magnets.
NOT PICTURED HERE:
Cinder block: You're going to need a cinder block as a work surface, for when you're soldering with the butane micro-torch.

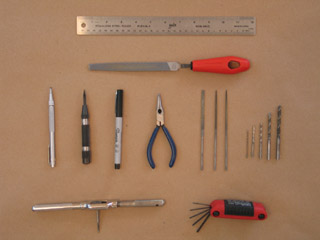
SMALL TOOLS:
A ruler that measures in both inches and metric.
A large file.
Metal scribe: Used for marking measurements on the brass strips. You could use the center punch to mark lines, but it has a wider tip and doesn't work quite as well. An X-Acto knife can also do the same job, although it will dull the blade. Lines made by the fine-tipped Sharpie are not very accurate, and will quickly rub off.
Spring-loaded center punch: A center punch starts the holes that you're going to drill. The spring-loaded variety is nice because you can use it one-handed. There are also non-spring-loaded center punches that you use with a hammer. You can get away with just using a hammer and a brass screw to start your hole... You'd lose a good deal of accuracy, though -- and this is a small project where accuracy matters.
Fine-tipped Sharpie marker: Useful for marking the brass rod, and for temporarily labeling the brass strips.
Small needle-nosed pliers.
Needle files: round, flat, and triangular.
HSS drill bits: 1/16", 3/32", 1/8", 11/64", and 7/32". HSS stands for High Speed Steel, which is adequate for cutting soft metals. Look on the side of your drill bits, they're probably labeled "HSS". The 1/16" bits are prone to breakage -- I recommend having at least three or four extras on hand.
Tap: Tapping handle and size 4-40 tap. This is how you thread holes that you've drilled. It's really very easy: just remember to rotate the tap half a turn backwards every few turns, to help remove the metal chips.
Hex key: A 3/32 hex key. This is what you need to tighten the 4-40 socket cap machine screws. You can see in the photo that I use a "Swiss Army Knife"-style hex key set, with a variety of key sizes on it.
ALSO USEFUL:
Sandpaper: Fine-grit sandpaper is useful for preparing brass parts to be soldered.
Eyedropper: While soldering, sometimes it's helpful to be able to quickly cool off a work piece by squirting water on it. While drilling, a few drops of water can also serve as lubricant. An eyedropper is a very helpful tool for delivery.
Metal letter stamps and hammer: Each set of sandwich plates is a mated pair. It's important to mark them, in case they become separated. You can do this with a metal scribe. However, it's more elegant to use metal letter stamps for labeling. I found a nice set of small letter stamps at Harbor Freight for under $10.

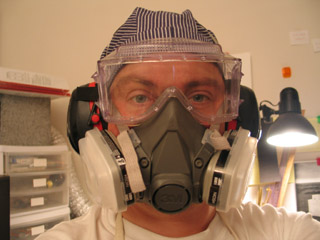
SAFETY GEAR:
Safety goggles: During this project, brass dust will be flying up at your face. Wear goggles! Cautionary tale: At one point while I was working, a cut-off wheel broke -- and I definitely would have lost an eye if I hadn't been wearing my goggles. Make sure that your goggles wrap around all sides and seal to your face. Also check where the air holes are -- since dust is going to be shooting upward, you want to make sure that the holes are located on the sides, not at the bottom.
Dust mask: You don't want brass dust permanently lodged inside your lungs. The cartridge respirator that I'm wearing here is overkill, but it has a tight seal to my face, which is important.
Ear plugs: Some of the drilling is very loud. Ear protection is optional, but recommended. Ear plugs work fine, and are cheap. I invested in the ear-muffs because they are easier to find after you've set them down, and because they stay clean better.
Hat: The hat's not just for style -- I didn't like getting brass dust in my hair.
...When you're using the Dremel cut-off wheel to grind away brass, a lot of dust is created. Plan ahead to limit the mess. I recommend taping down butcher paper on your work table. I improvised a dust guard over the vise by clamping a sheet of acrylic "glass" onto a spare tool stand. I also clamped the hose of a household vacuum cleaner just underneath my vise in an attempt to suck up some of the dust as it was actually being made. Even with these measures, you're probably going to want to keep a hand-held vacuum nearby, and will have to do some serious wipe-up after the project's done.
Leap from here to...