March 2006 archives
you are here [x]: Scarlet Star Studios > the Scarlet Letters > March 2006
<< before
February 2006
after >>
April 2006
March 30, 2006
brass armature complete
by sven at 11:59 pm
Tonight I finished making the brass armature!
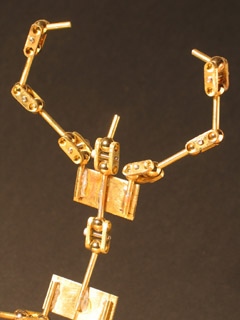
There are more pictures of the full armature at the bottom of the post. Let me first talk a little more about its construction...
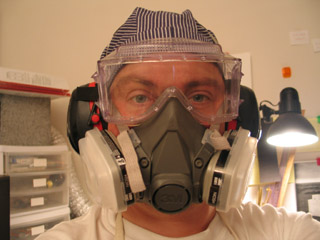
Here's the get-up I've been wearing during the making. The cartridge respirator may be over-kill -- but it has a tighter fit than a paper dust mask, and I really don't want brass dust in my lungs. I've recently purchased a welder's hat; brass filings were actually hitting me in the forehead and getting in my hair while I was grinding. I've replaced the AOSafety brand goggles in this picture... They have their ventilation holes on the bottom rather than on the sides, and occasionally dust was flying up at my eyes through them.
Dust has been getting everywhere... I think my next safety purchase needs to be a shop vac that I can clamp to the table while I'm grinding -- suck the dust away as it is made, rather than having to clean it up later.
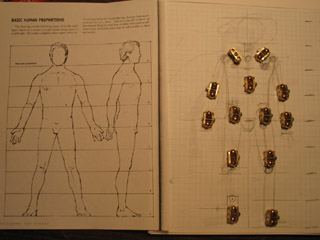
For this project I'm starting with an armature design, rather than a character design. To figure out how the armature should be proportioned, I consulted "Designing the Doll: From Concept to Construction" by Susanna Oroyan. This puppet will be eight head-sized units tall.
The armature is 10 inches tall. That's a little larger than the 9" = 6' scale I've been aiming at -- but I felt it needed to be bigger to accommodate the width of the joints. Oh well; I guess it will wind up being a monster of some sort.
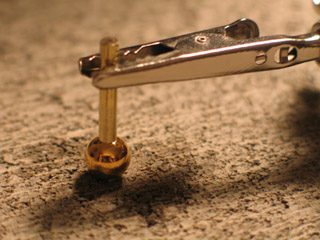
The balls for the joints are hollow brass beads. I widened the holes to 1/8" using a drill. The existing holes acted as pilot holes, which made things very easy.
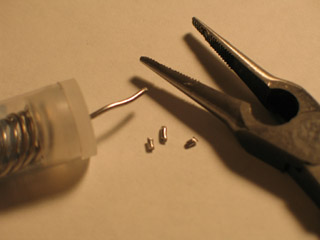
To attach the balls to the rods, I snip several very small pieces of solder and put them inside the hollow bead. Then, I put the rod through the bead. I clip one end of the rod into the "helping hands", and let the ball slide down onto the table. ...Or rather, down onto the cinderblock that I was using as a table while soldering. The cinderblock actually made for a very nice work area -- it raised everything up to a comfortable height.
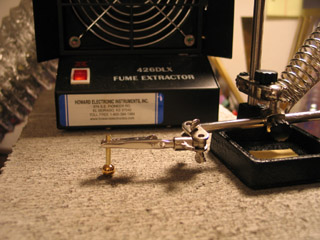
I used a butane micro-torch to heat the ball, melting the solder inside. A soldering iron would not work for this project -- it has to be a torch. ...After heating the ball (about 6 seconds) I'd use an eyedropper to shoot water at it. Then I'd grip the mostly-cooled workpiece with my needle-nosed pliers and quench it in a jar of water. I realize that this may weaken my joins -- but it seemed that the hollow beads were trapping heat, and for such a time-consuming project I was unwilling to spend additional time waiting for them to cool on their own.
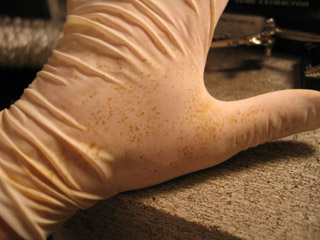
I've read in several places that brass reacts with latex... Check out the discoloration of my glove in the photo! It may be that this wasn't due to the brass, but rather due to the solder flux and solder fumes -- or the invisible layer of oil on the brass -- but I suspect it's the brass. Subsequently I switched to my nitrile gloves. They were also discolored somewhat, which surprises me.
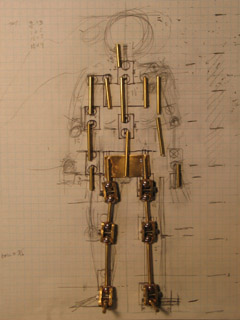
I got pretty much everything from the hips down done Sunday night. I meant to finish the project on Monday -- but I caught a cold and couldn't muster the energy to go back to the studio til today (Thursday). ...I gotta say, compared to making the sandwich plates, cutting rod and soldering on beads is pretty fun. It goes quickly, and requires very little measuring.
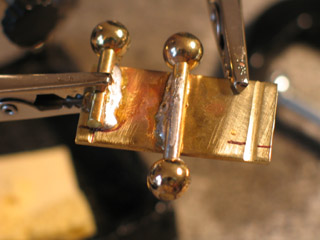
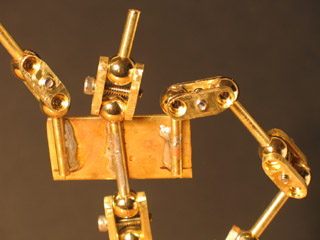
To attach rods to the brass strips that would be the torso, pelvis, and feet, I first created little grooves for them to sit in. I started the grooves with a jeweler's saw, then deepened them with a triangular needle file, and then rounded the grooves with a round needle file. Soldering the middle rod in the pelvis and torso was tricky -- the "helping hands" couldn't reach. I wound up using small C-clamp, which the "helping hands" could then prop up.
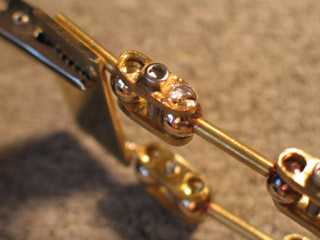
I knew that I didn't want to have double-jointed elbows and knees -- so at these points on the armature I "froze" one of the balls in each joint in place with solder. This worked out very well -- better than I expected, actually...
See, as I had been creating the "barbells" for the limbs, I discovered that if I overheated the second bead, the solder job on the first bead might also melt. I was worried that the problem would be even worse when I was freezing beads in place, because I'd have to be directly heating a bead I'd already done solder work on. Wouldn't the previous solder job quickly melt and be ruined? ...Well, apparently not.
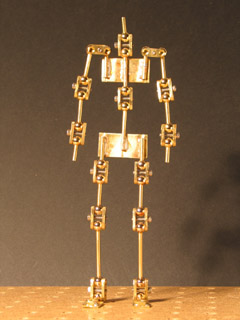
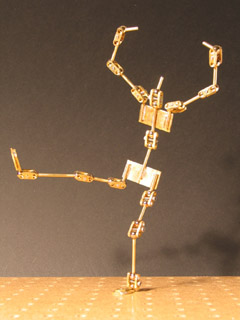
And here we are! The completed armature!
It seems to work very well... But I have had to make some repairs. There's more stress on the joints when you try to spin them in place than when you move them from side to side. In a few places the rod broke loose from the bead when subjected to this stress. It wasn't hard to fix, though -- at least not while I had all my soldering gear already out.
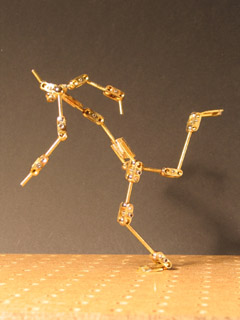
The armature easily holds its own weight while standing on one foot and leaning. I even posed it at an extreme lean so that the "head" was an only inch from the floor; the ankles still held their pose!
In terms of attaching a head and hands, I think what I'll do is epoxy glue some square K&S tubing onto the wrists and neck. Then I can use the plug-in system that I've explained previously, which I used on the Percy puppet.
Looking back at my records, it appears that it took just a hair over 19 hours to make this armature. That doesn't include the first attempt at mass-producing joints, which I consider a failure. Yowch -- 19 hours is a lot of labor for just one of these...
What's most important here, perhaps, is that I now have a prototype armature that following models can build upon. Mass-producing a generic joint worked OK -- but I think on my next model I would instead use long sandwich plates for the upper legs and the upper arms. Every place there's solder, there's a potential break point; using long sandwich plates would automatically eliminate four solder points on each limb.
I'm proud of this piece... But getting this taste of what a metal-jointed armature can be like -- it makes me want to be able to machine joints that are even more anatomically correct (e.g. knees that can't bend sideways). You realize what that means? ...I'm fantasizing about getting a micro mill!
posted by sven | permalink | categories: stopmo
March 28, 2006
process and product
by gl. at 11:13 pm
let me introduce you to fellow delighted documentarian miles hochstein, who runs the wonderful photographic sites portland ground and documented life. he says he considers himself more of a documenter than an artist, but i think documentation can be an art form, especially if you're compelled to do it. is it a form of creative self-expression? then that's the kind of art i adore.
does anyone remember the 2003 portland art center show "process"? i can find very little about it online anymore (damn the fickle web & bad organizations who don't archive things!), but this is what i wrote about it before i had an art blog:
"process" was an art show at the portland center for the advancement of culture [now called the portland art center]. an artist collaborated with a "documenter" responding with an equally artistic "documentation" of that artist's process:
- a painting with a timelapse animation (sven's favorite: over 12,000 photos were used!);
- a series of 7 paintings, a loose narrative of a car crash, with a music cd (this will apparently become a rock opera at the closing show);
- the penicillin corset w/ an accordian storybook;
- the muscles and tendons of man & the muscles and tendons of arm, with "samples" of the ingredients (sawdust, paint samples, diet pepsi, receipts) collected in jars w/ indexed, neatly-typed label tags. and while that was impressive, the documentation was vastly more extensive, including a montage of the studios, pix of the process, polaroid snapshots in baggies, and a map of portland which marked places & frequency of visitation. whee! (can you tell this was my favorite? it tugged at my ephemeral heart.)
btw, it was really cold in that space! if you go, bring a coat.
anyway, "process" is probably still one of my favorite shows ever & i was envious of the documenters. i would like to see another event like that or encourage it as a common method of artistic response. documentarians of the nw, unite!
posted by gl. | permalink | categories: exhibits & events, links
March 25, 2006
mass producing joints
by sven at 11:59 pm
A week ago I showed off my first successful brass "open hole double ball" joint. Since then I've been working on figuring out how to mass produce these things.
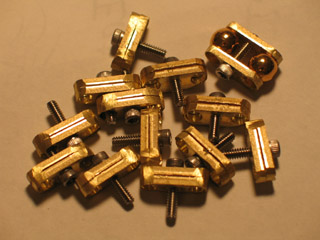
The photo above shows where I got to tonight. This is my second attempt... And I expect there'll be a third. When the process is perfected, I want to do a tutorial.
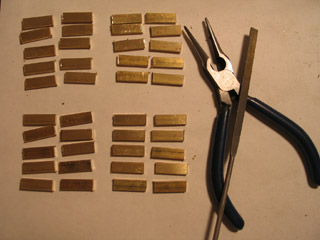
With my first attempt, I started by cutting forty 18mm-wide plates. That was a mistake.
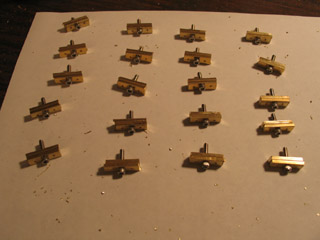
Problems with attempt #1: It was incredibly fiddly getting the parts in and out of the vise... The plates weren't always perfectly even with one another...
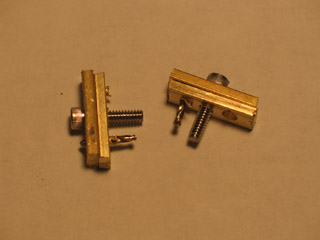
...And I broke two drill bits -- I believe because the drill would knock against the head of that screw as it punched through the brass strips.
Drat. I had a batch of 20 joints getting close to completion. But then I discovered the design (or rather, the process) was fatally flawed.
I was in the middle of a conversation with Gretchin, and suddenly stared off into space... Ah-ha! A new idea for how to mass produce these joints!
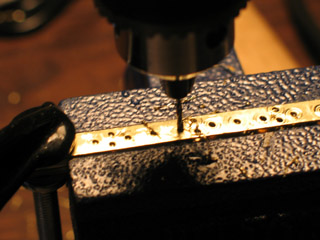
The gist: Rather than do one joint at a time, bind two strips of brass together, drill all the holes, and then cut the strips into pieces.
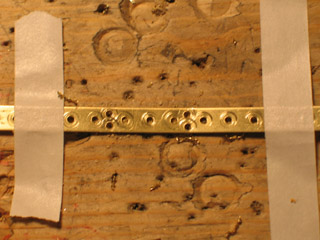
This time I made a template out of a thin piece of metal. It turns out that the template strip was too thin (it curled!) -- and I also drilled more holes than I actually need -- but the concept is sound.
When I got around to using the template to drill holes in the plates, I used lubricant for the first time. Just water -- but the difference was noticable nonetheless.
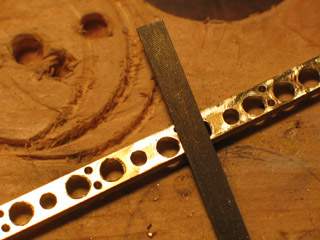
The K&S brand brass strips I'm using are .093" thick, 1/4" wide, 12" long. K&S has seven standardized displays that they send out to retail stores. The .093" thick stuff is only sold in their "jumbo" hobby metal display. I can name six stores in Portland that sell K&S -- but only one has the jumbo display.
I bought the last two strips in the store last Sunday. I used these up in the failed first attempt Monday. ...Waiting until Friday for the store to get new stock in was murder.
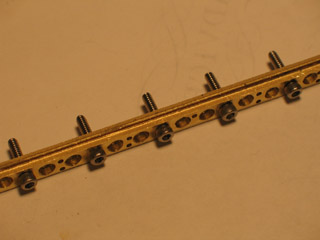
On the first attempt I used a fine-point Sharpie to mark measurements, and a hammer and a brass screw to start holes. For my second attempt, I used a metal scribe and a center-punch to make the template. It's my first time with these tools, and they helped a lot.
In the picture above you see the two strips fully drilled, and I've added 1/2" 4-40 stainless steel socket cap screws. Adding them in after all the holes have been drilled, I didn't have the same problem with breaking bits this time.
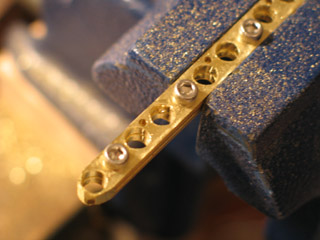
For cutting the individual joints off of the strip, I used a Dremel with a reinforced cut-off wheel. I tested normal cut-off wheels, and a jeweler's saw first... The jeweler's saw gave a nice hair-line cut -- but I broke two blades on my first two cuts -- so I'll be reserving that tool for finer work. The regular cut-off wheel made a cut 1/32" wide, whereas the reinforced wheel made a cut 1/16" wide. Given the amount of cutting I'm doing, durability won out.
Even with it being reinforced, I've worn one blade down from the size of a quarter (larger, actually) to the size of a dime -- and another splintered and flew at my face. Thank goodness Safety Boy is fastidious about wearing his safety goggles!!
An unforseen benefit of cutting the joints off of a strip: immediately after making the cut, I can round off the joint on one side. ...You see, this is such a time-consuming process -- every motion that you can eliminate from the workflow makes a difference.
I think I'm going to need 17 joints to make an armature. If they all prove functional, it looks like I got 13 done tonight. I may just try to salvage the remaining four from attempt #1.
--But there will be an attempt #3 -- and soon. The process is so close to being right...
posted by sven | permalink | categories: stopmo
March 24, 2006
mhcc calligraphy: class 10 (final project)
by gl. at 6:25 pm
today was the last calligraphy class at mount hood community college, which is the show & tell for final projects. i was worried because i got hit with a miserable cold this week that kept me on the couch for three days.
so when i finally roused myself into the studio last night after a trip to salem for a workshop i have yet to write about, i scrapped the amazingly dynamic nietzsche quote i had been planning on using and instead used a quote shaedra mentioned seeing at a friend's house. (at the time, she said, "oh, YOU could do that!" and my artist's way voice was, "no, YOU can do that!" because hey, who says you can't? :) but i thought this would be a neat little suprise when next we see her so i sure hope she's not reading this!).

["advice": what you don't see is the amazing shine on the "advice" & its swirls, nor the sparkles in the paper.]
because i was already feeling like i had to do something incredibly simple, i wanted to try a new technique (which isn't new to professional calligraphers or the newpaper person i was in a former life): a paste-up version, where i don't try to create a perfect original, but instead write the elements a bajillion times, pick the best ones, paste the elements together & photocopy it. this allowed me some flexibility in layout and control of the elements & the ability to add graphics.
even so, after doing originals for so long it's hard not to think of it as cheating, especially when, influenced by the amazing "hall of best knowledge" series, i decided to stretch it even further by adding the "advice" element taken from the universal penman (the original of which i got to see at the getty and its original, official title is outrageously long: The universal penman: or, The art of writing made useful to the gentleman and scholar, as well as the man of business. Exemplified in all the useful and ornamental branches of modern penmanship; with some necessary observations on the excellency of the pen, and a large number of select sentences in prose and verse; various forms of business, relating to merchandize and trade; letters on several occasions; accurate specimens of the oriental languages, and alphabets in all the hands now practis'd / written, with the friendly assistance of several of the most eminent masters, and engrav'd by Geo. Bickham. The whole embelish'd with beautiful decorations for the amusement of the curious.)
ahem. anyway. calligraphic exif: tape 2 nib w/ sumi on a fox river tablet, reduced 20% on brown sparkly paper, graphic element reduced 50%, then (and this is the part that wowed 'em in class) a layer of gold laser foil (that i bought from paper direct probably over 10 years ago) was applied over "advice" to make it look like a foil stamp (man, i wish the scanner would pick up shiny. i like shiny! i am such a magpie.).
sven worked his magic again and painted the edges of a 4x4 tile black (except all his recent metalworking also dusted the black with minute brass filings, adding to the sparkly effect), added a sawtooth hanger to the back and mounted the finished piece this morning while i was still unconscious on the couch, overcome with the effects of sleep deprivation and flu. thanks, sven!
the next round of mhcc calligraphy is uncial/blackletter/spanish round gothic, which i've already done, so i think i'll be taking a break for a while. i'm pleased to have done a whole year of study, but i slacked on this last class more than i should have (as you can probably tell from the lack of posts). i might get back into a PCC class in fall or take a PSC lettering workshop. either way, i should brush up on some skills before the October AOCC with denis brown! *sighs dreamily*
posted by gl. | permalink | categories: calligraphy, classes & workshops
March 22, 2006
tutorial: desktop ventilation
by sven at 4:55 pm
Many of us who are working on stopmo puppets labor in dungeon-like basements. Although we know that we should have "good ventilation" while working with toxics, it just doesn't seem possible -- so we play dumb. This is not OK!
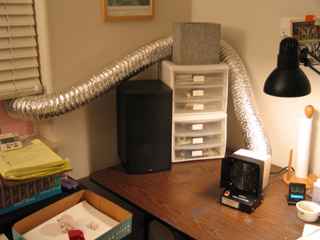
In this post I'll show you how to build your own desktop ventilation system. Please -- if you work with materials such as super glue, epoxy glue, epoxy putty, barge cement, turpenoid, acetone, or soldering wire while making your puppets -- strongly consider making a ventilation system siimilar to this one for yourself!
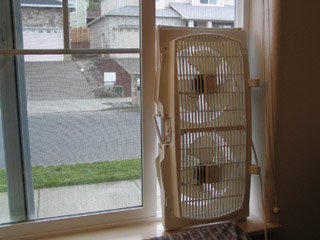
It takes a while to get new a ventilation system set up. In the meantime, at least put a fan in your window.
[Addendum: And be sure that the fan is sucking air out of the room, rather than blowing air in.]
When you're working on something toxic at a desk, you usually have your face right over the nasty stuff. Opening a window will help keep the fumes from building up in the room -- and using a fan to suck the fumes out will help even more. If you're just using a fan, though, you're still breathing in the fumes as they rise up from your work.
What you want is for the fumes to be actively sucked away from you, in a way where they don't go past your face as they escape.
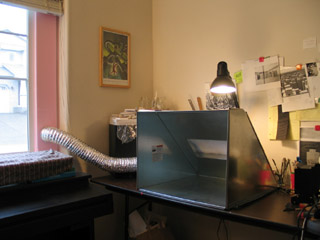
My first strategy for good ventilation was to purchase a Paasche hobby shop spray paint booth ($269 before shipping). But unfortunately... I HATED it!
The spraybooth takes up my entire desk. And although it's collapsable, it is not nearly as easy to set up as I had initially hoped.
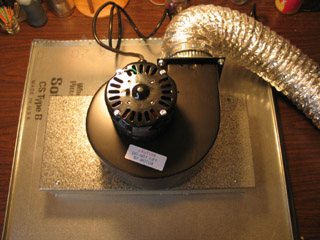
Storing this thing is another problem. Look at how huge that motor is! ...Much discouraged, I wound up returning the spray booth to the store where I had purchased it.
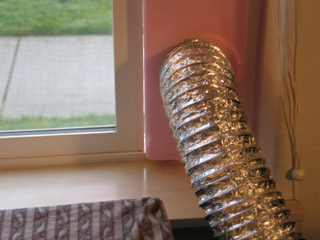
One thing about the spraybooth solution that did work well was the way that I vented it out the window. The insulation foam doesn't have to live there forever; I just pop it out of the window between work sessions. [In this picture it looks like there's a crack of light between the foam and the sliding window -- but I realized later on that the foam could fit even more snugly if I just pushed it into the window frame a little farther.]
...After finally admitting to myself that the spraybooth wasn't going to work out, I resumed research. Luckily, right around this time I was exploring soldering. I stumbled upon this useful quote on the Art Glass Association's website:
"Most fluxes contain zinc chloride that is harmful to the skin and eyes, and toxic if ingested. Read the labels on all chemicals you use for safety precautions. Flux also produces fumes when it is heated (as in soldering) and you need to work in a well-ventilated area.Well-ventilated means MOVE THE AIR - DON'T JUST OPEN A WINDOW. There are small, portable fume removers made specifically for eliminating flux fumes, available through your local stained glass retailer. If you find that you are getting frequent headaches or sinus problems, you may be breathing fumes. One rule of thumb - if you can smell what you're working on, you probably need to move the air a bit more, or invest in a fume remover."
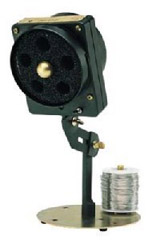
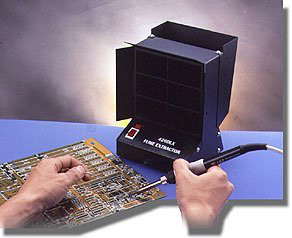
This site on soldering safety recommended the Edsyn Fuminator for soldering fume extraction. That was the most explicit product recommendation I could find. Hunting around on Amazon.com and elsewhere, I found that the Fuminator's main competition seems to be the Xytronic 426DLX fume extractor. ...So the problem became how to choose between the two.
What's important here? First of all, we need something small that won't take up a lot of desk space. Folks doing soldering (unlike folks doing airbrushing) have this same need -- which is why fume extractors are also a good option for puppet-makers. Second, we need something that has powerful sucking capabilities.
Airflow is measured in CFM (Cubic Feet of air per Minute). According to this Fuminator product info sheet, "the maximum air flow with both filters installed is 21 cfm." According to this Xytronic product info sheet, the 426DLX's "max. air volume" is "95/115 CFM". So, although the Fuminator has a sexier design and is more expensive ($79.95 at Amazon.com), it appears that the Xytronic 426DLX is really the better purchase for our purposes.
[This write-up on the Paasch spray booth says that it "provides approximately 80 to 100 LFM air movement." That's Linear Feet of air per Minute... These companies certainly don't make comparison-shopping easy!]
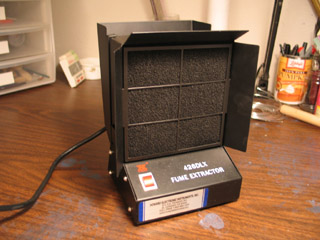
At present, the Xytronic is being sold for $59.95 at Amazon.com. With shipping and handling, it cost about $64, and took about a week to arrive.
One thing that I did not 100% understand when I ordered the Xytronic is that tabletop fume extractors aren't intended to be attached to a hose for venting. The fan sucks air through a carbon filter, and simply vents out the back. This raises a question: Would it make more sense just to buy a simple fan? I don't think so. What we need is a very small, very powerful fan -- which is what the fume extractors have. It's hard to find plain fan with these qualities.
...And, even though the fume extractors weren't built to attach to ducting, I feel it's easier to attach ducting to these than it would be to a fan. So I'm sticking with the Xytronic.
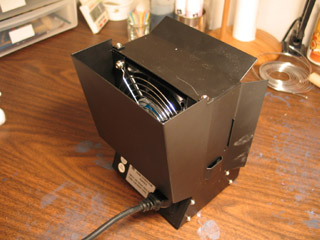
As you can see here, the Xytronic has a plate on its back that directs air upward and out of a slot on top of the device.
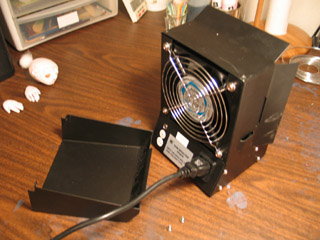
Removing the back plate was a simple matter of taking out a few screws. In order to maximize air flow, I also chose to remove the filter. The filter is supposed to be replaced every month, so the device is built to make removal of this part easy.
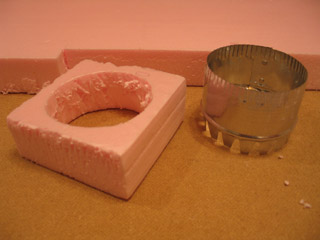
What we need now is an adaptor, so we can attach ducting. I started by measuring the back of the Xytronic, and then cutting out a square of insulation foam that matched its dimensions.
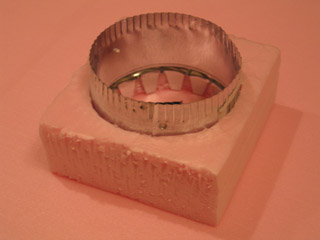
If you go to Home Depot and look in the aisle where they carry air ducting supplies, you should be able to find an adaptor that looks like the one above. Trace the adaptor's outline onto the foam, and then cut this circle out with a steak knife. Trim as needed so you can fit the adaptor snugly into the hole.
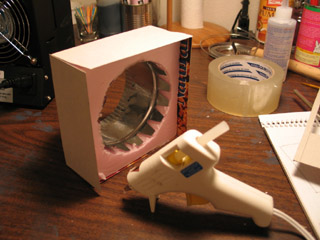
This next step is mostly just to disguise the ugly pink foam. I measured the sides of the foam square, and cut out rectangles of cereal box cardboard to cover them. The cardboard is wider than the foam on three of the sides so we can easily fit it around the Xytronic.
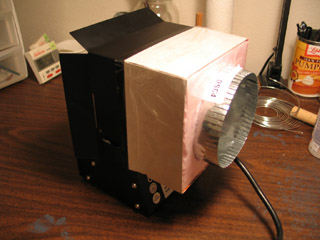
Press the pink foam square against the back of the Xytronic. The cardboard lips should wrap around the top and sides of the device. Now attach this adaptor that you've made onto the fan using clear packing tape. Seal up any cracks you notice where fumes might escape.
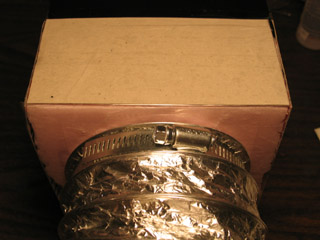
The ducting is the same kind that comes out the back of a clothes dryer. Attach it to the tin ducting adaptor using a hose clamp. The foam that sits in the window frame also has a tin adaptor in it, and the ducting is attached with a hose clamp there, too.
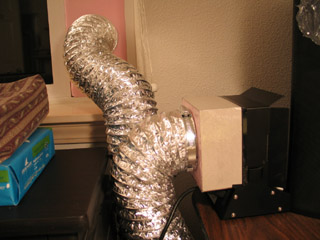
Here's the completed desktop ventilation system, tucked away at the side of my desk. The ducting is still a bit awkward -- but it's a far better solution than the spraybooth.
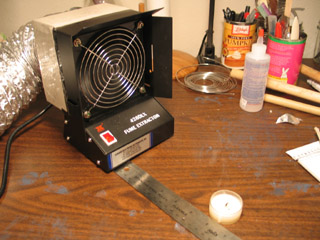
But wait! There's one more thing that you need to do. You need to understand the range at which the ventilation system is effective.
Turn on the Xytronic. Light a candle, and then blow it out. If everything is working properly, the smoke will be sucked into the ventilation system. OK -- now lay down a ruler. How far away can you pull the candle before the smoke just wafts up into the room?
I found that the suction is only effective when the candle is within 6 inches of the fan. That's not really very far -- but remember, this system is designed to deal with small jobs, like when you're using epoxy glue or soldering. Be mindful of the range when you work -- and even when the Xytronic is turned on, be sure to wear a respirator rated for organic solvents for additional protection.
Good luck, and play safe!
posted by sven | permalink | categories: sculpture, stopmo
March 21, 2006
art updates
by gl. at 11:52 pm
i've added art to several of the CREATA workshop entries:
- communicating through visual symbols
- self-care for therapists
- dreams, active imagination & creativity
- exploring creative arts therapies modalities
- children's graphic development
- intro to art therapy
also, another weathergram:

now me & my sick self will toddle off to bed. today at creative job club we developed a major paradigm shift for artist's way promotional activities, but it'll be a few months before it becomes something tangible...
posted by gl. | permalink | categories: administrivia, calligraphy, classes & workshops
March 18, 2006
brass "open hole double ball" joint
by sven at 10:43 pm
Very exciting! I just this afternoon created my first really successful "open hole double ball" joint!
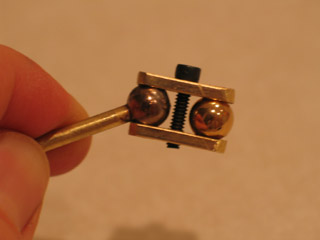
This design was inspired by Lionel Ivan Orozco's tutorial on how to make an open hole double ball joint and by a link off LIO's site that describes a similar design made of brass. It's a lot like a "ball and socket" joint -- but the balls just sit on top of the holes, rather than being recessed into sockets.
I'm scheming to make a full puppet armature out of these joints. Expect to be hearing more about them... ;-)
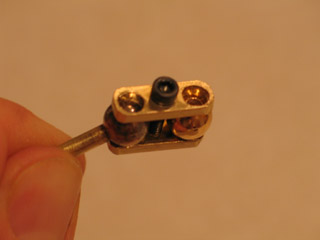
If all goes well with these joints, I'll probably do a full write up about how to make them. In the meantime, here are a few details...
The balls are 8mm hollow brass beads that I found at a bead store. The brass rod and the brass bar (for the sandwich plates) are K&S brand materials. The rod is 1/8" diameter. The bar is 1/4" wide and .064" thick; I cut it to be 18mm long using a Dremel cut-off wheel. Beads are measured in millimeters -- which led to this weird combination of metric and English units.
The trick to making the sandwich plates was to screw them together before drilling the holes that seat the beads. The screw is 4-40 and 1/2" long; it has a cap that can be turned with a hex key. I threaded the middle hole myself, using a tap. To allow the plates to move correctly, only one side of the sandwich gets tapped. After all the holes were drilled, I rounded off the bar's corners using the Dremel again.
I used a power drill to enlarge the hole through the bead. Because the bead is hollow, I was able to snip off a little bit of solder and actually put it inside the bead with the rod. I heated the bead with a butane micro torch (actually my brulee torch!) to melt the solder and seal the bead in place. I didn't round the end of the rod that pokes out of the hole -- but the joint seems to work very well, nonetheless.
posted by sven | permalink | categories: stopmo
March 16, 2006
artist's way open studio review (march)
by gl. at 11:59 pm
wow. what a night! lots of creative chaos and connections, a perfect way to celebrate the first anniversary of intuitive collage at scarlet star studios! the studio was perfectly packed and we made more collages than ever (21!) with an abundance of cupcakes. some classic faces and new additions, all with generous hearts. we even got a visit & a dvd from the woman who made a brief film of us for her documentary film class last time!

["i contain multitudes": click the image to see the other collages]
i was almost too busy to make a collage tonight! the largest circle is actually a CD that sticks out a little past the right of the card and the topmost circle is a typewriter key that says "shift lock" and will look better when the glue has completely dried. it definitely has that "worlds within worlds" or "all potential futures" sort of vibe.
the title of this piece is from walt whitman's "song of myself":
Do I contradict myself?
Very well then I contradict myself,
(I am large, I contain multitudes.)
next month i'm changing the format a little: instead of just straight intuitive collage, i'll be including a theme based on an artist's way chapter (april=strength). i might throw in a writing exercise, too, or simply a more coherent show&tell option at the end of the night.
posted by gl. | permalink | categories: artist's way
March 15, 2006
unitarian artist's way: week 8
by gl. at 11:40 pm
i can't believe i haven't checked in about the unitarian artist's way lately, and tonight was our last night. we were to share some of the art we've been doing, so someone brought a guitar, someone brought a banjo, someone brought a bright fabric-patterned cloth, someone brought a chapter from a novel, someone brought a book she'd made for her grandmother & some sculptural driftwood pieces. someone even brought us gifts: stones she had painted with the word "zhong dao" (balance) and a chop which represents longevity.
i brought a weathergram i made at psc monday night and the printmaking pieces i made last month:
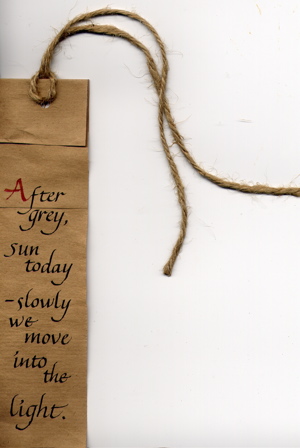
(these look so much better in trees, but we don't have any! harumph.)
posted by gl. | permalink | categories: artist's way, calligraphy
March 13, 2006
creata: healthy vibrations
by gl. at 12:47 am
this is the eleventh and final in a series of posts about workshops sponsored by CREATA during Creative Arts Therapy week. i'll go back & add images to these afterwards. session date mar09.
this intro to music therapy was an energetic & lighthearted session to end the conference with. the same music therapist from "establishing a private practice" facilitated.
we had about 12 more people than usual -- a pacific university instructor had brought her students and they trickled in late for the first 15 minutes and many looked like they'd rather be somewhere else, especially the boys, of whom there was a larger proportion than i would have expected.
all the toys came out for this session: several baskets of drums & rattles & maracas & tambourines & sticks & spoons & ratchets & bells & and oddly shaped unknown instruments were offered for us to choose from in the middle of the room. i chose a paddle drum because i'd never seen one before and i wanted to see how they sounded: if i ever wanted to buy some, they'd sure take up a lot less space in the studio than the cylinder drums i keep thinking of getting.
i've not had success w/ music exercises yet, but i'm relieved that this workshop gave me some ideas about how i could go about it next time:
warm up by making sounds from pictures: screaming, barking, sleeping, etc.
let people choose their own instruments. let them feel & explore the instrument. ask them to explain why they chose them. for people who aren't very comfortable playing w/ music, having an intermediary in the form of an instrument is important, especially as the instrument they choose will be their "voice" for the rest of the exercise. (this also means one must have a variety of instruments to choose from, which could get expensive. if everyone contributes one, this might be a good birthday present request....)
play for a bit individually: play regularly, play loudly, play softly.
go around the circle, each person saying "hello" to the person next to them just with their instrument.
play 4 beats at a time together, then 4 beats with one person solo: take turns going around the circle 4 beats together, 4 beats solo.
then move into a full-fledge drum circle, where you add a person every four beats until everyone is playing at once. drum circles i can do. :)
the opportunity to play as a chorus and then small solos is quite a nice technique. if you move into non-mediated music (i.e. clapping, voice, etc.), begin with a chant (hers was "welcome to our sacred space/thank you for our sacred space" but i'd have to think of something else :), then move to clapping & snapping (lap, lap, clap, clap, snap, snap, beat), then do the clapping and the chanting together. you can model a hey-ey-ey-o sort of call and response while doing the drum circle, too, and add sign language to translate singing to movement.
during the "establishing a private practice" presentation she showed us a video with an instrument that intrigued me and she remembered my interest and brought them in for us to play with! tone chimes are freaking awesome: portable, one-handed and with a beautiful sound, i would buy some today if they didn't cost (wait for it) $700. still, it was a lot of fun to play with them. since our tables were in a horseshoe shape, she grouped them into 5-note chords ("this is where your music theory comes in handy," she said) for each of the three sides and she orchestrated our chimes to ring while we sang "peace like a river." since there weren't enough tone chimes to go around, for the next verse i handed it to one of the boys next to me, and he was amused but also delighted at how delighted i was. by the end of the session, everyone was smiling.
posted by gl. | permalink | categories: classes & workshops
March 12, 2006
creata: communicating through visual symbols
by gl. at 10:04 pm
this is the tenth in a series of posts about workshops sponsored by CREATA during Creative Arts Therapy week. just one more to go! session date mar09.
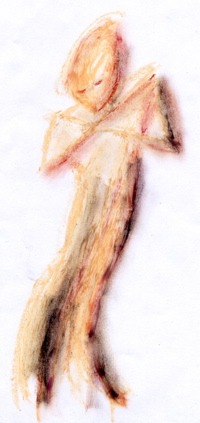
the rest of the title for this session was "The Use of Stimulus Objects in Working with Cognitively Frail Individuals" and it should have been my first clue to skip it: by "cognitively frail," she mainly meant "geriatric." a speaker from vancouver, she had an odd affect and i couldn't often tell when she was being funny or serious. with her red hair and tall boots, it was like being lectured by tori amos. but the most frustrating part was that we didn't seem to get to "communicating through visual symbols;" after talking about the causes & effects of dementia, we only talked about "the use of stimulus objects" -- participants finish a half-drawn image or make a story/relationship between two images. we were given a HUGE packet about memory disorders and after a guided meditation through a museum, we were asked to draw a statue that represented how we were feeling right then:
posted by gl. | permalink | categories: classes & workshops
creata: establishing a private practice
by gl. at 7:02 pm
this is the ninth in a series of posts about workshops sponsored by CREATA during Creative Arts Therapy week. just two more to go! session date mar09.
when i saw there was a to be a panel on "establishing a private practice" i was very excited. however, i expected more than two people on the panel, one of whom it turns out i already know -- one of the people running the unitarian artist's way! the other was a very gregarious music therapist.
i learned a little more about the unitarian artist's way facilitator, who also has ties to penn state, may be connected to pwcl, and left a job that had her feel like she was wearing blinders, simply moving from crisis to crisis. and the music therapist will be an excellent resource, i think -- later she came in for a separate music therapy session that was very useful.
but this particular session was less practical than i thought it would be. some bits from the art therapist:
- spent the first 1-3 years advertising: flyers w/ cards at ocac, pcc among others
- 3-5 years later still getting calls
- it takes seeing your name 7-9 times before they remember you (if i use a garden metaphor, this is like preparing the soil & planting; germination time is different for all plants)
- $80/hour, though can slides to $30
- comfortably at half-time, resisting the urge to fight for more, more
- "groups seemed like a good idea at the time, but sometimes they're a little difficult to pull together." (amen, sister!)
some bits from the music therapist:
- use score, a resource for small businesses
- music therapists don't have nearly as much of a gauntlet to practice in an official capacity as other art therapists: they just need a BA in music, a 6-month clinical internship & passing an exam.
- she recommends the use of an llc instead of a sole proprietorship
- find an advocate
- always tell people what you do
- speak everywhere and be bold: when can we schedule a time to meet w/ you and your group? (this made me think about speaking at rob's class; having a clear, approachable topic i know well is a good way to begin. how many people could benefit from knowing more about the morning pages concept?)
the music therapist took a metaview that is similar to what vicki asks us to do in the creative job club: why are you doing what you're doing? if you know that, you can evaluate all your decisions based on whether they further that goal or not. hers is "to serve."
both panelists recommended staying connected w/ "your community," and that's where i have trouble, because i don't feel i have one yet. art therapists are what i consider a "sympathetic industry," but i'm not an art therapist (though creata is inclusive and specifically values having people involved who are not art therapists). artist's way facilitators tend to only do artist's way part time and/or are too flaky to be considered a community; i've tried getting us together before without any success.
none of the other topics felt particularly advanced to me, but this one was thick w/ a soup of acronyms & clinical terms & references to education programs & licensure requirements (i learned that one of the reasons you might want to be licensed is so that you can accept insurance payment & referals -- though insurance payments are apparently their own nests of unhappiness).
posted by gl. | permalink | categories: classes & workshops
March 11, 2006
won't go slow so's not to focus
by gl. at 11:09 pm
hey, look! a non-creata entry! instead, a day packed with art activities:
i was going to go see shu-ju's work in the most recent print arts northwest show, but when i went to check on the address i realized they were having a fundraiser & demonstration at barnes & noble, so went to pick up one! hundred! demons! and visual journaling: going deeper than words. which worked out well, because we got to talk to shu-ju who helped sven figure out how to build a larger registration plate for the gocco, and i found out laurie is still selling gocco supplies.
on our way to collage to take pix of the show, we dashed into foster & dobbs, a food store i've been wanting to check out w/ sven. we walked away with caramels, cheese crackers & a japanese-inspired chocolate bar w/ ginger, wasabi & black sesame seeds.
we finally got pix of the 4x4 show! the owner remembered me and asked me about the inquiry from the OCADSV, but alas, i haven't heard from them yet. i'll follow up w/ a phone call this week.

4x4 display
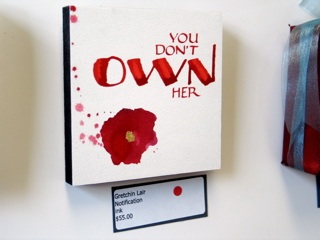
"notification"
i also submitted a piece to portland modern's "saturation" issue today. i sent one of the star-based printmaking pieces i made last month:
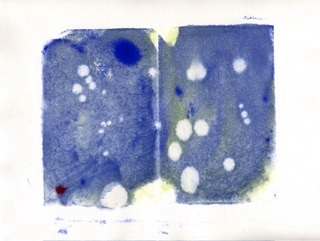
"atlas céleste," named after discovering some amazing rare books at the us naval observatory library collection sitewe stopped by the ace pearl hardware store (16th/glisan) because sven has been wanting to check it out and he was on the hunt for a tiny tap, anyway (4-40, for those for whom such details matter. making your own threaded holes is still magic to me). it looks to me like they have many of the same things as uptown hardware, which i adore, but it's closer to the creative job club so i may stop there more often.
then we had dinner at pizzicato w/ michaelmas, and then we all headed to...
nochnoi dozor (link in flash, sorry). i had very low expectations of this movie but found myself enjoying it immensely: excellent cinematography, intriguing mythos (i love the Gloom), artistic subtitles and room for replay. there was even a buffy reference (and you haven't lived until you hear buffy say "get out!" in russian).
also, on friday i checked out the ceramics show "about place: the signature of a kiln" because it was in the mt. hood community college art gallery which is right next to my calligraphy class. one of my artist's way independent study students is a ceramicist and is almost giddy at all the nceca activity this weekend.
i have two and a half more creata sessions to write about & need to prepare for my tax appointment monday. but tonight, now, sleep!
posted by gl. | permalink | categories: calligraphy, exhibits & events, printing
March 10, 2006
creata: self-care for therapists
by gl. at 11:41 pm
this is the eighth in a series of posts about workshops sponsored by CREATA during Creative Arts Therapy week. just three more to go! session date mar09.
i went to this session in part because i figured some of it would be adaptable to artist's way participants, as one of the artist's way goals is learning how to treat yourself well. checkov says, "if you want to work on your art, work on your life," and i say that if you want to explore creative self expression, first you need a self to express. but i also went because i know the presenter and after recovering from a major surgery, i was glad to see her up & around again.
many places have a culture of competitive deprivation: who's working hardest? who's staying latest? who's too busy to take sick leave or vacation? certainly i did my share of that at csusm before i fled san diego. what would happen if we competed for self-care? apparently one of the other participants had a 3-month focus at her workplace: everyone got charts & stars & rewards, along with breaks for yoga and access to massage. i'm alternately amused and appalled that while i treat myself better than i did when i was in academic technology, i'm still incredibly busy, working from deadline to deadline, rarely stopping to rest or dream (or, um, exercise). blogging is a form of self-care for me: not only does it help keep my creativity newtonian, but it forces me to acknowledge everything i've done so far, giving myself credit for what i have done instead focusing on what i haven't done.
i like the way this was worded: consider setbacks a form of feedback rather than failure. and i smiled today when i realized that if i was going to attend a workshop w/ plenty of glue sticks & neatly-labeled supplies, this would be the place.
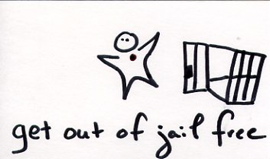
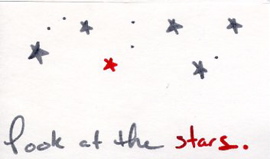
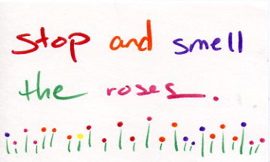
the experiential exercise was creating a "permission slip" for us to use when we needed it. instead, i created several cards that could be tucked away into my daily file or for sven to set gently atop celeste: "can gretchin come out to play?" "get out of jail free," "breathe," "powell butte misses you," "stop and smell the roses." i could see creating a pack (31?) of these to make sure i do something each day. they're really kind of cute, sort of like oblique permissions.
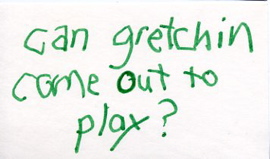 2.
2. 
3. 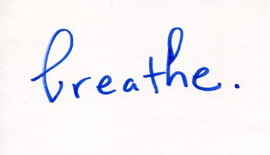 4.
4. 
5. 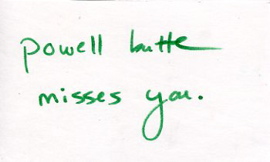 6.
6.
melanie, you would have really liked this session because the presenter brought all her art journals to share and they were very good. one of them was a journal inspired by lynda barry's one! hundred! demons!. she also recommended twyla tharp's the creative habit which has been on my wishlist for a while now, and visual journaling: going deeper than words, which is the first visual journal book i had seen and my artist's way facilitator pamela used. also: what is art for?, art is a way of knowing and creativity: flow and the psychology of discovery and invention.
posted by gl. | permalink | categories: artist's way, classes & workshops
March 9, 2006
creata: dreams, active imagination & creativity
by gl. at 11:34 pm
this is the seventh in a series of posts about workshops sponsored by CREATA during Creative Arts Therapy week. session date mar07.
i was really hopeful about this session so in some ways it was the most disappointing when it turned out to be fairly uninspiring, in part because the experiential piece could have been a concrete supplement to her abstract outline and confusing powerpoint presentation, but instead it ended up as a simple "recall a dream & draw it" exercise. we didn't even try to work through the worksheet she gave us, which would have at least acclimated us to her process. also, the presenter's partner typed on his laptop while she was presenting and while we were working: very distracting!
luckily, i had two dreams the night before. the first was about this very large collective of angry cats in my garage, and i knew if they got out it would be Very Bad:
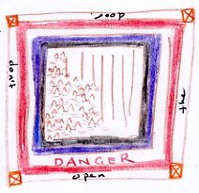
the second was about opening door after door after door in the closet beneath the stairs:
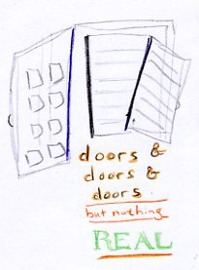
these aren't supposed to be amazing drawings. one of the great things about art therapy techniques is that they are less about developing your visual acuity and more about developing your personal visual vocabulary. every art you do helps with your primary art: these are the seeds of poems and further art exploration. starter culture, if you will.
posted by gl. | permalink | categories: classes & workshops
creata: exploring creative arts therapies modalities
by gl. at 10:32 pm
this is the sixth in a series of posts about workshops sponsored by CREATA during Creative Arts Therapy week. session date mar07.
originally a session titled, "when words heal: writing together through cancer," this was re-engineered at the last minute because the instructor had a conflict. this caused panic amongst the therapists, many of whom were counting on it to complete their ceu requirements. getting a new AATA-approved course together within a day seemed unfeasable, but creata somehow managed a miracle and while it suffered a little for its rushed creation, it all worked out pretty well. attendance was about half what it was in previous sessions, though.
first we listened to the beatles' the long and winding road and were asked to create a visual piece in response to it. [as an aside: i just read a quote from paul mccartney that's amusingly relevant to the workshop: "It's rather a sad song. I like writing sad songs, it's a good bag to get into because you can actually acknowledge some deeper feelings of your own and put them in it. It's a good vehicle, it saves having to go to a psychiatrist …" hee. :)]
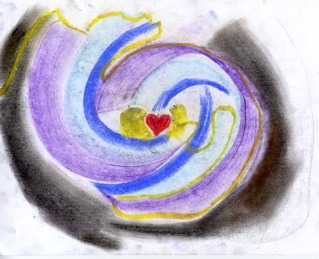
then we were asked to create a scribble drawing, which i haven't done since the first creata workshops though it's an exercise i often give to artist's way participants. a scribble drawing involves simply putting a squiggle down on paper and then squinting at it until it becomes something the way you you do w/ clouds, then filling in the details. i drew a random squiggle that became a stained-glass heron.
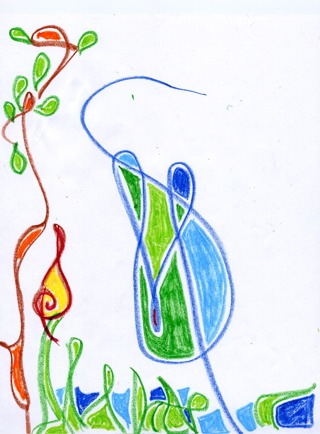
then we had a choice of creating a response to that piece in a medium we were uncomfortable with, creating a story from a list of words, or continuing to work on the piece. i chose to create a music piece because it's the medium i'm least comfortable with. alas, none of the musical instruments really spoke to me (sticks, rattle), so i ended up creating a soundscape that was meant to be vaguely episodic for the heron. each episode was transitioned by a chime:
- water lapping at the shore (water poured between two cups)
- the rustling of tall grasses (sugar packets shaken)
- ducks flying overhead (our squeaky table shaken a particular way)
- water lapping at the shore again
- frogs (the squeaky table shaken from a different angle)
- water lapping at the shore
- silence
i was pretty self-conscious while doing this: it's sort of silly and i wanted to be unobtrusive, which was difficult since i was the only one in the room doing a piece with sound. and even though i know it definitely sounds silly, i think it turned out better than i expected.
afterwards, i asked if anyone there had had a successful music/sound exercise, and nobody had, but there was some handwaving about how that would be the domain of music therapy. i forgot to mention that art therapists are also divided by specialized domains: "art therapy" primarily means "visual art," while "creative arts therapy" applies to the other flavours, like dance therapy, drama therapy, music therapy & poetry therapy. i prefer "expressive arts therapy" as an umbrella term to mean any sort of art one can use to express one's self, but some people reserve it as a term to attach to drama & dance.
everyone has their niche, but i believe in a very multimodal approach to artist's way (and, well, pretty much anything, really), so i always want to know about all the art therapies.
posted by gl. | permalink | categories: classes & workshops
percy wakes up
by sven at 1:14 am
Tonight I got set up and did some motion tests with the new puppet, Percy.
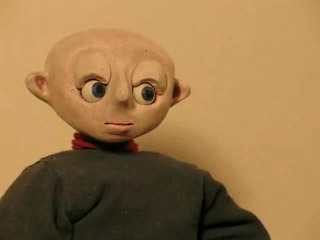
In my opinion, the first clip was the best. The eyes more than anything else make Percy live.
Problems:
- using just sticky wax, one of the eyelids fell off a few times (a plug-in system might have been wiser)
- the eyeballs catch and don't want to turn smoothly
- it looks like the facial paint smudged an eyeball; do I need varnish?
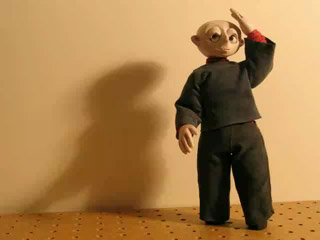
In the second clip, I wanted Percy to smack himself on the head -- as if to say, "What was I thinking?!"
Problems:
- jerky, jerky, jerky...
- I only tied down one foot -- and it shows
- the pants hang so low, they almost entirely cover the shoes
- when the head leans back, there's a big gap between the neck and the body
- is there a camera flicker? --or did my shadow effect the lighting?
- the eye movement is unmotivated
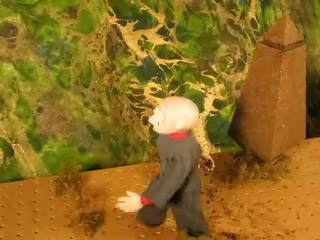
...And, of course, I had to try a walk cycle. Trying to make things a little more interesting, I dressed up the set a bit with stuff I got from Loose Ends back in January, and had the camera shoot from above.
Problems:
- dang it's hard to keep the head moving in a straight line; guess I need a surface gauge
- when the arm moves forward, the shirt sleeve pulls up and shows a lot of wrist
- the shirt also wanted to ride up and uncover the small of his back
- I tried to make sure I was bending the limbs, but he still looks pretty stiff
After all the effort that went into making this puppet, it's hard not to be a little disappointed as I discover design flaws. Still, the point is to learn -- and I can't complain on that account. I learned a helluva lot making this guy.
posted by sven | permalink | categories: movies, stopmo
March 8, 2006
creata: writing to health
by gl. at 9:59 pm
this is the fifth in a series of posts about workshops sponsored by CREATA during Creative Arts Therapy week. session date mar07.
the most dynamic and interesting presentation so far was from the well arts institute, which talked about a project called "performing wellness," developed from a artists repertory theatre outreach project. essentially, members of a targeted population (e.g., cancer survivors) learn to write plays about their stories, at which point, with the input of the author, they are professionally cast, directed & publically staged, providing an opportunity for catharsis and witnessing.
one of the primary tools they use is something they call "wild child writing," which is very similar to the morning page exercise i just did w/ rob's class). wild-child writing is topic-directed, stream-of-consciousness writing. the goal is to write right past the barriers their internal censors try to erect, to write despite their self-criticism, to learn how to recognize their own voices. at that point, they can begin to work on their plays. there is no critiquing of the work done in this project, nor can a participant use words they may have already written about the event.
during the workshop, we tried the wild-child writing three times: once with the prompt "right now i am feeling," then with the prompt "i am water" and finally with the prompt "i am earth." then we highlighted three words and three phrases in each writing and using only those combined words, created a poem:
i am earth
i make breath and dreams
creatures you have yet to meet
i keep you from the sky and you resent that
but i have no quarrel with the sky
my mountains pin me to her
because she has no hands to hold me.wait. this quake grows slow, thunderous.
what is this language i speak?
it is the rising and falling of breathing
heaving like birth
the taste of sour and salt.
blood, moon, heart.
one of the things the presenter wanted to make clear was that while "performing wellness" is therapeutic, it is not therapy (have you heard that somewhere before?) and they had a great document i may need to adapt for my own therapy vs therapeutic statement:
the creative process vs therapy
differentiating performing wellness from therapy
- we approach each person as a writer or an artist, not a client or patient.
- the focus is on creating something, not what it means or even what it says.
- the facilitator has no expectation on outcome and is there as an artistic leader.
- the artist can be the audience to his/her story (vs. the focus of the story)
- the stories extend beyond the [individual] to the public. it is shared by a community.
as someone with a theatre degree that's just sitting around gathering dust, this presentation made me realize that what i've been waiting for in theatre is a culture of compassion rather than competition. there is something amazingly powerful in acting and telling someone else's story, and egos just get in the way.
in artist's way we do an exercise inspired by playback theatre, and it's always an unexpected delight for the players & the teller to work together. it's a late-stage exercise after participants have developed trust in each other, so there's a fair amount of empathy & benevolence instead of pride & prejudice (ha! please forgive me the pun), which creates a very satisfying experience for all involved.
i was so impressed with this presentation i offered to volunteer for the well arts institute: i gave the presenter my card and she wants me to send her a resume. wish me luck!
(also recommended by one of the very nice people i connected with at the conference (hi, alecia!): what i want my words to do to you, a film about a similar program for women inmates.)
posted by gl. | permalink | categories: artist's way, classes & workshops, writing
creata: hitec phototherapy group
by gl. at 4:09 pm
this is the fourth in a series of posts about workshops sponsored by CREATA during Creative Arts Therapy week. session date mar06.
arts therapy is a field primarily dominated by women. the presenter for the hitec phototherapy group is the only male presenter this whole week, and was the first to run his entire lecture from a powerpoint presentation in that style i hate: reading each of the slides to the audience. he obviously knew his stuff, but engaged with the computer more than he engaged w/ us.
this was, however, the first session that brought tears to my eyes. the phototherapy group targets troubled children ages 4-13 (average age=7 or 8) and has them create pictures or videos that represent their past, present & future. most of the children have been traumatized and abused and create gut-wrenching images. a particularly tragic sequence involved dolls: the title for the past was "i am scared." when i saw the present image and its title "i am the worst kid," my heart simply broke.
the presenter says he keeps the groups limited to four and says that teenagers in a group with younger children are a "disaster." ironically, though he's very firm about doing the entire still photography process manually, videos are created on an imac. he says he has a knack for how to write grants to fund this, and i felt everyone else in the room sigh wistfully.
posted by gl. | permalink | categories: classes & workshops
March 7, 2006
creata: holding memories in clay
by gl. at 7:37 pm
this is the third in a series of posts about workshops sponsored by CREATA during Creative Arts Therapy week. session date mar06.
this presenter projected a casually intense presence (if you can grock the contradiction), both warm and strong, and she walked us through a couple of exercises using crayola model magic.
we began with a small white ball and integrated chunks of red, blue & yellow to it -- and then we were asked to remove the chunks, but of course you can't, not anymore than you can remove the trauma that's occured to someone. so then we made an object that represented someone or something we had lost. initially i began with an odd creature roboamn might have made, but ended up with a mobius strip that resembled something brian gave me once, which eventually became a ball like a tangled knot.
model magic is weird and kinda cool: it's squishy like foam and pulls apart like a marshmallow circus peanut. you can blend colors and it moves & sticks well. its biggest fault is that it smells a little funny, though mine mostly smelled like bbq after lunch. ;) and even just handling the texture makes my teeth itch. you're supposed to be able to paint it when it dries, but mine's still a little soft over a day later.
(random: an interesting distinction between mourning and grieving: mourning is visible, grief is internal.)
posted by gl. | permalink | categories: classes & workshops
creata: children's graphic development
by gl. at 9:49 am
this is the second in a series of posts about workshops sponsored by CREATA during Creative Arts Therapy week. session date mar06.
this was a much better presentation -- the woman who presented it really knew & loved her stuff. this is the same woman fror whom i dropped off my flyers for the information table when her dog bit me, and the first thing she wanted to do was check out my hand, which is doing pretty well by this point. the irony here is that by this time i had discovered the flyers weren't on the information table, so it was a good thing i had brought more with me! :D
there was an interesting bit about choosing different types of mediums for different intents, or "prescriptive materials," and it's things like this that are the reason why i attend CAT week. on a continuum of controlled to expressive/fluid, different activities & mediums & colors & positions & tools evoke different emotions for participants and choosing the rights ones is a big part of your job. also, there's a difference between "uncovering" and "building" activities and what sorts of themes they tend to evoke. i knew this intuitively, but it was nice to see it all laid out.
i knew many of the best practices for children could be adopted or adapted for adults, including this excerpt from "conditions for creative growth," which i feel very much guide the ways in which i've tried to use the studio for artist's way:
- appropriate & maintained materials
- appropriate & welcoming space
- predictable times & ritual
- order, consistency & privacy in space & supplies
- physical safety (non-toxic materials & sturdy furniture) & emotional safety
- respect for & interest in each person's individual creative process & art (no "rescuing")
- encouraging expression rather than performance: "convey that you believe pleasure [in art] is possible and powerful."
the experiential part of the program had us approximate the drawing style of a particular age group. this is where pix would come in handy, because some of the stuff i made is awesome, but we didn't have enough time to do all the stages so we just did three. :)
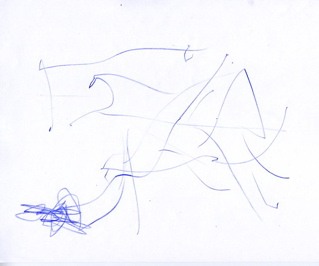
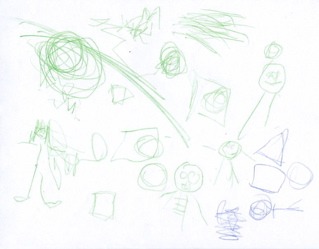
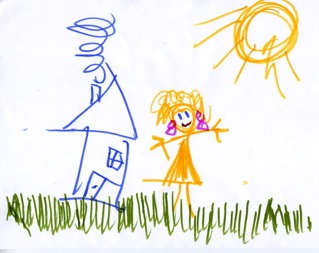
drawing earlier than these stages doesn't mean your child's a genius, and in fact, given too much praise, your child may begin to view art as a performance rather than a source of creative self-expression.
at some point, the presenter was talking about "accessing information available in your non-dominant hand" and then caught my eye and surprised me by saying, "right, gretchin? gretchin teaches an artist's way class and she has some flyers available on the table." *blush*
posted by gl. | permalink | categories: artist's way, classes & workshops
creata: intro to art therapy
by gl. at 12:24 am
this is the first in a series of posts about workshops sponsored by CREATA during Creative Arts Therapy week. session date mar06.
this year we're at the kennedy school, and it's great to have everything in one location. and with mcmenamin's emphasis on art, this is a pretty ideal space. i've gone to CAT week for three years now (i went to the first one the first year i moved to portland!) and even just last year we all fit around a conference table at the davis business center. this year there are consistently about 35 people in the room for each session (4 sessions today).
we began by introducing ourselves, and i'm so glad creative job club has helped me hone my introductory speech. a surprising number of people are here just for the continuing education credits and another surprising number of people said things like "i don't have a creative bone in my body," or stated they weren't artistic, which made me wince. if the art therapist doesn't believe, who will?
i was disheartened when the very first question from the audience was "can you call yourself an art therapist without a degree?" because if you've paid $30,000 for your art therapy degree from marylhurst, you're not going to say yes! this is a very touchy subject for art therapists, who are trying to pass licensure laws to prevent exactly this sort of thing, which is why i try to be clear that I Am Not A Therapist though i believe Art Is Therapeutic. anyway, for this question to be the first one asked felt like it set a defensive tone for the rest of the workshop and the presenter brought it up more than once during the presentation.
speaking of which, the presenter for this session was low affect and read frequently from her notes; her handouts had no citations or bibliography. she mentioned a couple of times that she doesn't like working with teens, never expected to be doing it, but that's what she's currently doing. a shaky way to begin the morning.
the experiental exercise was to pick a medium you don't usually work with (in my case it was markers) and draw a representation of your name. after initally choosing to represent my name with letters (because hey, i like letters!), i took another piece of paper and worked w/ my intial signature in a sort of fractal pattern:
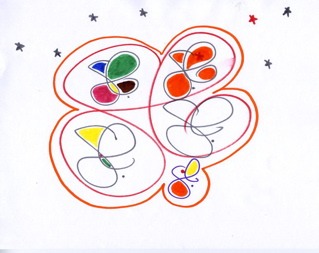
posted by gl. | permalink | categories: classes & workshops
March 6, 2006
puppet #2: percy five
by sven at 5:21 am
It took me a full month -- from February 5 to March 5 -- but I've finally completed my new puppet: Percy!
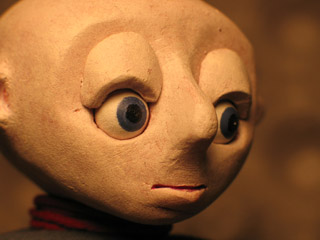
My first puppet, Moon Baby, met an untimely demise even before he was complete. So technically this is my first puppet... But we will count Percy as #2, out of respect for M.B. -- he may yet rise again!
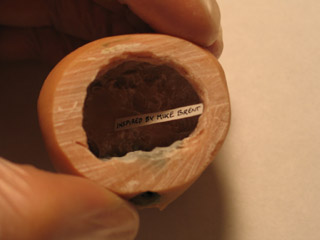
When last we saw our hero, I had just opened up his head to hollow it out, because it had been too heavy. Since the head was open, I decided I ought to slip some sort of symbolic soul inside... Since Mike Brent has helped me (and so many others) so much in my quest to learn puppet-making, I decided a dedication was appropriate. Thank you Mike!
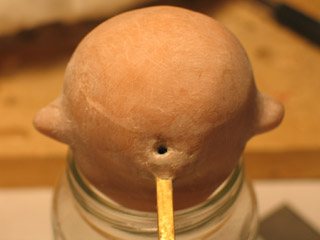
I glued the back of the head on with Duco cement. I smeared Super Sculpey into the crack and gave the head a quick bake. After sanding the whole thing down, you can't tell that Percy ever underwent brain surgery. ...In this photo you can see the little hole in the back of his head -- that's where I tighten the screw that attaches head to neck.
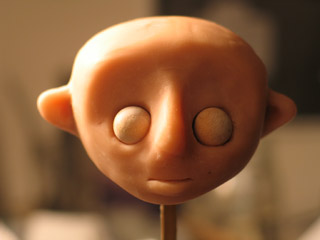
I had planned to attach eyelids onto the head using magnets. However, the eyelids for this puppet had to be smaller than the test eyelids I made, so it didn't look like that was going to work out. It might have been possible if I'd had some very tiny magnets on hand... But I didn't -- and I wanted to avoid drilling into the front of the face, now that I had a decent sculpt.
So, instead of using magnets, I decided that I should be able to keep the eyelids in place using museum wax. It's not ideal -- but it does work. It's fussier to take eyelids off and put them back on than it should be; this is going to discourage me from doing much with blinks.
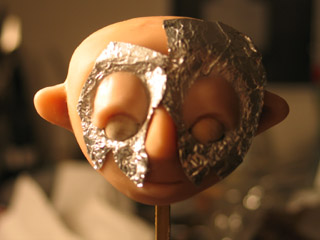
To make the eyelids, I put aluminum foil on top of the face, and then pushed the wooden eyeballs into their sockets. When I was done sculpting the eyelids with Super Sculpey, I gently pulled the aluminum out of the eyesockets, and put the eyeballs and lids into a toaster oven. (The eyeballs helped the lids keep their shape.)
On to the hands...
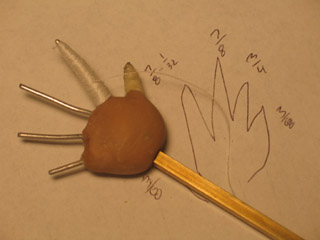
My original hand design involved wrapping thread around the finger wires, and then painting the thread with liquid latex. The principle is sound -- but it was taking a million years to do the wrapping -- and it was such fine work, it made my hands hurt. So, after getting through just two fingers, I abandoned this plan and decided to come up with a new design.
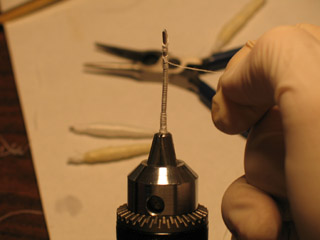
I experimented with putting short pieces of wire into a drill bit, using the drill to do the winding for me. This worked very well! The plug-in drill, which is stronger than the cordless drill, actually worked best. It got the job done quite quickly -- but I did need to wear a glove on the hand that was guiding the thread, to avoid rope burn. ...I didn't think to take a picture of it, but the spool of thread is actually attached to my sewing machine. Having the spool sit on a dowel that's stuck into a piece of wood would probably do the job just as well.
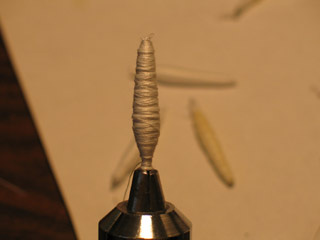
It was surprising just how noticable the thickness of the thread was. If you try this technique, I definitely recommend using an extremely fine thread. Strength doesn't matter much -- the thread just bulks out the wire -- liquid latex holds the whole thing together. I tried dipping the finger into the liquid latex; that gave me globby results. Painting three coats of latex on with a brush worked much better. I used a hair dryer sitting in my lap, propped against the edge of the desk, to make the latex dry more quickly.
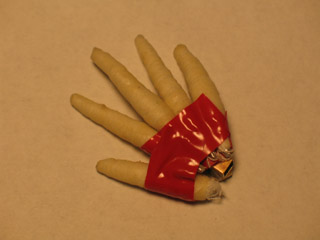
After making a batch of these odd little latex maggots, I tried binding them together with the tubing that attaches the hand to the wrist. (I had to make a new batch of these joints after deciding to redesign the hands.) The concept looked promising, but tape clearly wasn't going to be enough to hold it all together. I drew some sketches of a more complicated design, where each of the fingers would have some exposed wire that could be epoxy glued into a small piece of aluminum; the brass joint would be silver soldered into a slot in the palm of the hand.
At this point I both ran out of thread, and the head of my dremel broke.
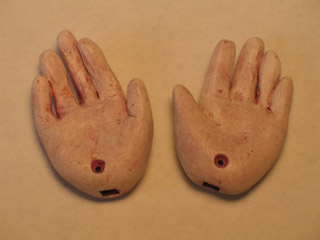
It was late in the evening, and stores were closed. I couldn't stand spending one more day fussing around with the hands, so I decided to give up on movable fingers and just make the hands out of Super Sculpey. Since the hands are detachable, I can always go back and try a new design if I want. ...It turns out that I'm pretty happy with this sculpt, though, so it's unlikely that I'll get back to the complicated design -- at least on this puppet.
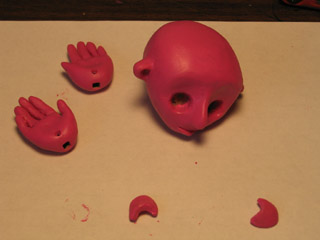
In the photo of the hands, you see them already painted. Figuring out what I wanted to do with the skin tone took a long time in itself. I know I spent at least two, if not three hours one night experimenting with acrylics in a sketchbook, looking for just the right layering of colors...
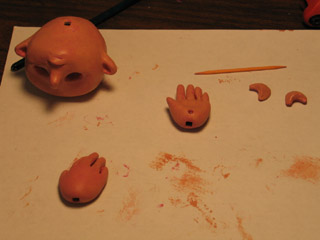
What I finally settled on was three coats of paint: first, brushing on a light magenta base coat; then sponging on a peachy-tan made from white, brown, red, and yellow; and finally, lightly sponging on white with just a tint of the previous peachy-tan. ...I'm not sure how much of this will show up in photos -- but in person, I feel the color has great depth to it. It has a pale, almost newborn quality to it, which I was looking for.
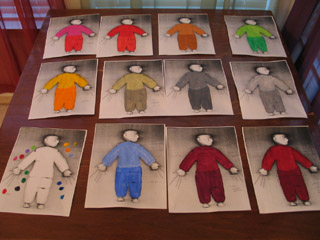
To figure out what color I wanted for the clothes, I did lots of tests. I laid the naked puppet face down on the photocopier, and made a bunch of copies that I could paint on. This is a puppet being made without a story in mind -- so I wanted a fairly neutral "everyman" costume that could fit in lots of settings. ("Percy" is the actor's name. Hopefully he'll get to star in many roles.)
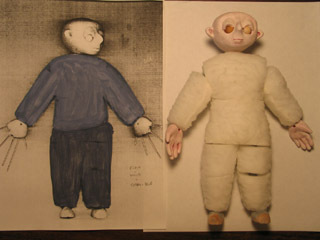
I settled on a sort of New England blue, mixed with grays. In the photo above, you can also tell that I've done more sculpting work on the cushion foam body -- Percy's still curvy, but not nearly as zaftig as he was in my initial post.
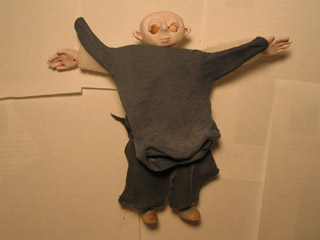
Mike Brent has a neat trick in his "Simple puppet fabrication" tutorial that I wanted to try, where you use a pair of gloves to make a shirt and pants. After some looking around, I found some white cotton gloves at Columbia Art and Drafting Supply. Unfortunately, I realized too late that Mike's puppet is about six inches tall, and mine measures in at nine and a half. Hoping that I could somehow stretch the fabric, I forged ahead with the fabric dyeing process... That was a waste of several hours.
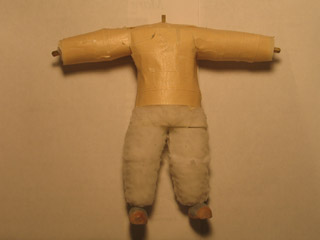
Since using gloves for clothing didn't work out, I was left with having to make the clothes by hand. To do this, I had to come up with a custom-designed pattern. I started by creating a mock shirt on the puppet using masking tape...
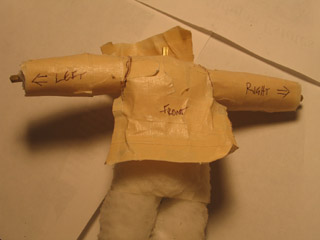
I carefully cut the masking tape shirt off the puppet, and then traced the outlines of these pieces onto graph paper. I tidied up the shapes and added in extra space for seams. When I thought I had a pretty good shape, I'd lay a piece of tissue paper (the kind you wrap presents with) on top of the graph paper, and trace the design. I cut the piece out of the tissue paper, and tested it on the puppet's body.
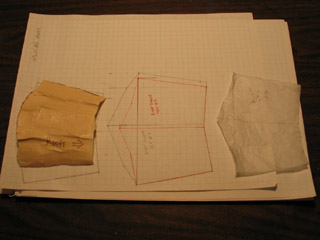
Here you can see three steps in the process of making a pattern for the arm of the shirt: masking tape, graph paper, and tissue paper. The costume is a simple shirt and pants ensemble; it turns out that this required four patterns: a pant leg, a sleeve, the shirt's front, the shirt's back. When I tested the tissue paper on the puppet, I innevitably discovered tweaks that I wanted to make, and went back to the graph paper for adjustments.
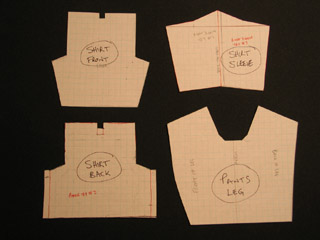
When the patterns were finalized, I glued the graph paper onto cardboard from cereal boxes; I cut the patterns out to make templates. I went to that delicious monstrosity, Fabric Depot, and chose a fine white cotton knit (with a percentage of lycra) for Percy's costume. I traced the templates onto the fabric, and cut the cloth...
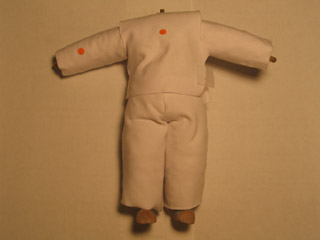
In retrospect, I should have dyed the cloth before cutting -- but at first I thought that I was going to test the fabric before committing... And then I liked how it all was working out, and kept the first attempt. Rather than use a sewing machine, I used fabri-tac glue to put the pieces together. The glue was excellent -- it was easy to control, and bonded cloth within seconds. (My one concern is that it seemed to go through Nitrile gloves, making the insides sticky. The label says acetone is one of its ingredients; I'll have to look into what can hold up against that.)
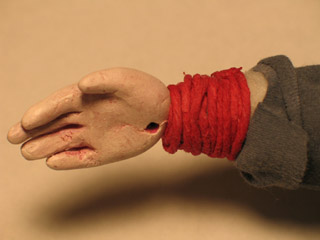
With the end in sight, I didn't take many more photos. I dyed the clothes using acrylic paints. Mixing the right colors took a long time. Any smudges of glue on the cloth acted like resists, which was annoying. The shirt was tricky to assemble, the arms being attached to the body of the shirt last of all.
For the neck, wrists, and ankles, I used a trick I invented with Moon Baby: wrapping dyed string around the joints. It's a stylized look, but I like it. After getting the joints taken care of, I realized that the shirt is short enough that when Percy bends over his back shows. It's not a very good solution, but I wrapped some more string around his midriff to conceal the foam when the clothing gapes. The string acts a lot like a corset, changing the shape of the body, which is not what I want.
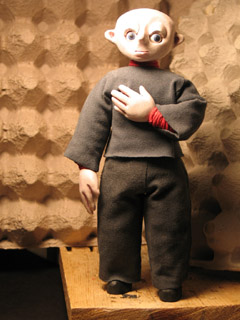
...And here he is!
In the book Learning by Heart, by Corita Kent and Jan Steward, there's a passage that says puppetmakers in India always save the eyes for last -- the eyes giving the puppet life. I thought that was a great idea, so I did the eyes last too. I drilled little holes in wooden balls, put short strands of wire in the holes, and then put the wires in a drill bit. The drill spinning the spheres made it relatively easy to paint round irises. (This is a trick I picked up from Susannah Shaw's book, Stop Motion: Craft Skills for Model Animation.)
By the way: The name "Percy" came to me while I was in the shower one day, as a diminutive for "Perseus". When I checked my mythology, it was actually Theseus and the Minotaur I was thinking of -- but the name had stuck. I added the surname "Five" just this morning, thinking about how I began and and finished this puppet on the fifth of the month. I dunno -- the name "Percy Five" just sorta has a pleasant sci fi sound to it that I like.
posted by sven | permalink | categories: stopmo
March 4, 2006
se portland artwalk
by gl. at 10:50 pm
i was surprised to find many of the same exhibitors at the se portland artwalk from last year, so it didn't have quite the same impact and i didn't buy much (though yes, markalope, i stopped by juiceglass & bought some irresistable beads!). and apparently i missed melanie's last-minute addition, but the weather was good and it's fun to spend the afternoon exploring, so all in all it was a success. i can't believe we managed to fit it in after an artist's way independent study student and before seeing leopoldo off to thailand and marvelous marvin's bon voyage party to maui. happy trails, all!
posted by gl. | permalink | categories: exhibits & events
March 3, 2006
no rest for the wicked
by gl. at 12:38 am
lots of art activities today:
we drove to salem to see the shrine exhibit at mary lou zeek gallery, but she took a big chunk of it down early, so we only saw about half the pieces -- but one of them was immediately recognizable from claudine hellmuth, whose collage discovery workshop we have beneath the coffee table, waiting for its turn to be read and then packed off to the studio library for others to borrow.
we ate lunch w/ dayna, a previous artist's way creative cluster member who just got back from a workshop with julia cameron herself, and she gifted me w/ a julia-autographed copy of the writer's life ("to gretchin, for your heart" -- heart is underlined three times) and a copy of the art magazine artella, which has poetry & hidden things in addition to collaged art pieces. thanks, thanks, thanks, dayna!
we dropped by mary anne radmacher's word garden and she gave us some "tuckers" for free, little packages of word art squares presumably to be tucked into lunches and pillows and notebooks...
we drove home and then took arwen to the vet & had pizza w/ michaelmas, and though that's not really an art activity, it led to...
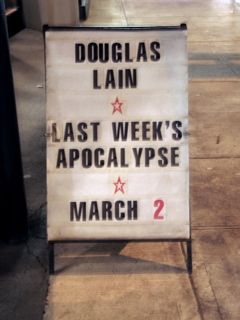

doug's reading from his recently published book, last week's apocalypse, though we really had to push to get him to read more. i've already got a copy & sent one to my dad, so doug signed copies for michaelmas & sven.
since this is first thursday, sven & i then went to an exhibit i wanted to go to simply because of its title: "moon babies"! it turned out to be a decent exhibit: 12-15 black & white paintings on cabinet doors w/ a narrative that we accidentally began at the end and worked our way to the beginning. it was like a comic book but w/o any words & there were about 2-3 panels per piece.
when we got out of the unfortunately smokey bar that held the exhibit, i smelled donuts & realized we were near to voodoo doughnut, so we stopped by and i got a bleeding voodoo doll donut and sven got some sort of monstrous peanut-butter-chocolate-chip-sugar-crust fritter.
and then finally (!) home. still to look forward to this week & next: the se portland artwalk & the creative arts therapy week!
posted by gl. | permalink | categories: artist's way, exhibits & events, miscellany
March 2, 2006
stopmo safety - initial notes
by sven at 8:11 am
[This is another long post that I made to stopmotionanimation.com. The context was a discussion about using lead wire in armatures. The person I was responding to had just written, "I've heard it works very well. I've never used it though. But don't forget, um... lead is poison!"]
Of all the poisons we're working with, lead is probably just the one with the most notorious reputation -- not necessarily the most dangerous.
You can wear gloves to avoid skin contact, and use snips to prevent creating particulates. The wire's going to be buried inside of the puppet, so the period of contact is fairly limited.
...There are many dangerously toxic materials that we're working with in puppet construction. I've been working on a full analysis of safety hazards and how to protect ourselves. I'm not done yet, but here are a few initial notes:
epoxy putty (including Milliput, Apoxie, and Magic Sculpt) - used for the armature, and sometimes for sculpting heads, etc. Epoxy putty is basically epoxy resin mixed with talc. With enough exposure over time, all people develop a sensitivity, which involves (minimally) a nasty rash. Over time, epoxy putties can cause nerve death in the fingers. Neither latex nor vinyl gloves are fully protective; nitrile gloves are recommended.
epoxy glue - used for glueing wires of armature into body parts. Same toxins as epoxy putty, but with powerful vapors. In addition to getting as much forced ventilation as you can muster, it's a good idea to wear an organic vapors respirator -- a face-mask with carbon cartridges. You can find these for about $30 at Home Depot and paint stores. I recommend 3M brand as being probably the most comfortable.
barge cement or spray glue - used for attaching cushion foam (urethane) to armature. Barge contains tuolene; I'm not sure if even an organic vapors respirator can protect you -- but I'd wear one. Most organic solvents attack carbon (hence "organic"); the cartridges basically contain charcoal -- concentrated carbon. Since spray glue also creates a cloud of floating particulates, I only ever use it outdoors.
rubbing alcohol (isopropyl) or turpenoid - used for smoothing polymer clays. These are powerful solvents which are just as happy to dissolve you as whatever you're working on. Gloves and an organic solvents respirator are recommended.
liquid latex - used for puppet skins. Liquid latex cures by releasing ammonia. In the quantities that we work with, the fumes usually aren't concentrated enough to do more than cause irritation. However, it's not a bad idea to wear safety goggles -- ammonia can cause blindness. If you do decide to use a respirator (I don't), you'll need cartridges that are specially made to deal with ammonia -- carbon filters won't help. Fortunately you can generally fit ammonia filters onto the same mask.
brass and aluminum dust - created while grinding K&S tubing or metal strips used in armatures that have removable parts. If metal dust gets into your lungs, it may be with you for life -- wear a dust mask. The ones that have a little plastic box on the front are much more comfortable to use, which will increase the chances that you'll actually wear them. Aluminum has been associated with Alzheimer's disease (technically the studies have only demonstrated this link when the aluminum is carried in water). Brass may have other metals in it that pose special dangers. ...There are concerns about how to clean up dust without putting it back into the air -- but I haven't found safety recommendations yet.
solder - used for making armatures that have removable parts. Typically solder is a combination of lead and tin, used with an acid flux ("rosin"). During soldering, all three release fumes which are toxic. One can buy a desktop fume extractor: a small desktop fan that sucks fumes through a carbon filter. I recently purchased one from xytronics via amazon.com for $64 (including shipping).
A word about ventilation: Particularly given the nasty glues we use, ventilation should a big concern. The ideal is to have air being forcibly sucked away from you, to be vented outdoors. As animators are often working in dungeon-like cellars, the ideal's probably not possible.
...But do as much as you can! With the powerful stuff, do the job outside and wear a mask. Minimally open a window. Put a fan in the window to push the air outside. Try to put your table in front of the window, so fumes don't have to go past you to escape. Personally, I've just put together a system where I've attached dryer ducting to a table-top fume extractor so I can vent fumes out the nearest window.
A few things that are relatively safe:
Polymer clay - used especially for sculpting puppet heads. Polymer clays such as Super Sculpey, Cernit, and Fimo have vinyl in them. However, these materials have recently gone through rigorous testing, and it's been proven that absorbtion through the skin is negligible. The fumes released while baking are judged to be noxious, not toxic; diluted in a normal room full of air, they shouldn't pose any harm. (Avoid taking a deep breath as you open the oven perhaps, though.) If you're sanding baked polymer clays, however, be sure to wear a dust mask.
Acrylic paints - used for painting the puppet. So long as you use good hygiene, you're pretty much OK. Do NOT put brushes in your mouth to point their tips! Avoiding getting paint on your skin is a good practice. Different pigments are based on different chemicals -- each one varies. Be particularly mindful when you're working with Cadmium Red, Cadmium Orange, and Cadmium Yellow.