February 2006 archives
you are here [x]: Scarlet Star Studios > the Scarlet Letters > February 2006
<< before
January 2006
after >>
March 2006
February 28, 2006
old tech, meet new tech
by gl. at 11:10 pm
hooray! the portland society for calligraphy now has a webpage! it still needs a little more work, but mostly just tweaking the menu & adding beautiful works of art. the current chairperson of the society has been really great to work for, but even given the opportunity to work w/ good people & an ideal topic, i just don't enjoy web development the way i used to. i am glad to have the chance to give them a website, though, something they've been needing for years. now when people search for the portland society for calligraphy, people will hopefully find themselves there instead of here! :)
posted by gl. | permalink | categories: calligraphy, links, miscellany
February 27, 2006
the head of the class
by gl. at 6:26 pm
rob invited me to be a guest lecturer at his english composition class at clark college today. i spoke about "the benefits of a daily writing practice," aka morning pages. it went pretty well! it was a small class but there were actual questions at the end (including an insightful one about whether morning pages are intended to be meditational: yes!). we actually did one page in a morning-pages like style (stream of consciousness, no stoppping) and they blazed through it -- i thought i'd need to prompt more about needing to keep moving. someone even knew newton's first law of motion, adding to my "creativity is newtonian" concept.
i added a twist to the standard morning pages routine: i've often said if you could combine julia cameron with david allen, you'd have an even more productive flavour of artist's way (julia allen? ;). julia talks a lot about how you can expect god/the universe to help you, but adding a getting things done component would place the artist's way in a more "god helps those who help themselves" camp.
at any rate, morning pages are not something you typically return to; in fact, if you let them sit a while, you often can't return to them because if you're doing them "right" (i.e., quickly) your handwriting is probably illegible. :) so i asked them, after they were done writing, to review their page and pick out "actionable items" or ideas they'd like to keep track of. their morning pages revealed job interviews to call back on, reminders to talk to their children, and buying new journals. i think this practical step really enables you to act on what you say you want, reinforcing the hopes & dreams that inevitably surface during morning pages.
i also passed out copies of "notes on making art" because they work just as well for writing, too. at the end, one of the students told rob, "you should have her speak earlier in the semester. i wish i had known about this sooner!"
posted by gl. | permalink | categories: artist's way, miscellany
February 25, 2006
stopmo puppets: twisted vs. untwisted wire?
by sven at 12:41 am
I just wrote a long post over at stopmotionanimation.com that was more or less an essay in itself. It seemed worth re-posting here:
[Mike Brent wrote:] "To twist or not to twist? That is the question. Really it's a matter of personal preference."
I can't tell you how much I've been wanting to hear a vigorous discussion of twisted vs. untwisted wire, and about wire in general! Guess now's the time...
Here's what I understand so far:
(1) single strand vs. multiple strands
First off, there's a question of whether to use a single strand of wire or multiple strands. Most people favor using multiple strands -- the thinking being that if one of the strands breaks, the others will still work. The one exception seems to be among people who are using lead wire. The reason folks using lead wire tend work with single strands, I think, is because it's hard to find lead that's less than 1/4" diameter. (I've only been able to find lead wire in stores that carry fishing supplies, in the area where they sell lead sinkers.)
(2) twisting with a drill vs. twisting by hand
The main reason to twist multiple strands seems to be to hold them all together. At this point, there's a choice about whether to twist by hand, or twist the wire using a drill bit. Folks against using the drill bit seem most worried about accidentally nicking the wire in the process, which almost guarantees that the wire will break. It's also fairly easy to over-twist the wire using a drill, which may put extra strain on the strands. However, using a drill will give you a tight and even twist -- whereas hand-twisting can give you a very funky twist. In Susanna Oroyan's book, "Designing the Doll", it's suggested that uneven twists weaken an armature's strength (p.73).
This is a point where I'm hearing contradictory messages: some folks claim that uneven twisting strengthens, some claim that it weakens.
(3) stress between the strands
Some folks say that twisting strands inherently creates stress points between your wires. As I understand it, this is the main argument for using untwisted wire: no twists equals no stress between wires. Without twisting, though, you need another means to bind the strands together. Barge and silk thread are the only suggested solution I've encountered so far.
(4) when do multiple strands become a single wire?
The main rationale for using multiple strands is to have back-ups when one breaks... But if you twist the wires, do they start to act as a single wire? I've only had one break so far -- in a twisted-wire armature -- and it seemed like the wires all broke as one. I presume a wire armature usually breaks after it's been covered with foam, latex, clay, etc... Has anyone actually seen a puppet performing with just one of the multiple strands in a limb broken?
...Or am I misconceptualizing how this is supposed to work? Is the idea that twisted strands are stronger because they distribute the stress among each other -- so you'll never see just one strand broken; they'll break all together, but not as quickly as a single strand otherwise would?
(5) point of entry into the torso
Having multiple-strand limbs is supposed to distribute stress and protect against breakage. But with puppets that use epoxy putty torsos, the point where the arm enters the putty effectively turns the wire "rope" into just one strand. I think it's really note-worthy, then, what Nick does with some of his puppets: He uses a wood block, threads the wires through holes, and only twists them together afterwards. With the wires entering the torso at multiple points, you preserve the benefit of having multiple strands! (Nick's tutorials: http://www.picturetrail.com/gallery/view?p=999&gid=60051&uid=42706 )
(6) other strategies
I've read about a strategy where you twist together three types of wire: lead (for its lack of memory), steel (for strength), and aluminum (for a combination of these qualities). I've also seen someone mention actually braiding their wires together -- not just twisting them. Both of these strategies have been attributed to pros in the field -- but I haven't seen enough about either to really say anything else about them.
(7) accepting that wire armatures break
I'm probably thinking too hard about this... All wire armatures break. Maybe multi-strand untwisted aluminum that enters the torso at multiple points is the most durable -- and maybe not. When you build the puppet, though, you consider not just durability, but also ease of construction. Maybe you do a quick epoxy putty torso -- you accept some risk for the sake of convenience, having the wire all enter the shoulder at one point.
...Or, you could design your puppet the expectation that it's going to break -- having plug-in limbs that are attached into the torso with little socket set screws, limbs that can be replaced if needed. (See Juergan Kling's armatures for an example: http://www.animateclay.com/index.php?module=PayPalCart&cid=7 )
Hm. I seem to have written an essay...
I guess what I'm really curious to know, personally, is if anyone with an engineering background can actually say anything authoritative about the physics of wire...
Does twisting wires together really create significant stress? How exactly?
Does uneven twisting weaken or strengthen your armature?
Stress-wise, do multiple strands start acting like a single strand when you twist them together?
Has anyone seen a multi-strand limb where one strand has broken, but the others continue to function?
If having multiple strands distributes stress, how does that actually work?
Does the wire stop distributing stress (as I suspect) when the strands all enter the torso via a single point?
Ever curious,
--Sven
posted by sven | permalink | categories: stopmo
February 23, 2006
4x4 art show a success!
by gl. at 11:21 pm
wow, what a crowd! collage was packed with people! and i am extremely pleased to announce my piece has already been sold! (thanks, colleen!)
i want to thank everyone who came: your support means a LOT to me. artists need other artists and friends who both encourage and support their endeavors (well, and who doesn't, really?). so when i say "thank you" here, i am full of gratitude & appreciation. many thanks to sven, michaelmas, susan, dian, jessica, leigh & her sister, kristen, colleen and amanda for coming by to say hi! thanks also to mph & linda sawaya, who both sent kind emails.
of course, this was just the reception and there's still plenty of time to see the show: it's up till march 27 at collage (1639 ne alberta). so if you find yourself in the area or with a hankering for small, accessible art, you should totally stop by. and because there won't be a big crowd like there was tonight, you'll have all the time you want to look at the 80-odd pieces. :)
sven bought a piece from linda womack tonight. he's been loving encaustics and we recently saw her work at an outside interactive installation. as a fellow dinnergrrl she's on my radar for a while, so i'm glad to have had an opportunity to influence an art purchase! afterwards, sven treated kristen & i to north pix, where i celebrated with a chocolate pear rosemary tart. :) thanks, sven!
posted by gl. | permalink | categories: calligraphy, exhibits & events
February 21, 2006
trixie: a study in opposites
by gl. at 2:40 pm
as i was stopped at an intersection today, two grizzled men walked past trixie and glared at her, slowing down and looking at her poetry menacingly. i was relieved when they got to the other side of the sidewalk.
when i stopped at the next intersection, two teenage girls noticed trixie: one of them stopped for a moment with her eyes wide and dropped her mouth in awe. then she broke into a huge smile: "i love your car SO MUCH!" she yelled as she passed. when she got to the other side, the other girl hugged her friend in delight.
posted by gl. | permalink | categories: trixie
February 20, 2006
unitarian artist's way: week 3
by gl. at 2:42 pm
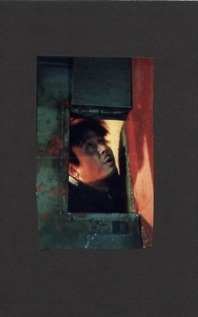
we created critic & ally cards last week: on one side was an image that represented our artistic critic, and on the other was an image that represented our artistic ally. we placed them on small pieces of matteboard:
 ally:
ally: 
when i'm at my most self-critical i feel like the man in the box, trapped & small without a future. the blank space around the image is intentional: if i was animating it, it would shrink more and more until it disappeared completely. adopting the oppposite as my ally, the box becomes a window open wide and smiling into unknown blue. these are actually both the same size, but they're different orientations.
then i ended up making another one, which i like even better:
 ally:
ally: 
you can't beat these for quick personal imagery. the fish packed close together correlate pretty closely to a similar "lost in the crowd" metaphor i used in the last collage we made and bears, for whatever reason, have often found their way into my poems and images. the butterflies around the bear are symbolic of an event that happened to me on the way to my first burning man.
earlier in the evening, we also wrote letters to our "addictions," the things we love to be distracted by rather than doing art. we read them aloud; here's mine:
my very dearest interweb:
oh, i use your affectionate nickname because that's what all the cool kids do, and i so want to be a cool kid. they're so smart and witty and passionately geeky and very, very attractive -- of course you would want to hang out with them. i must tell you my heart flutters, dear internet, when i hear the chime that announces new email, and then my stomach sinks when i find just spam and random listserv mail.
i'm sure you know by now how interesting and fascinating and absorbing you are -- there's always something new to discover with you. and you know what a curious person i am: i can ask you dozens of questions at any time of the day or night and you never seem bored or irritated. in fact, you encourage me to ask more! you have no idea how rare and wonderful that is.
of course, you never ask questions of me, and when i try to talk about myself, you never listen. over 10,000 sent-mails and 3 regular blogs and it's like i've been talking to myself this whole time. c'mon, internet! isn't this supposed to be a 2-way relationship? or is it always going to be all about you? you know i love you, but something has to change.
posted by gl. | permalink | categories: artist's way
February 19, 2006
printmaking party
by gl. at 11:07 pm
last sunday i got invited to a printmaking party by a woman who attended a previous artist's way open studio, and other than gocco & letterpress i don't have a lot of experience with traditional printing techniques, so i was very much looking forward to it. i expected to use use the large shiny wheeled press more than i did, but really it was simple monotyping that i really enjoyed.
monotyping involves painting a piece of plexiglass with a design, then laying a piece of paper over it and using a rolling pin to apply pressure. using the "get through your first 50 failures as fast as you can" rule, these are the first two monotypes i created while everyone else was trying to create the perfect one:
 2.
2. 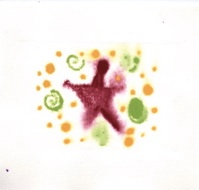
we used Rives BFK for the first batches of prints (and random paper later as supplies began to dwindle), which has a high rag content and is a beautifully creamy, lightly textured, thick, soft paper. we soaked the sheets for 10 minutes because we were using water-based pigment (gouache & watercolor crayons) and it helped lift the print from the small sheets of plexiglass. also, soaking the paper allowed the plate to create a luxurious emboss on the print.
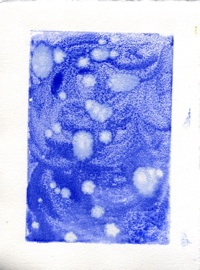
emboldened by the ease & speed of making monotypes, i tried more. i've been wanting to make more stellar-themed art, so i brought out a copy of a star map from 365 starry nights (which i cannot recommend highly enough as a way to learn the night sky, and it's the same map i used in "web"):
 4.
4. 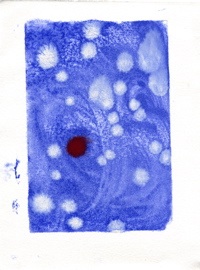
i love these. they didn't come out as expected, but i think they're beautiful. i'd lay the plexiglass over the part of the sky i'd want to print, paint blue first and swirl it around, the paint the stars in. except once the blue is on, it's very difficult to see the stars and monotyping is an imprecise process with a lot of spread. so these are more impressionist than print, but i'd like to think they have the same spirit as van gogh's starry night.
then i tried using two plates w/ the same technique:
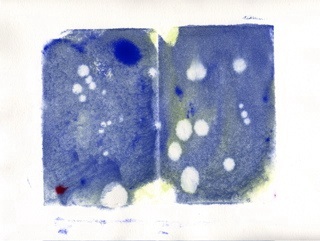
6.
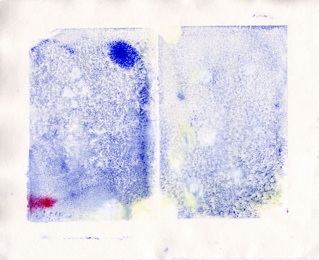
the second one is a ghostprint of the first, printing what was left on the plate after the first print. i like these, too; they have a flavour of those tinted images you see from nasa, or nighttime infrared images.
but i still couldn't identify constellations and chalked it up to the vagueries of the monotype process: i hadn't quite caught on that monoprints are a reverse printing process (that particular detail almost always eludes me because my 3d spatial ability is poor, and positive printing is one of the reasons i love gocco so). so when i made a G on the next piece, it came out backwards and i salvaged it by stamping letters over it.

yes, i know it looks like "kidneys" rather than "kind eyes." i was going for an awkward justification effect where the letters simply fill the space without spaces or punctuation, and it would have worked better if the upper lines were more consistent.
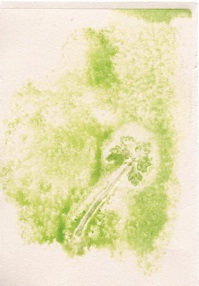
so i tried a backwards G on the plate but then painted over it with another water-based medium, which obliterated it. still, it made a nice texture, and the colour intrigued me enough to try a plant-based print with it:
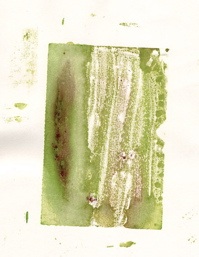 9.
9. 
i tried a couple of different plant-based prints i'm not showing here, actually: the others were too thick and i couldn't apply enough pressure to get them to print -- and when i used the large shiny press, i forgot to add my paper, and so printed onto newsprint! (and the print still didn't come out). however, another woman made a simply stunning print of a small pine branch, so i know it's possible.
i tried more dimensional objects, and the puzzle pieces below did the same thing: the wide swath of white in the middle is where the puzzle pieces didn't print. so i tried an overprint: i removed the puzzle pieces and printed the swath of paint still left on the plate. i didn't line it up very well, but i like the asymmetry of it. if i can find decent lowercase letter stamps (they're all uppercase or overly quirky stamps), i'd like to print "i want to know" on this piece.
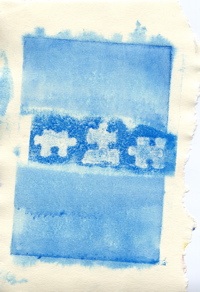 11.
11. 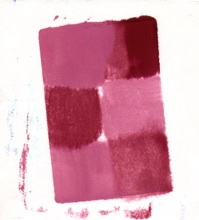
at that point my brain was full, so my last piece was this pink & red checkerboard. check out that spread at the top! sheesh! also, you might notice how incredibly, um, off-kilter these pieces are becoming; it's a trend that begins early enough on that i ought to have corrected for it, but i didn't notice until it was too late and then couldn't figure out what i was doing wrong, so i want to be more careful on the next round.
i can't believe i walked out with almost a dozen prints! now my problem will be deciding what to sacrifice to attempt lettering on them...
posted by gl. | permalink | categories: exhibits & events, printing
February 17, 2006
artist's way open studio (february)
by gl. at 1:13 am
overbooking worked: we set up for 10 but ended up with 7.5 -- the .5 being the 5-year old who outcollaged all of us put together! it was active but didn't feel frantic or constricted. met some very nice people i hope to see again, and someone even dropped in to film us for her documentary film class! sven did a great job helping me set up and entertaining monica's daughter by teaching her about zombies and butoh dancing.

["web": click the image to see the other collages]
i'm fond of this piece: i did a citrisolve transfer of a star map over the spiderweb raindrops, and though this is a simple collage, i find its colors, composition & juxtaposition to be very effective.
next month marks the one-year anniversary of hosting artist's way open studio. hooray! i can't believe it's been so long, and yet it feels like i've been doing this forEVER. i've sure gotten a lot of cards out of it!
posted by gl. | permalink | categories: artist's way
February 16, 2006
4x4 art show
by gl. at 1:16 am
ee! i've been accepted to the 4x4 show! i recreated "notification" (formerly known as "you don't own her") to fit in a 4" square because i like it so much and am thrilled it will be seen in public. the art reception is 6-9 p.m. february 23 (next week!) during last thursday on alberta. collage is located at 1639 ne alberta and the show runs till march 27. come say hi! w/ more than 65 other artists, there will be lots to see. :)

[original version: i forgot to take pix of the one in the show!]
sven got a wooden craft tile at craft warehouse, painted its z-dimension edges with black acrylic and added a sawtooth hanger on the back. he also mounted the piece for me this afternoon when i was afraid to breathe on it lest it do what the last one did. thank you, sven!
tech notes:
again, this piece uses ink & gold leaf; the stain uses four different colours of red. i tried using watercolor paper and arches text wove, and i am surprised to find the arches text wove worked better for this piece (and a little disturbed, since i gave all mine away).
but the most surprising discovery was that despite the recent investment in several types of folded pens, nothing compares to my favorite calligraphic tool in the whole wide world, the soda pop pen (a writing implement made from an aluminum soda can & a chopstick -- someday i should post the instructions).
see, i struggled to create a decent O with the firefly and the folded pen, even after consulting the calligrapher's bible (the only lettering book i know with not just one but three ruling pen hands) -- the edges are just too stiff, i think. but the soda pop pen is so flexible and effortless it's simply joyful. its only lettering deficiency is a tendency to scrape the inside of the letter, which causes the middles of strokes to be slightly lighter than the edges. but i had strayed from soda pop pens because i wanted more durable, easier-to-clean pens i didn't have to make myself. well, then. guess i'd better learn to cut my own quills next...
posted by gl. | permalink | categories: calligraphy, exhibits & events
February 15, 2006
tutorial: how to analyze puppet construction
by sven at 8:40 pm
For a little more than two months now I've been feverishly studying how to make puppets for stop motion animation. In the process, I've developed a useful checklist of 11 things to look at when you're studying a particular puppet's design.
The checklist works for puppets that use a wire armature with latex and foam build-up. [If you need background knowledge on what that means, refer to my post on the basics of stopmo puppet construction.] It is designed with mainly humanoid characters in mind.
A CHECKLIST FOR ANALYZING PUPPET CONSTRUCTION:
When you examine a puppet's design, attempt to describe the eleven following features...
The Basic Wire Armature
- Wire
a. What metal is used?
b. What gauge?
c. How many strands?
d. Twisted, untwisted, braided? Body blocks (torso and pelvis)
Limb bones
Attachment points
Focus Areas
- Head
a. eyes
b. mouth
c. eyebrows & ears Hands
Feet & tie-downs
Neck, wrists, ankles
Covering for the Main Body
- Musculature
a. Material?
b. What adhesive?
c. How are joints dealt with? Clothes
Skin
Example: Analyzing Mike Brent's puppets
Right now I'm working on a puppet that's inspired by Mike Brent's designs. But what makes a Mike Brent puppet different from other puppets? I know, it's not an entirely fair question; Mike has written about several designs he's done. For the purpose of this exercise, I'm looking mainly at his "Simple puppet fabrication" tutorial, his improptu tut on making hands, and a post where he talks about using urethane upholstery foam.
1. Wire: aluminum armature wire (lead wire broke); wire is hand-twisted (untwisted wire for the "Buster" puppet)
2. Body blocks: epoxy putty
3. Limb bones: cloth tape ("Buster", however, doesn't have bones)
4. Attachment points: wires are fixed directly into the epoxy putty; the wires of a limb are twisted together into a single strand at the point where they enter the putty
5. Head: no movable features; Super Sculpey, baked directly onto the wire (Mike says he often casts heads in resin, though)
6. Hands: the ends of the three arm wires form the middle three fingers, a loop of wire is attached with epoxy putty to create the remaining two
7. Feet & tie-downs: wood feet with a hex nut set in place with epoxy putty; regular machine screw for tie-down
8. Neck, wrists, ankles: for the neck, the finger of a latex glove is glued to the head with Barge contact cement while being stretched
9. Musculature: cushion foam (Mike's disavowed use of polyfil batting); adhered using Barge cement; where possible, piercing the foam with an Exacto-knife rather than gluing separate blocks together
10. Clothes: cotton or leather gloves are turned into shirts and pants
11. Skin: not applicable
posted by sven | permalink | categories: stopmo
the basics of stopmo puppet construction
by sven at 8:33 pm
There are two main components to a stopmo puppet's construction: (1) its armature, (2) the covering that goes over the armature.
types of armature:
There are three main types of armature: (1) flexible wire, (2) wood, (3) metal ball & socket. Wooden armatures (similar to artist's mannequins) have mostly been abandoned. Wire is inexpensive, light, and easy to make; however, it can't be posed as precisely as a ball and socket armature, and is prone to breaking. Ball and socket armatures rarely break and can be posed quite precisely; but they are heavy, expensive, and rather difficult to create.
types of covering:
There are three main types of puppet covering: (1) clay, (2) latex and foam build-up, (3) cast foam latex. Clay is the easiest to sculpt -- but the most difficult to animate; every time you touch it, it changes -- so it needs constant re-sculpting. Puppets built-up from soft urethane foam (cushion foam) and liquid latex don't need constant re-sculpting, and are relatively easy for the amateur animator to learn how to make. Cast foam latex is trickier and more expensive to learn, involving a combination of four chemicals that must be frothed in a kitchen mixer and then baked. The curing of foam latex is influenced by temperature, humidity, and barometric pressure; a good casting is not guaranteed.
alternative constructions:
There are many variations on the basic types of armatures and coverings that I've described. For instance, one can make an armature from stiff wire and swivel joints that falls somewhere between flexible wire and ball & socket armatures. Many people have also converted store-bought toys into workable armatures. With regards to coverings, exciting things have been done with cast silicone. There is also a technique for casting a skin using liquid latex, and then filling it with expanding urethane foam (which does not self-skin like foam latex does).
[For more info, I recommend Mike Brent's excellent links page, "A Basic Overview of Puppetmaking Techniques."]
posted by sven | permalink | categories: stopmo
February 14, 2006
happy birthday, blog!
by gl. at 11:22 am
though the studio's been around for a while, we finally got the blog going one year ago today. can you feel the love? :)
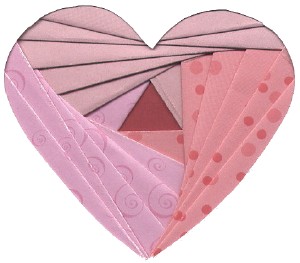
this is part of an iris-fold card i made sven for valentine's day. (michaelmas got a cthulhu valentine card.) happy valentine's day, everyone! me, i'll be working on a piece for the 4x4 art show. and a few other art deadlines that have snuck up on me and caused me to carefully manage my time this week.
posted by gl. | permalink | categories: administrivia, other art
February 11, 2006
tutorial: how to make a puppet's limbs removable
by sven at 9:26 pm
If you're making stopmo puppets, then this is just a fact of life that you have to accept: wire armatures break.
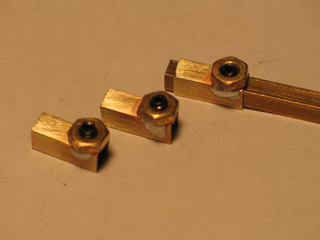
A lot of work goes into making a good looking head and hands... You want at least to be able to save these parts if an armature breaks. So wouldn't it be a good idea to make an armature with removable parts? I know of two people who have systems for removable parts: Susannah Shaw, and Juergen Kling (follow the "shop" link). Both work on similar principles, but Susannah's is somewhat easier for the amateur to accomplish. Her's is the one that I'll be demonstrating here.
Here's what Susannah says in her book, "Stop Motion: Craft Skills for Model Animators"...
"It's always a good idea to be able to remove head, hands and feet, as they often need extra work -- so glue on a section of square brass sleeving K&S of sizes that will slot into each other for arms and hands, and head and neck. K&S is square brass tubing that you can buy in any model shop. It comes in different sizes allowing a smaller size to fit into a larger, giving a firm, well-located joint. (K&S is only available in imperial sizes.) An M3 nut is soldered onto the larger piece of K&S at the wrist, neck and ankles. This allows the grub screw to be used to hold the smaller size of K&S in place. This in turn holds the wire in place. The strands of wire are then epoxy glued into the relevant pieces of K&S to form the armature." (p.53)
Susannah's book is excellent -- probably the best general book on stopmo available at present -- go buy it! ...However, it took some work to figure out exactly how to accomplish what she describes and to find U.S. equivalents for the parts, so I offer this tutorial as a supplement. [Refer to my most recent puppet work to see these joins in action.]
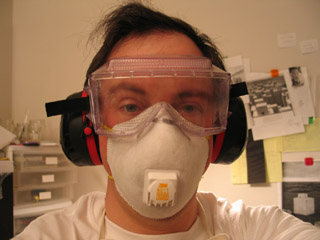
Safety first. We're about to create brass dust -- you don't want to breath that stuff. So wear a dust mask. The ones that have a funny little plug in front are more comfortable. Wear goggles that protect your eyes on all sides; tiny bits of brass most definitely do shoot up at your face. Cutting metal is loud... I recommend wearing earplugs, which are cheap. I bought myself some safety ear muffs, which last longer, are more comfortable, and don't get lost. All of these things should be available at your local hardware store. They're also available at Amazon.com.
"K&S" is a brand name. K&S has a standardized "hobby metal center" display that you can find in many stores; it looks like this. Here in Portland, I know that I can find K&S at Ace Hardware, Columbia Art and Drafting Supply, a model railroad store, and a hobby store that specializes in remote-control cars and airplanes.
The two pieces of square brass tubing that I'm using are 5/32" and 3/16" in diameter. They fit snugly within one another, but are able to slide easily. Each piece is 12" long, and costs roughly $1.50.
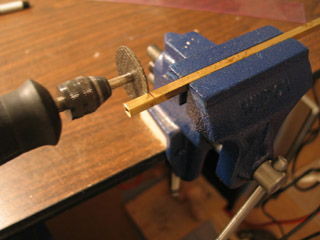
I've found that my join only needs to be about 1/2" long. To cut the tubing, I recommend using a dremel tool with a fiberglass cut-off wheel. A hacksaw works OK -- but I felt that I got a sloppier cut. Either way, you're going to need to hold the tubing steady while you saw. If you're using a hacksaw, you might be able to just hold the tube against a table. However, any sort of clamp will make the job easier. Here, I'm using a 3" vise that I bought for $20 at Home Depot. It just clamps to the table -- so you don't have to drill screws into your desk, which is nice. ...This is my first vise, and it has made my work SO much easier. :-)
The two pieces of K&S don't have to be the same length. If you want them equal, though, it works just fine to slip one inside of the other and then make your cut. An "ultra fine point" sharpie marker works well to mark your measurements on the brass. After you've made your cut, there will probably be metal burs; you can use the flat face of the cut-off wheel to grind them down. Watch out: after cutting, the brass is hot!
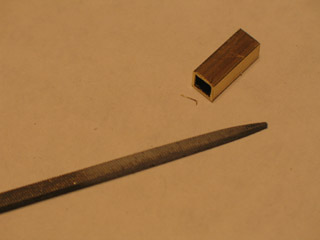
I have a small square-shaped file that's very useful for getting rid of burs on the inside of the tubing. This is necessary, or else you won't be able to fit the smaller tube back inside of the larger. This file is also a very useful tool for picking up small pieces of K&S and putting them in the vise.
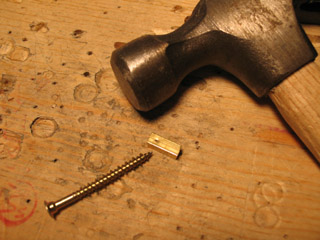
Next, we're going to drill a hole in just the larger piece of K&S. At this point I lay one of the nuts that's going to be soldered on on top of the K&S to figure out where the hole goes. I mark that spot with the sharpie. When you drill, the drill bit is going to want to slide around on the metal's surface. To fight this, I made a little dent in the K&S using a spare screw I had lying around. This will help get the drill started.
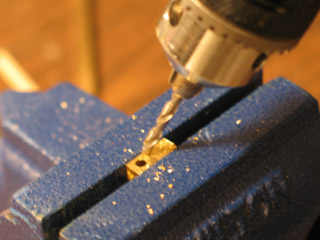
We're going to drill the hole in the K&S with an electric drill. Look at your drill bits; if they say HSS (High Speed Steel) on the side, then they're adequate for cutting soft metals (brass or aluminum). If you cut thicker material than this tubing, be aware that you'll probably want some sort of lubricant -- even just using a little water will help. I've broken two 1/16" HSS drill bits during the past few weeks, so I've replaced these smallest bits with carbide, which is sturdier.
To get a really exact hole, I started with a smaller bit, and then enlarged it with a bigger one. My first hole was 1/16"; I enlarged it to 7/64". Remember that you want the hole to be a little larger than the diameter of the screws you'll be using.
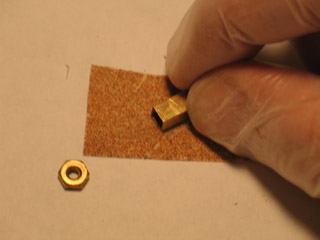
OK, we're about to solder the nut onto the tubing. I've tried using super glue and epoxy putty as alternate means for adhering the nut: neither worked. When you tighten the screw, it acts like a tiny, powerful jack and breaks the glue or tears the epoxy putty. The only bond that's going to be sufficient is molten metal. It's got to be soldered on.
The nut has to be made of brass. I'm not sure what normal nuts are made out of, but when I tried to solder them to the brass tubing, I couldn't get a bond to occur. Soldering brass to brass, however, works great.
The brass hex nut is measured as "4-40"; that's one size smaller than 6-32. What Susannah calls a "grub screw" seems to be sold as a "socket set screw" in the U.S. Get yourself socket set screws that measure "4-40 x 1/8". These are the smallest nuts and screws that I could find. Happily, both are available at my local Ace Hardware store. The nuts cost me 11 cents each, and the screws cost 13 cents each. Get yourself a bunch, so you can feel free to make mistakes.
To prepare the surfaces for soldering, go over them with sandpaper. Make sure that you do the sides of the K&S and the nut, as well as the faces that are going to be touching. It's actually the sides where the bond is going to happen. You can't see it, but there's a film of oil on the metal that will prevent the bond; sanding removes it. I wore gloves at this point to avoid adding any fingerprint oil back into the mix.
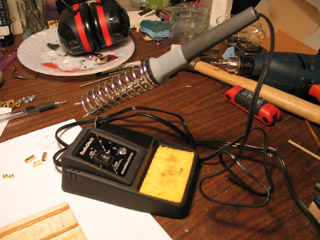
I got this soldering iron for about $30 at Radio Shack. You can get soldering irons for as low as about $7, but I wanted the one that had a built-in holder. (I'm paranoid about burning down the house.)
For solder, I chose a wire with a rosin core so I wouldn't have to apply flux in a separate step. The "rosin core" is liquid acid that makes the brass more receptive to bonding. I chose a very fine solder, "diameter .050", made of 60% tin and 40% lead. I don't know if this is the very best solder to use, but it seems to have worked well. I found it at Ace Hardware.
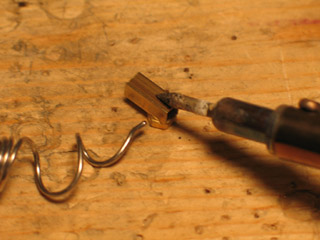
The trick with soldering is that you don't actually touch the soldering iron to the solder. Instead, you heat up the brass and then touch the soldering wire to it. I found that it worked well to put the socket set screw into the nut, and then put the nut underneath the K&S with the screw nested inside its hole. This allowed me to hold the whole thing down with the soldering iron from the top, giving me space to touch the soldering wire to the sides, where it would run down onto the edges of the nut. [The photo should help make this clearer.]
If you overheat the work piece, it will give off smoke -- and that smoke has lead in it. Very toxic. Have the best ventilation that you can manage for this part of the job . I switched to my "organic solvents" respirator for this part of the work... I don't think that this is quite the right safety measure; I'd appreciate it if anyone who knows better would let me know how best to deal with fumes while soldering.
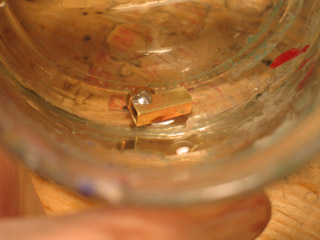
After I finished adding solder to the piece, I picked it up with the little square file and dumped it in a jar of water to cool it off. ...Voila! A join that will allow you to make removable puppet limbs!
posted by sven | permalink | categories: stopmo
February 10, 2006
puppet #2: construction notes
by sven at 11:05 pm
I've been studying, studying, studying the puppet designs of Mike Brent, Nick Hilligoss, and Susannah Shaw. Finally it was time to stop studying and just make something. Because my head is so full of new techniques, though, this puppet has had rather confused beginnings.
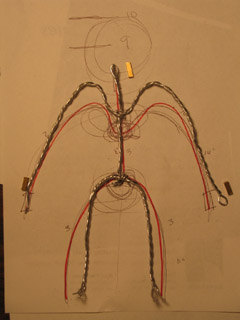
I'm saying that I began this puppet last Sunday (Feb 5); that's the day I assembled the wire for the armature. Simultaneously, I was working on making a set of Nick's T-style tie-downs, learning how to solder the replacable joints that Susannah describes, and developing my own design for hollow heads. Initially, this puppet was pretty much just another experiment: the goal was to construct a wire armature that's 10" tall. [My first puppet was only 5" tall, and I wanted to get a sense of how the bigger scale would feel.]
...Once I had the beginnings of an armature, though, it was clear that I was actually making a puppet. I needed a better plan. I decided that much of my mental chaos was the result of trying to use bits and pieces of three designs (plus my own) all at the same time. New plan: as an exercise, do each design just as the author has described. Do a Mike Brent. Do a Nick Hilligoss. Do a Susannah Shaw.
This puppet is supposed to be a Mike Brent... Except that Moon Baby (puppet #1) was already a Mike Brent. So I've been letting myself experiment a little bit in areas that I covered according-to-blueprint last time. I don't think I've done myself a favor, though.
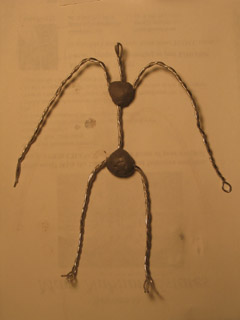
The wire of the armature is composed of three pieces: the legs, the spine, and the arms. The legs and spine are each made of three strands; the arms are made of two strands. I twisted the wires by hand this time, rather than using a drill. Twisting always makes the lengths shorter; I must remember next time to start with longer strands than I actually need. I have the shoulders go up and then down, to help lessen stress on that joint. The wires are joined with 20-minute plumber's epoxy putty that I bought at Ace Hardware in the plumbing section.
[Note: You can see that when I took this picture I was still planning on attaching aluminum feet. Each of the foot wires would have been glued horizontally into separate holes.]
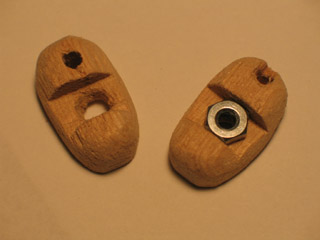
One aspect of Mike's design that I copied faithfully was the feet. On my previous puppet, I used the design for feet described by Kathi Zung in her "DIY - Foam Latex Puppetmaking 101" video: a hex nut epoxied on top of a loop of wire. The problem for me with Kathi's design was that the feet weren't really flat on the bottom. Mike's wooden design should solve this problem nicely.
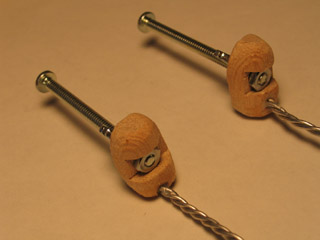
For a while I'd been thinking that the best design for feet must be the aluminum feet and T-style tie-downs that Nick uses. However, last week I discovered that Nick has added a new puppet making tutorial to the StopMoShorts.com tutorial section... In it he uses plain screws and hex nuts! I have a pair of aluminum feet all ready to go on the next puppet -- but seeing that Nick doesn't entirely shun the simpler screw-and-bolt strategy made me feel a lot better about using it here.
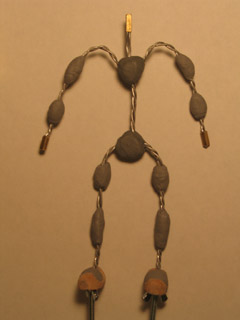
I added more epoxy putty "bones" to the basic wire armature. I attached the feet using two-part epoxy glue (gel). I tried a quick little test with epoxy glue a few days beforehand -- but this is my first time actually using the stuff on a project. I also used the epoxy glue to add on 1/2" sections of K&S (square brass tubing) at the neck and wrists. The K&S is so I can have detachable hands and a detachable head. [I hope to give a tutorial on K&S pretty soon.]
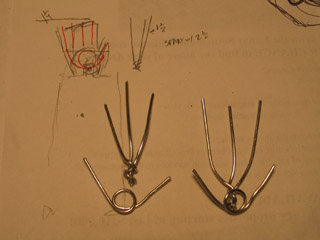
Mike did an improptu tutorial on making hands over at StopMotionAnimation.com. Since I'm trying to do a Mike Brent puppet, I figured I should use his technique. However, since I'd already added the K&S, I sort of botched my attempt.
In his tutorial, Mike uses three wires from the arm to make three fingers, and then uses a loop of wire to add two more. I twisted three new pieces of wire together, added a loop, and then epoxied this big wad to the brass tubing. It's very bulky, and kinda misses the point... But then again, my last puppet didn't have fingers that move -- so I guess I'm still going in the right direction.
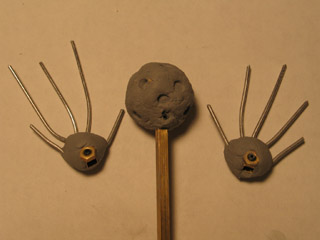
I'm very excited about Susannah Shaw's system for replacable parts. I'm using the tiniest brass hex nuts I can buy, and socket set screws that are only 1/8" tall -- the screws don't even poke out of the nut when they're in! In the picture above, you can see a spare piece of tubing extending from a ball of epoxy putty that will be the "skull" over which I build a head. Inside that "skull" there's a slightly larger piece of brass tubing, which forms a sheath around the smaller. The nut and screw allow me to clamp the sheath to the tubing. [Look closely at the base of the "skull" -- you can just make out the tiny hole for the hex key.]
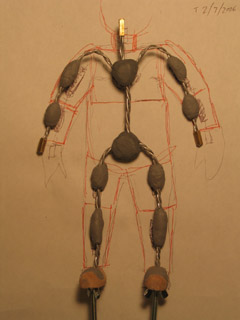
One of the catastrophic failures with the Moon Baby puppet had to do with its foam "musculature". I used foam weather-stripping tape for MB; it hardly allowed the limbs to move at all. For this puppet I'm using blocks of cushion foam, instead. It's not what Mike uses in his tutorial (although he uses it on his later puppet, "Buster") -- but it's standard for most puppet makers, so I feel fine about this choice. I also made sure to draw up a plan in advance showing where I would add the blocks of foam -- I wanted to intentonally leave gaps, so joints could twist without fighting the cushion material.
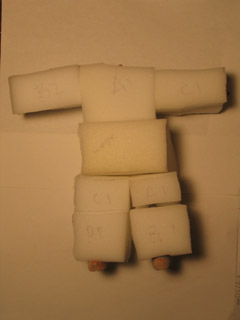
I bought my cushion foam at Michael's. I've also seen it for sale at JoAnne's Fabric, and at the local store Fabric Depot. It seems to be sold mainly for people who are sewing and doing up cushions for kitchen chairs.
I snipped the foam into blocks and sandwhiched the armature between them. I glued all this together a bit at a time using Elmer's brand spray glue. I've used 3M in the past; this was half the price and available at Ace Hardware, so I figured I'd give it a try. The blocks of foam had to be squeezed together for one or two minutes before they adhered adequately.
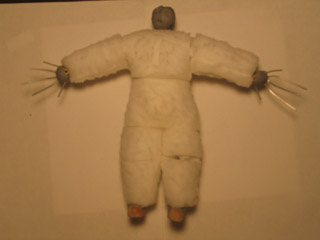
I've been sculpting the foam blocks using rounded cuticle scizzors. I'm not done with this step yet. In the photo above, you can see that I've screwed on the "skull" and hands to see how things are coming along.
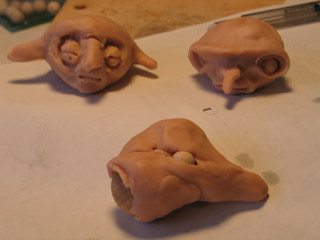
I didn't have a clear idea about what I wanted to do for the head when I began this puppet. I had been working on a scary bird-like head -- but it really looked wrong on this zaftig body. [More about the bird monster to come in a future post!] I decided that what I wanted was a fairly sweet, sympathetic, "everyman" character. This turned out to be more difficult to achieve than I'd expected. My 2D sketches got me nowhere -- so I did a series of rough 3D sculpts, exploring the possibilities.
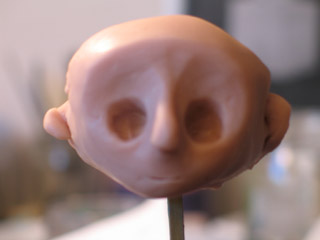
My "ah-ha!" moment for the head was realizing that the basic form I was looking for was sort of like a mushroom cap. Often in the world of 2D animation you see diagrams where characters are broken down into their basic component shapes... I feel like I'm really just beginning to learn that the same is true for 3D characters, too -- if you look, you can see that complex forms are made up of simple solids. The photo above is where the head first begins to take shape.
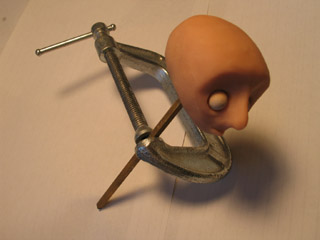
Having the K&S tubing bolted into the "skull" proved very useful when it came time to bake the Super Sculpey. I clamped the tubing with a metal C-clamp that I could use as a stand in the oven. After reading a bunch more online about the chemistry of Super Sculpey, I decided to bake at the prescribed 275 degrees (rather than 200 degrees for a longer period, as smellybug has suggested). I baked the head for 30 minutes. I removed the delicate ears and eyelids -- they'll be done in a second pass. The eyes are wooden balls that sit loosely in their sockets.
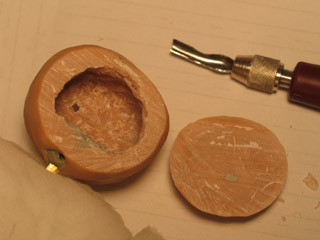
Unfortunately, when I tried the head on the body after baking, it was too heavy. When I tried to lean the character forward on one foot, he'd totally bend in half. Arg! This is exactly why I've been working on a strategy for hollow heads...
I think this can be salvaged, though. I cut the back of the head off with a hobby saw, and have begun hollowing it out. At first I used an electric drill to get things started. Then I started working at it with some woodcarving tools. I tried to be careful, but it was awkward to handle, and not too surprisingly I wound up cutting myself. Not badly, luckily; but it was enough to prompt me to quit for the evening and rethink how I'm going about this.
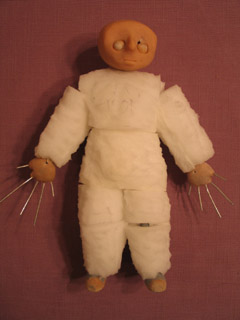
If you look carefully, you can see the hole above the eye socket where the tool poked through and got me...
What's left at this point? Finish hollowing the head. Add ears and magnetic eyelids. Paint the eyes. Wrap the fingers in thread and tip them in liquid latex (Richard Svensson's technique). Make the clothing out of cotton gloves (this is one of Mike's unique tips that I really want to try). Paint all the exposed skin.
...And animate it!
posted by sven | permalink | categories: stopmo
puppet #2 is underway
by sven at 10:11 pm
Work on my second puppet is finally underway! Here's a picture of what I've got done so far...
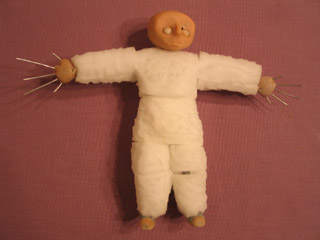
I don't have a story that I want to animate right now. For the while, I'm just trying to learn puppetmaking. Once I have puppets, then I think short stories will suggest themselves.
...This might seems backwards -- normally you'd write a script, and then build puppets for it. But in the StopMotionAnimation.com forums I see a lot of newbies planning films that are beyond their abilities, and consequently getting stuck. In my opinion, puppet animation is an advanced form of playing "make believe" with dolls. Thus, you should begin exploring stopmo with learning how to make really beautiful and functional dolls.
I think that only a fairly advanced animator can successfully start off a project with a script. The implication is that you already have the ability to fabricate any actor or set that comes into your mind. A newbie (like me) isn't going to have those skills. In my opinion, treating stopmo as if it were a live-action film really does beginners a disservice. You can't cast your friends as actors; you can't use neighborhood buildings as sets. You have to build all this stuff from scratch. --So begin with learning how to build things.
posted by sven | permalink | categories: stopmo
February 9, 2006
unitarian artist's way: reading deprivation
by gl. at 4:34 pm
so the little unitarian group has reached chapter 4, and you know what that means! yes, it's time for reading deprivation! yes, we can still read the artist's way, but other forms of reading (books, newspapers, email, web, the backs of cereal boxes) are off-limits. in my creative clusters we actually go to full-on media deprivation: no reading, radio or tv for a week, which includes music. at that point, i call it "media fasting" because it sounds so much more virtuous. ;) at any rate, reading/media deprivation is designed to let you find out what you make when you're not spending all your time filling yourself with what other people have made.
good timing, too: i have several art deadlines coming up. i am still communicating via email w/ people i know or to accomplish tasks that need to be acted on this week, but otherwise i am ruthless with the delete key on listservs, let the rss feeds pile up, and don't use the interweb as a reference resource. see you in a week!
posted by gl. | permalink | categories: artist's way
February 7, 2006
artist's way status
by gl. at 3:56 pm
neither of the artist's way creative clusters formed this time around, so it looks like i'll have more flexibility to schedule artist's way independent study participants.
i don't think i've mentioned i'm in an artist's way class right now, an 8-week one at the unitarian church downtown. the first night we introduced each other (not ourselves); for a class that is about discovering & recovering your creative self, letting someone else tell your story is like playing a game of telephone, leaving everyone with an impression you did not mean to make. we also filled out worksheets ("soft as a ____").
last week we created a collage (and it reinforced my rule that if you're hosting an art activity, then you should have extra gluesticks on hand!).

[click the picture to see larger]
most people didn't have time to finish their collages, much less talk about them, but this one was mostly finished when someone came over and pointed to the woman in the chair: "are you sad?" "yes," i said. she pointed to the chinese bicycling crowd: "are you feeling lost in the crowd?" "yes," i said. she pointed at the ice-climber: "are you feeling cold?" "actually, no," i said, "that feels like it's about the enormous impossibility and futility of everything."
posted by gl. | permalink | categories: artist's way
February 4, 2006
mare nubium estates
by gl. at 11:30 pm
i was going to write about this elsewhere, but sven considers this a "creative endeavor" worth blogging about over here:
tonight we went to an "alternative history" party (happy birthday, edward!). since the 20-year challenger explosion commemoration was this week, i ran across an old life photoessay where christa mcauliffe says of her children, "within their lifetime there will be paying passengers on the shuttle." i'm not sure there will be now, but you know if there's a chance, there's someone who will want to capitalize on it. and i've probably been influenced by the number of houses for sale in our neighborhood, so i decided that my alternative history would begin, "what if the challenger mission had completed successfully?" certainly cheesy lunar subdivisions wouldn't be that far off.
so... welcome to mare nubium estates!

[click the photo to see the "for sale" flyer (138k pdf)]
sven photoshopped the picture & i designed the flyer, nametags and sign for the cheese plate ("compliments of luna realty") while sven made them physical. we attended the party w/ more-or-less matching outfits, nametags on our suit jackets, translucent folders w/ flyers to pass out, and a a bowl of adorable bite-sized cheese cut into star shapes. i think people were impressed and a little overwhelmed we had gone through so much trouble. we're no good at socializing at parties so at least it gave us something to talk about. :)
influences: thanks to the lunar republic society, the lunar settlement initiative & the challenger center for inspiration and reference.
posted by gl. | permalink | categories: exhibits & events, miscellany
February 3, 2006
stopmo puppet work: eye, feet, neck
by sven at 1:33 pm
When I was working on CG animation, I found myself getting stuck on the modeling -- not actually getting around to making things move. I worry that I may fall into the same pattern with puppet animation... Constantly striving to make the perfect puppet.
Worrying aside, though, I did some neat experiments yesterday. A few more details to work out, and then I'll begin construction on puppet #2 in earnest.
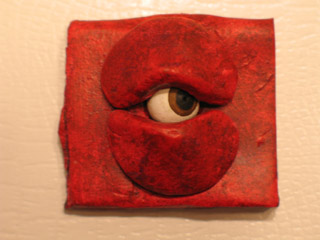
Eyes are one of the most expressive parts of the puppet -- I want them to be posable. The trick for this eye was figuring out how to embed it behind some eyelids. If I were using soft clay for animating, it wouldn't be a problem... But I'm working with baked Super Sculpey here; it requires a paint job.
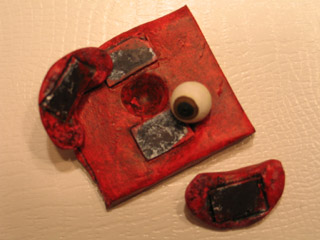
What I did was to make the eyelids as separate pieces. Then, I glued little magnets on with Duco cement. The eyeball just sits in its socket, unglued; the magnetic eyelids hold it in place.
One thing to improve upon: When you stick a magnet to a magnet, the magenetic forces sometimes cause the connection to twist or jump. On the next iteration, I'll have the magnets coupled with snippets of tin instead.
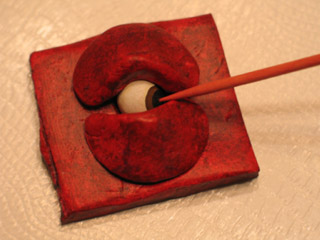
The eyeball is a little wooden ball that I found at Craft Warehouse in Gresham -- you can buy bags of them at pretty much any craft store, e.g. Michael's. To make it easier to work with, I drilled a 1/16" hole in the back and stuck the sphere on a piece of wire. To paint the iris, I put the wire in an electric drill bit and had it slowly rotate while I held the paintbrush stationary. That's a trick that I picked up from Susannah Shaw's book, "Stop Motion: Craft Sklls for Model Animation".
After painting, I pressed a very tiny hole into the iris using a needle. This allows me to gently move the eye in its socket using a toothpick. I think that it would rotate even more smoothly if I put a little vaseline in the socket -- need to pick some up at the grocery store.
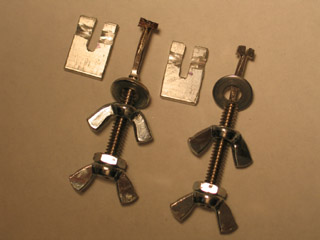
When you have puppets walking, you need a way to "tie down" their feet to the set. An easy way to do this is to have a nut in the foot of the puppet, and then have a screw come up into it from beneath the set. Getting the screw into the hole can be a little fussy, though.
Animator extraordinaire Nick Hilligoss has a tutorial on making "T-style" tie-downs on his site that I've wanted to try. Basically, what you do is take a bolt and file down its head until you have a "T". The "T" then fits through a slot in the puppet's foot, rotates 90 degrees, and comes to rest in a groove. Underneath the animating table you tighten a wing-nut, and -- voila! -- your puppet is tightly bolted to the floor.
I had to learn several new skills to pull this off...
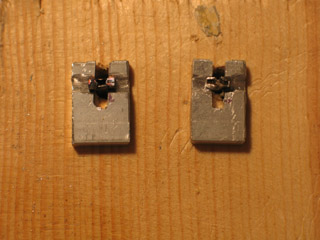
First off, I had to find a vise that I could clamp to my work table. I thought I could use a drill press vise -- but that was a total failure. I wound up buying a little 3" vise at Home Depot for $20.
The feet are cut from a strip of aluminum. I first tried cutting it with a hacksaw. The saw blade kept binding up -- until I bought some wax for it, which acts as a lubricant. The cut worked then, but was sloppy. Next I tried using a cut-off wheel attachment with my dremel tool. That worked much better! The dremel tool made it easy to cut the feet off the strip, cut the slots, and make the grooves.
To grind down the heads of the bolts, first I tried using a bastard file. That worked well -- but it took about an hour just to do one bolt! Next, I tried using the dremel cut-off wheel to grind it down. Much faster... But also a very different experience. When I use the cut-off wheel, sparks shoot off like a Fourth of July sparkler, and the metal starts to glow orange! (I was careful to be wearing a dust mask, goggles, and apron this whole time.)
I'm feeling rather proud of myself: this is the first time I've ever done any sort of metal working. :-D
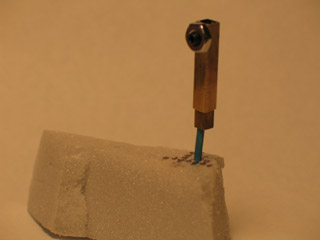
When you build a puppet with a wire armature, it's just a fact of life that the wire is going to eventually break. So, it can make a lot of sense to create armatures that allow you to replace joints when needed. ...Here I'm working on a system that will allow me to replace a puppet's neck. The head is where you do the most detailed sculpting work -- it could be tragic if there's no way to reattach it to the body after a break.
What you see above is two pieces of square-shaped brass tubing, one fitting inside of the other. The larger piece will eventually be epoxied into the head. The neck wire will be epoxied into the smaller tubing. Then you can slip the head onto and off of the neck at will. Once again, this is a design from Susannah Shaw's book.
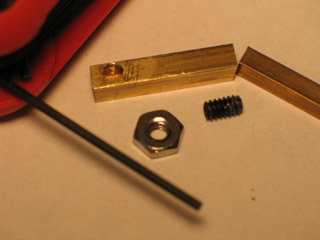
To make sure the head won't fall off while you're animating, you need a way to keep the tubes fitted tightly together. A hole is drilled the larger piece of tubing, and a nut is attached over the hole. When the smaller tubing is inside the larger tubing, you tighten a screw into the nut, which should then lock the two pieces together.
I made one mistake here. I thought I could just super-glue the nut to the brass tubing. It didn't work. Rereading the book, I realized that you need to solder the nut in place. Soldering isn't a skill I have yet -- but I've looked into it, and think I can learn it within another week.
...Incidentally, the screw is a "grub screw". Rather than having a head, there's a hole in its middle, and you turn it with a hex key. You can see a hex key in the photo above.